Creative Convention--Day 5!

5 awesome days of inspiration! Yippee! I hope you have been following along so far, if this is your first visit, make sure you go back to see what you have missed. I away in Las Vegas this week with some of my Stampin’ friends for Backstage—a leadership conference SO I thought I should have my own little Creative Convention by sharing a full week of projects with you!

I couldn’t resist making another project with the Autumn Leaves Bundle. Fall is beautiful here in Edmonton, but sometimes it doesn’t last that long and winter comes too quick. So I will take all the opportunity to create fall projects while I can!

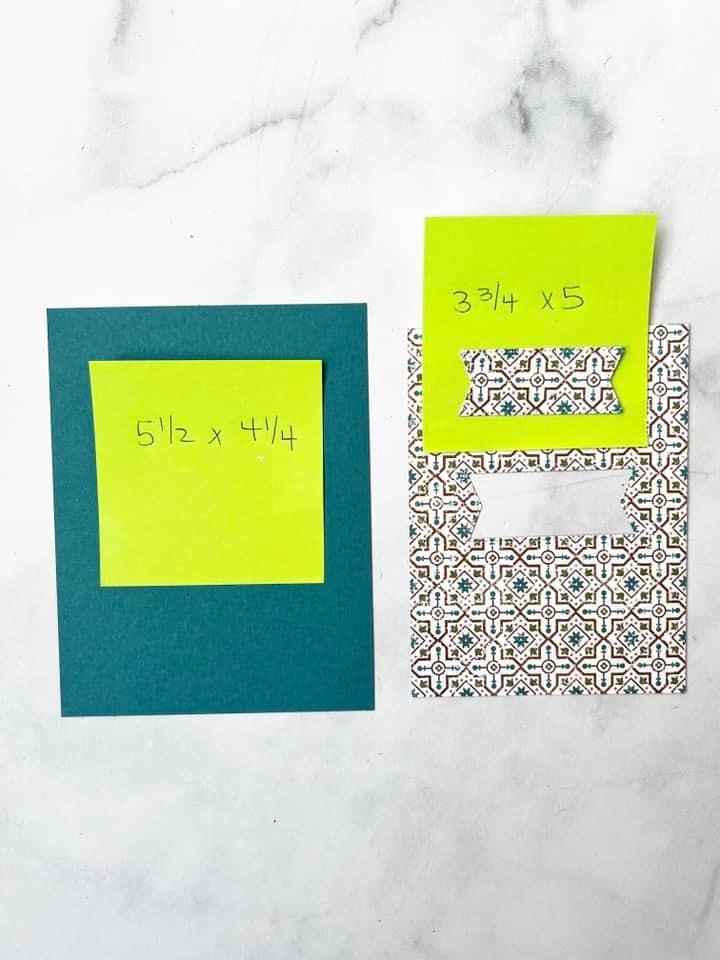
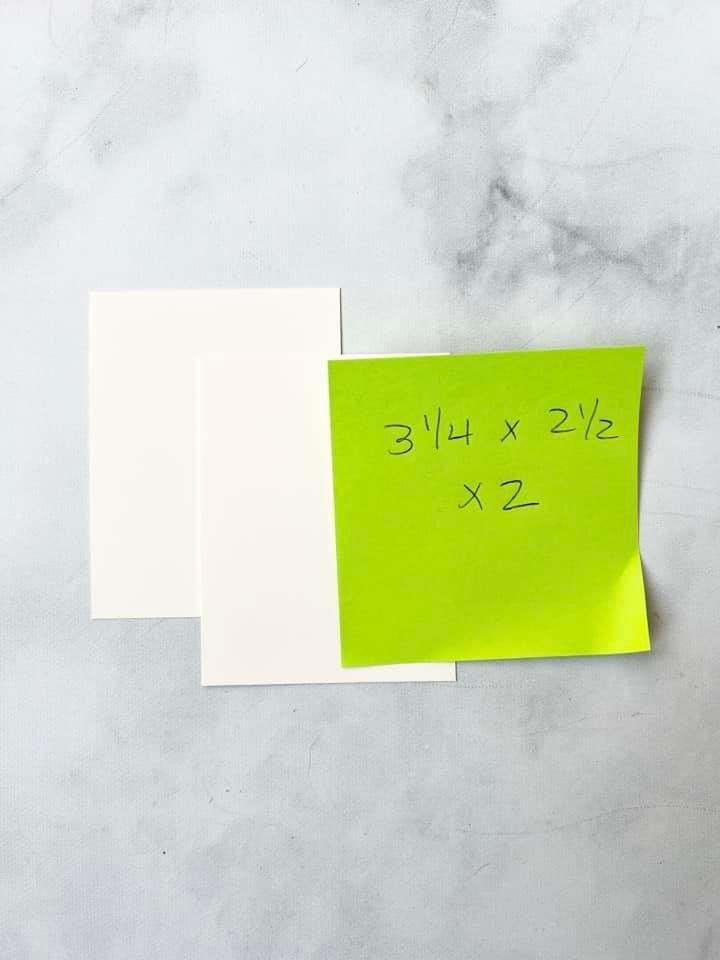
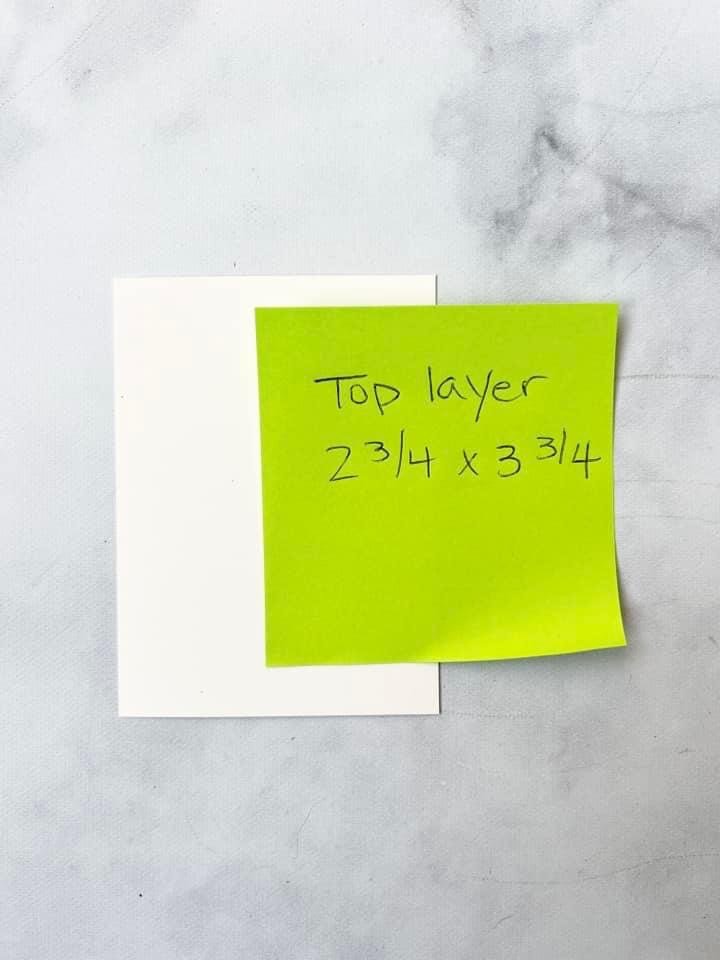
Earlier this month I had a Team meeting and I have been trying to share fun or unique folds with my team. Now I do not have the brain power to create these folds myself which is why I am so grateful for this amazing Stampin’ community we have. I found this ‘Pull Tab’ card on Instagram by @stampinjill (go give her a follow if you aren’t) and I went to her blog for all of the measurements and instructions on how to make this card. Here are the measurements I shared with my team (I have the pictures so why not share!)

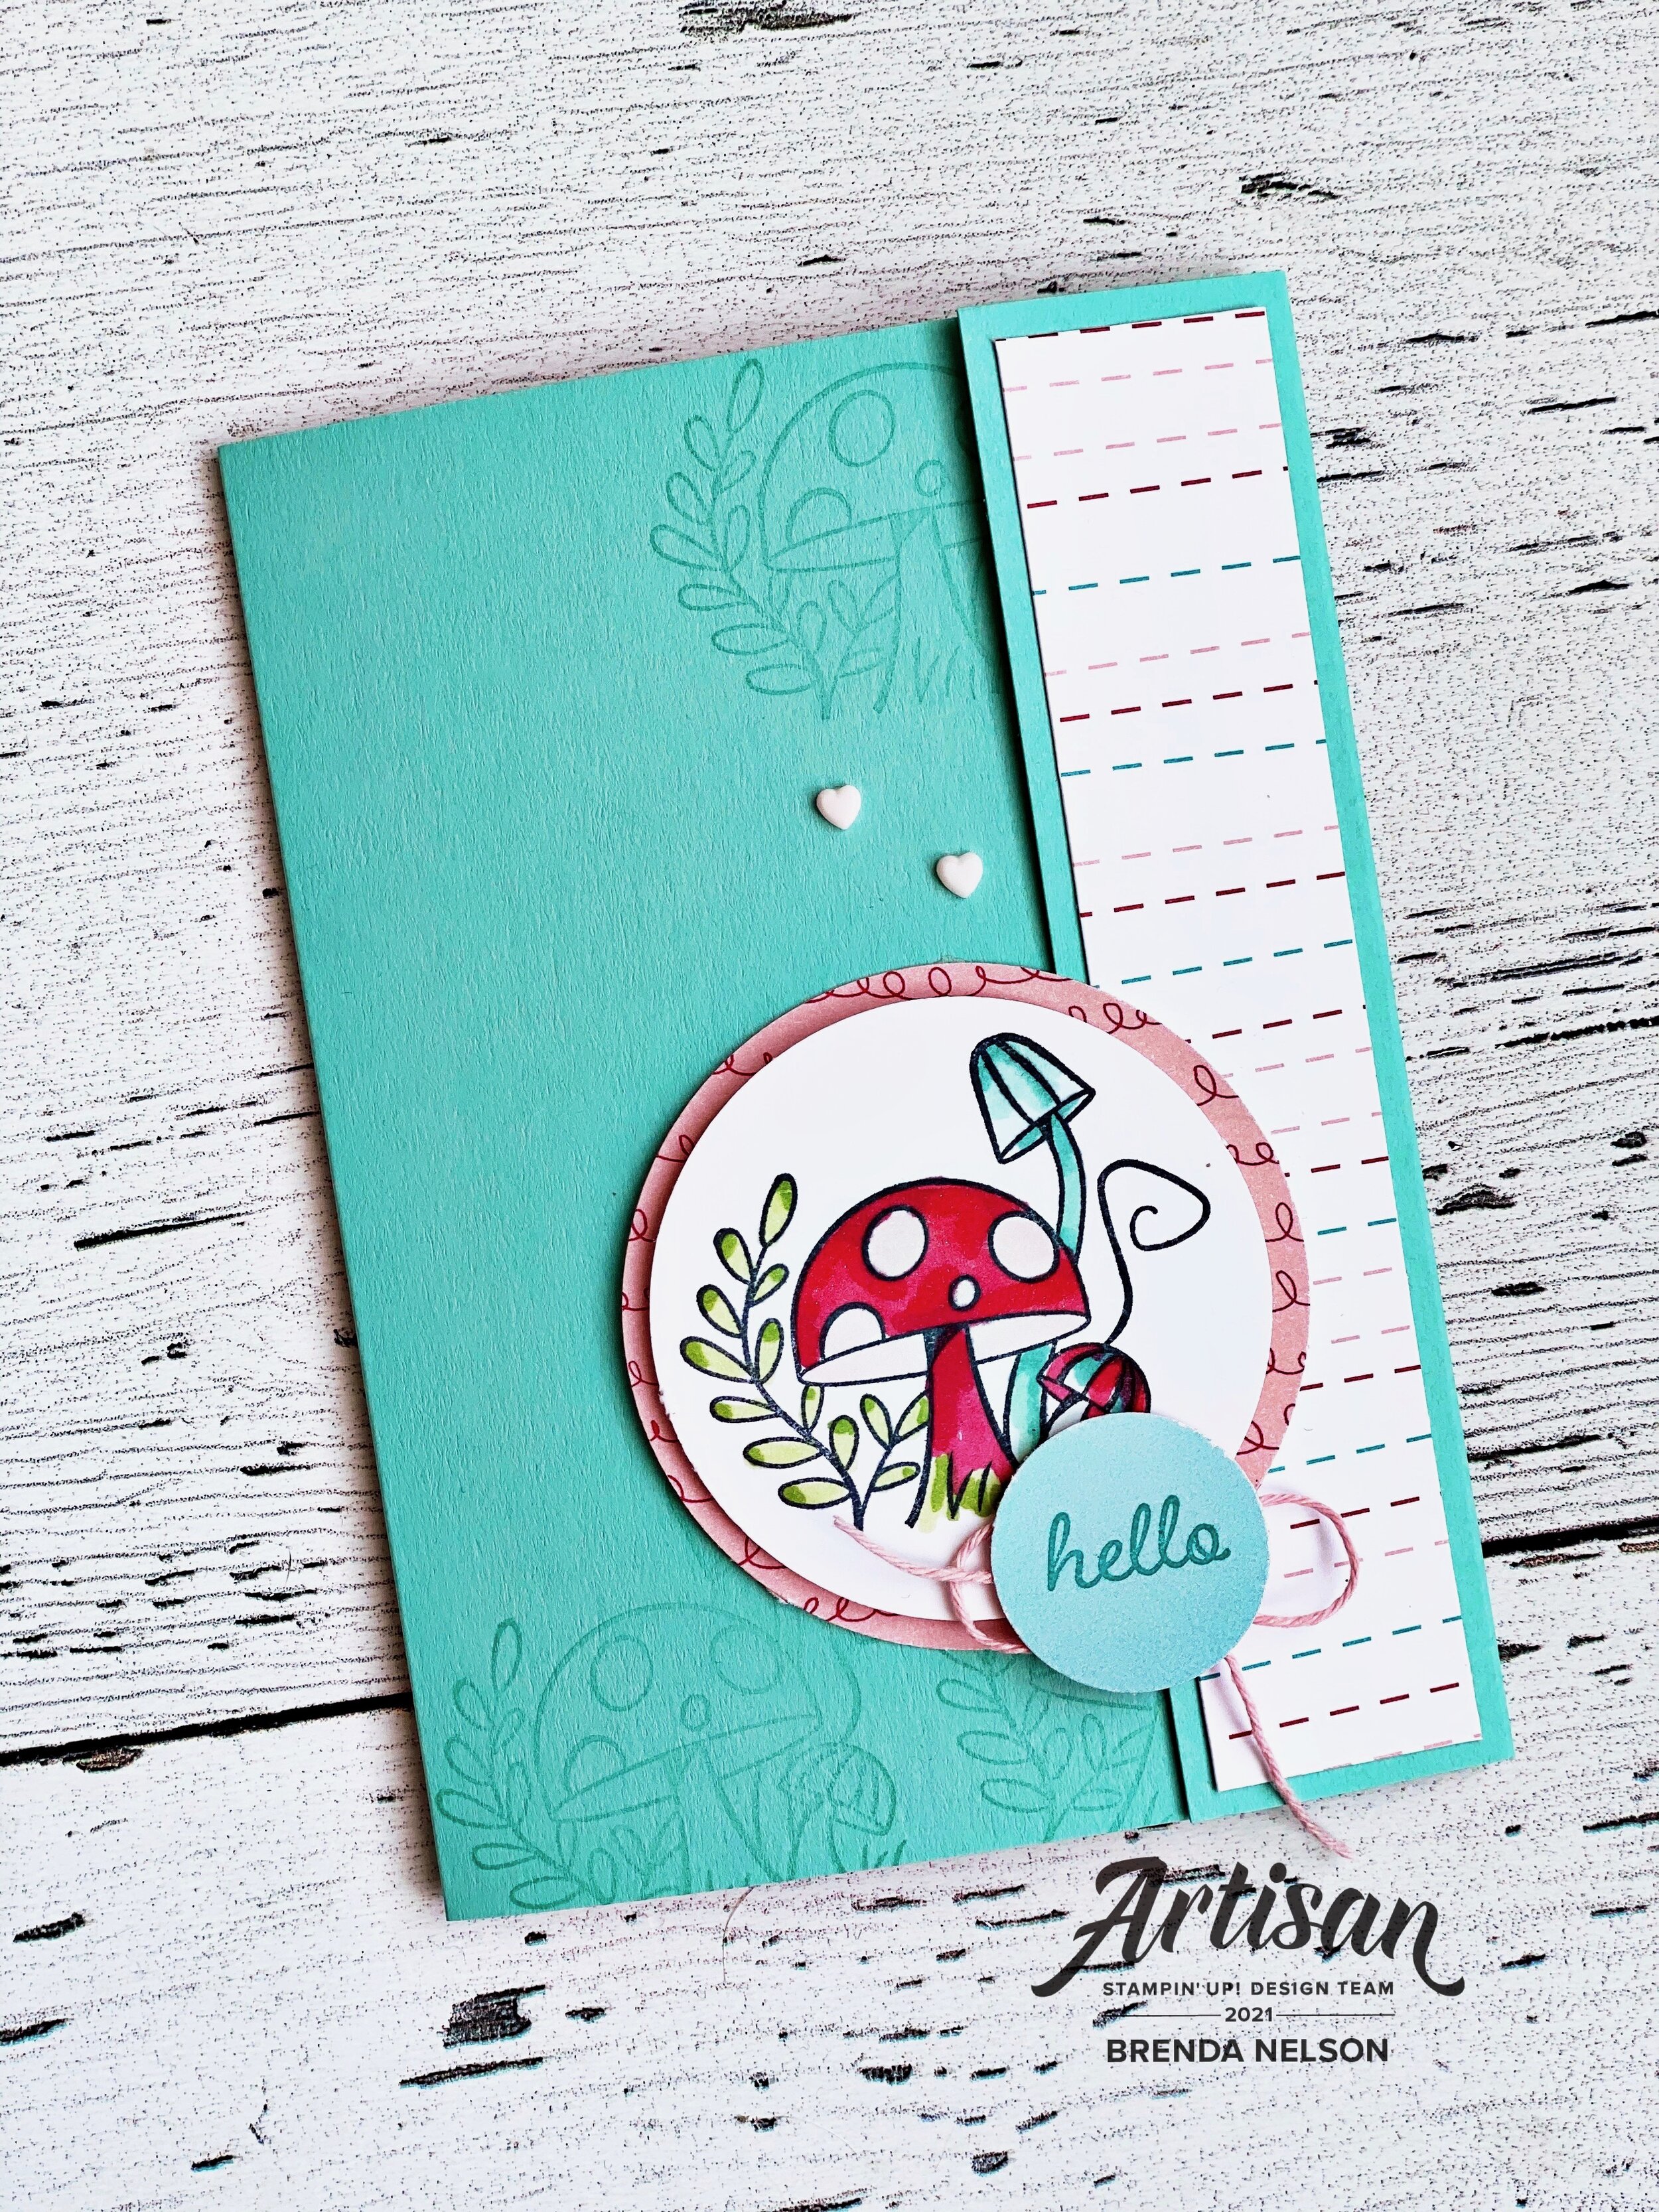
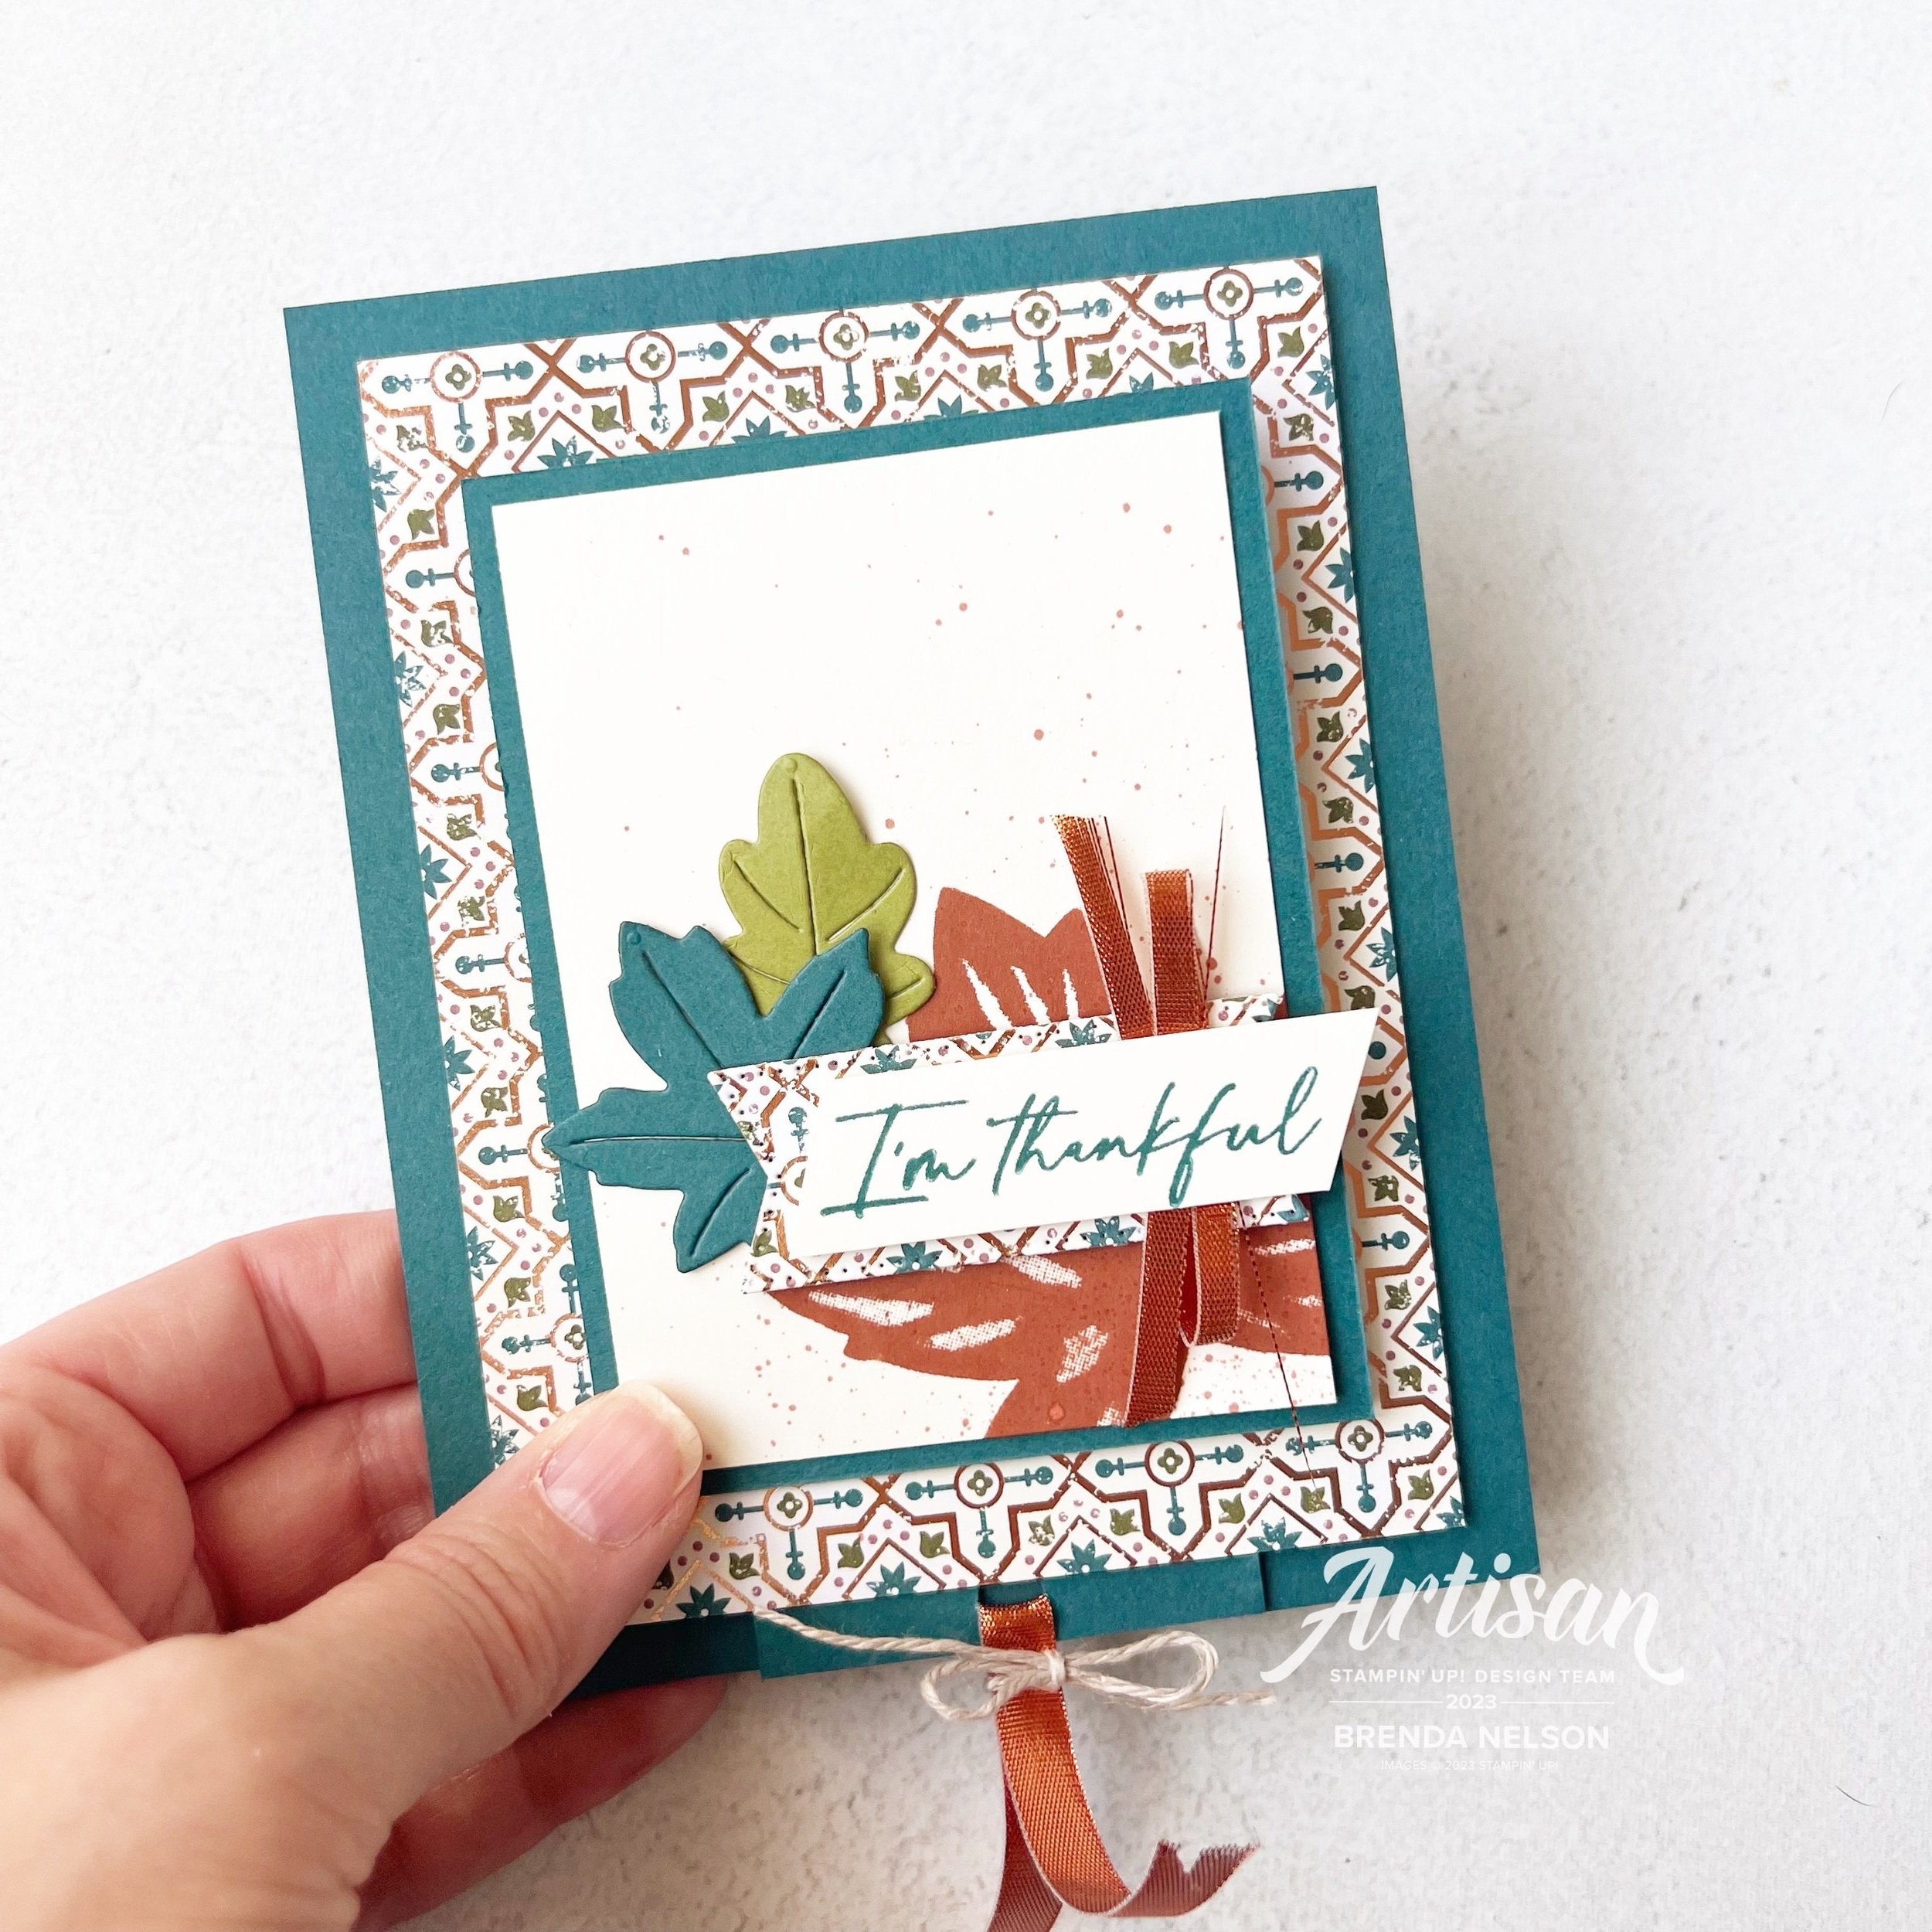
I wanted to use the All About Autumn suite to inspire my team so I stayed really true to the colors found in the All About Autumn 6x6 DSP.

The base of my card is Pretty Peacock and I used Very Vanilla for all of my stamping.

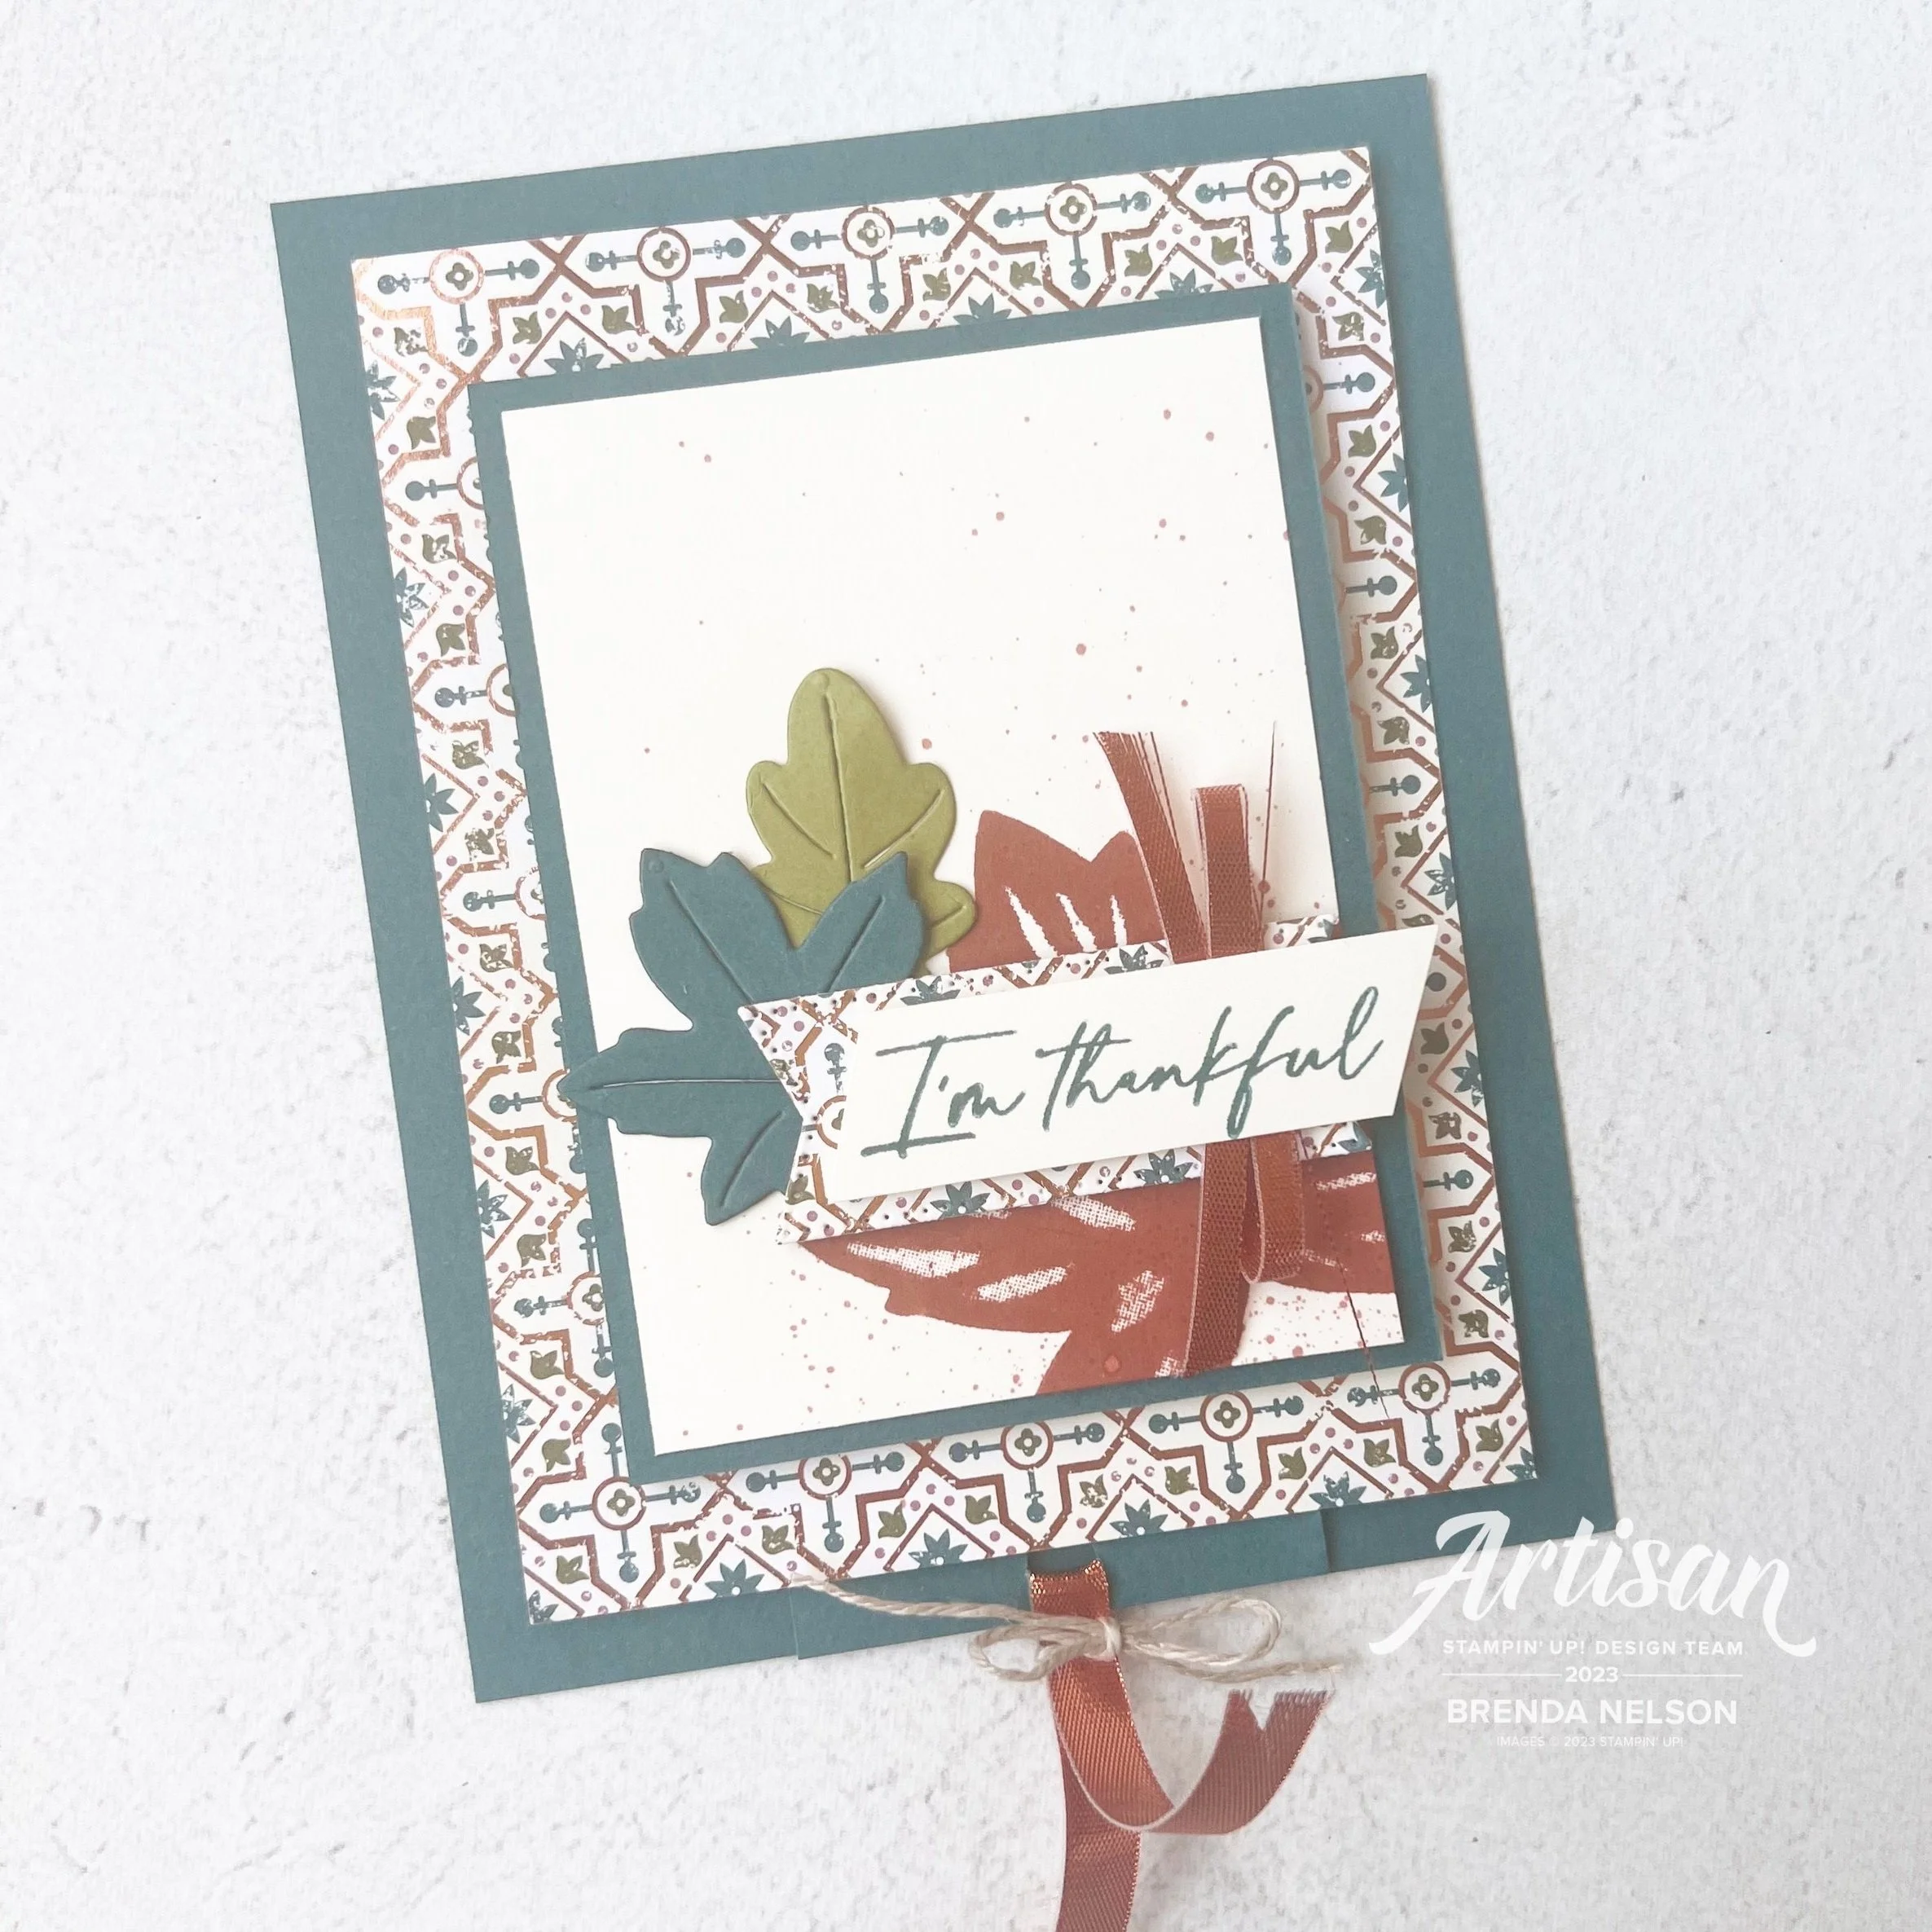
I stamped the large maple leaf in Copper Clay, one of our fabulous new In Colors and did a little spray of ink with the dark Stampin’ Blend marker. Two die cut leaves in Old Olive and Pretty Peacock finished off the front with the sentiment and some of the new Copper ribbon.

NOTE: I repurposed the tag die that was used to cut the pull tab section from the DSP. I don’t like to waste so it was perfect to add under the sentiment

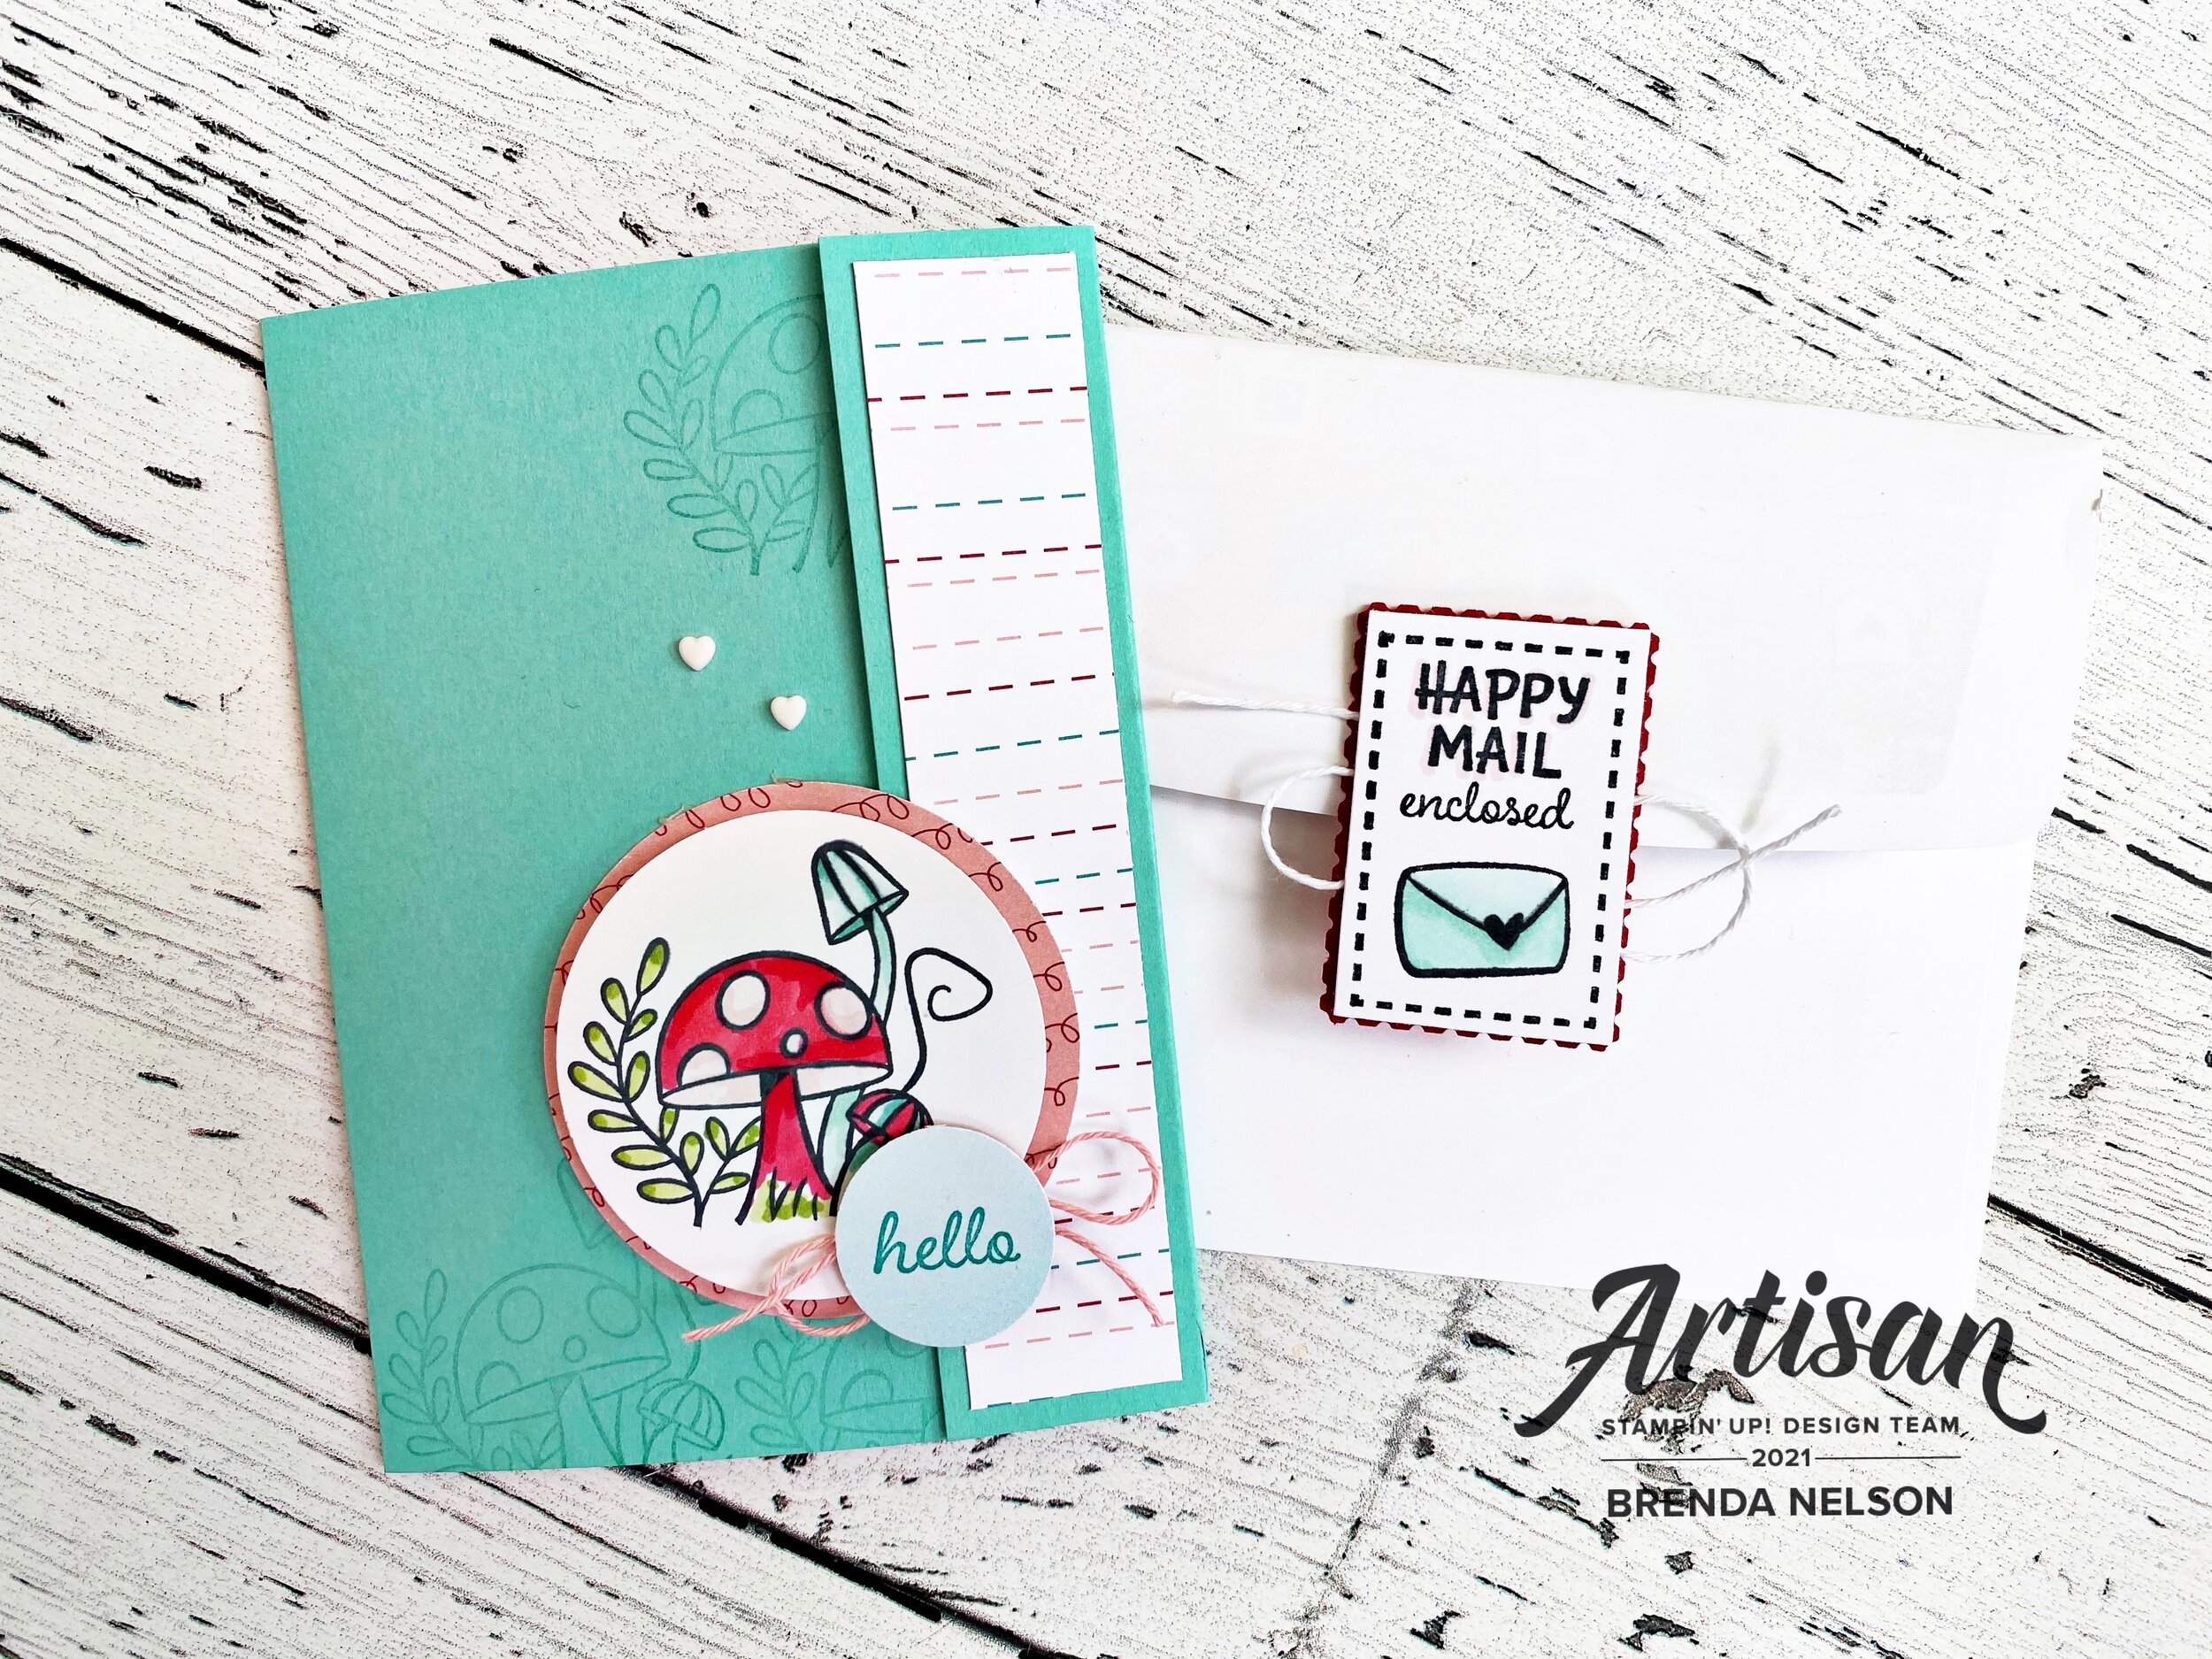
When you pull the tab at the bottom the front panel flips open to this perspective.

I did a little more stamping on the top Very Vanilla piece, this time using the large leaves from the set in Old Olive ink and the smaller leaves in the Copper Clay ink. I did a little more ink spray and added another leaf die cut.

On the bottom panel, I let the DSP shine (along with the base piece of course) by choosing a pattern and simply cutting it with the maple leaf die and adding the sentiment on top w a little Linen Thread.

I hope you head over to Jill’s blog— https://stampingjill.com/ to see her awesome instructions on how to make this Pull Tab card!

Hope to see you back tomorrow! Please feel free to leave me comment too!

Happy 50th Anniversary!

Did you know that can make Custom Cards? It is a service that I offer if you do need an extra special project! I have experience designing custom wedding invites, baby shower invites and even anniversary cards like this extra special one I made for my friends parents!

The only request my friend had was that I used some gold on this special card for her parents. I incorporated it on the 50 using Gold Foil paper and on the inside layer with the Shimmery Gold Vellum. Because the rest was left to me I decided to use brand new upcoming products with a bunch of favorites and retired products.

The star of this card though is the flower from the Blessings of Home stamp set. This set will be released in the upcoming January-June catalogue and I know you will love it as much as I have already! I colored this in using ink pads and a Water Painter and my lazy watercoloring technique. The stamp was stamped using Basic Grey ink in place of traditional black to give it a bit of a softer touch.

The sentiment is from a favorite retired stamp set of mine, Many Mates and is punched using the Label Me Fancy punch. I added a little bit of gold thread behind the sentiment. The card is a “fun fold” and is elegantly tied together with some of the White Crinkled Seam Binding Ribbon.

I added an extra panel of Basic White card stock to the front panel of the card. The fun flap is in Soft Seafoam card stock and the flap part was run through the Timeworn Type 3D Embossing folder to a add a subtle bit of textrure.

When you open the card you see a gorgeous panel of Shimmery Gold Vellum which I just love. You can see a tiny bit of a scalloped edge along the fun fold panel. I cut this with a die from the Peony Dies.

I stamped another floral image from the Blessings of Home stamp set and colored it with the same technique as the front. “Congratulations” is from the stamp set Inspired Thoughts in the Annual Catalogue. I added a few retired little pearls from the Share What You Love collection to complete this project.

I was told my friends parents absolutely loved their card and I was so happy to create it for them!

If you are ever in need of something extra special, please reach out to me, I would love to design and create something for you too!

Around the World on Wednesday--You've Got Mail!

Hello friends! Welcome to another Around the World on Wednesday Blog Hop! This month our theme is You’ve Got Mail so I made a card with a design on the outside, inside and a coordinating envelope! I am currently living in a polar vortex in Edmonton, Alberta. Today’s temperature as I write this is -48 with the wind chill. So gross. Luckily my card is bright and cheery and makes me think of warmer weather!

91442295_10216484369808661_2887014979863576576_n.jpg

The Snail Mail Suite was the perfect choice for this theme. I have had so much fun creating with it lately as I find coloring very therapeutic! I love that it has dies and a coordinating punch (Rectangular Postage Stamp), plus some amazing Resin Heart embellishments and twine! So thankful Twine is back in our line up!

IMG_3447.jpg

Isn’t the back of this envelope so cute and fun? I added a bit of Tombow glue to the bottom and let it air dry. This allows the glue to become tacky so you can use it to close something but it can also be lifted up! Its a fun tip if you have never used the glue in that way before!

My card is also a bit of a fun fold card too! The dimensions are 5 1/2 x 8 1/2 and you score the base at 3 1/4 and 7 1/4. It makes the fun little flap on the front that you can embellish with Designer Series Paper. I used the Snail Mail paper on my card with a Coastal Cabana card base.


The flap is going to want to hang open so you need to find a creative way for it to stay closed until you want to open your card.

I used a 2 1/4 DSP circle and added a 2 inch Basic White circle on top that I stamped the fun mushroom image from the Snailed It stamp set. I used my Stampin’ Blends to color him in with some Wink of Stella on the main mushroom.

IMG_3439.jpg
IMG_3444.jpg

The inside panel is Basic White cut to 3 3/4 x 5 1/4. I stamped my cute snail and created a mask so that I could use my Blending Brush around him to create a Coastal Cabana halo. I then stamped Hello across the background. The snail is also colored with Stampin’ Blends. I created a little polka dot pattern on his present and added in a red Resin Heart! LOVE!

IMG_3454.jpg

Remember our theme? Well I knew I needed to dress up the envelope a bit so I pulled out a very very old retired die that cuts an envelope liner and I added it to the inside of our Basic White envelope. You could always trace one of our envelopes on your Designer Series paper to achieve the same idea.

IMG_3446.jpg

I had alot of fun with this theme and was so happy with what I was able to create! If you haven’t played with the Snail Mail Suite I hope you will give it a try, it is alot of fun!

IMG_3450.jpg

I can’t wait to see what the other design team members have created this month. I am sure you will be truly inspired as you travel around the world with us! You can click on Next Blog to see what Tricia Butts from the United States has created!