Hey Chick!

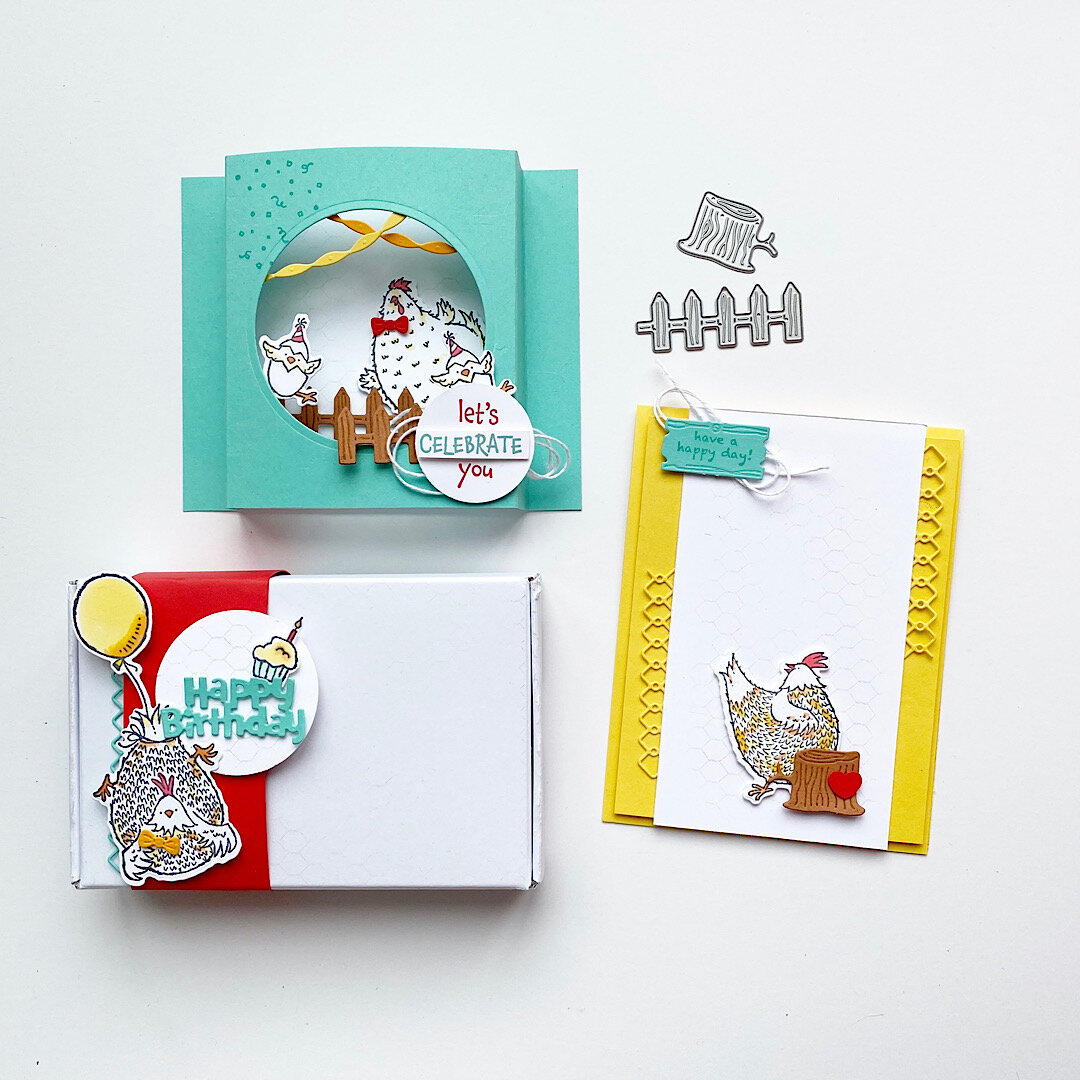
Hello friends! This month the Artisan Design Team is sharing projects that feature the Hey Chick and Hey Birthday Chick bundles, the Sand & Sea suite and the Cactus Medley with the Succulent bundle! My assignment was to create some fun projects featuring the CHICKENS! Such a fun and cute couple of sets to work with!

2021_BLOG_BADGE.jpg

As soon as I saw the big chubby chicken and the little chicks I knew I wanted to showcase them with a Diorama Card! This is such a unique card style to showcase a ‘scene’ and its a throwback to those fun shoebox diorama projects I loved make as a kid for a school project.

IMG_3494.jpg

To recreate these projects you will need some Stampin’ Blends to add a hint of color to your chickens. The secret weapon and fun tip with this project is to take the wood stump die and the fence die and add extra details and dimensions to them by pressing them into the Cinnamon Cider ink pad prior to running them through the Stampin’ Cut & Emboss Machine. The ink on the die will press into the card stock and transfer, giving the recessed area some ink detail!

I also used the Wired Up background stamp set with my projects. I inked it up, keeping it right in the stamp case, with Grey Granite and then lightly touched my surfaces to the stamp. By not fully pressing it I was able to just add the chicken wire detail in a few places. Its a faint but awesome detail.

I think the bright colors of Poppy Parade, Coastal Cabana, and Daffodil Delight really added to the whimsical feel of these projects. I was really happy with how cheery and fun the finished projects turned out!

I think the bright colors of Poppy Parade, Coastal Cabana, and Daffodil Delight really added to the whimsical feel of these projects. I was really happy with how cheery and fun the finished projects turned out!

The Daffodil Delight card is a traditional card fold. I added die cut chicken wire poking out from each side of the main panel for a fun detail. The sentiment in Coastal Cabana at the top of the card is the sign trimmed to look like a board instead of a sign post. I always look for ways to change how a die works and this was easy! I added a light coloring detail to the chicken on this card with Poppy Parade, Daffodil Delight and Mango Melody Stampin’ Blends.

IMG_3580.jpg

To create the Diorama card you will need a large die to cut the window in the front. I used the largest circle die from the Circles Dies in the Annual Catalogue (a crafters must have set!).

The base of the Diorama card is 6 3/4 x 4 1/2. You want to score this at 3/4, 1 1/2, 5 1/4 and 6. You want to peek and valley fold these score lines to create the raised up front area.

The Basic White background piece is lightly stamped with the Chicken Wire background stamp and measures 4 1/4 x 4 1/2. You can attach this and then piece in the chubby bowtie chicken and fence. I found this was easier as I knew exactly where to place it instead of adding it to the Basic White first.

I then added a Coastal Cabana back piece to the card which measures the same as the Basic White, 4 1/4 x 4 1/2. This also gives the card a bit of weight and makes it easier to stand up.

The little chick on the left hand side is attached with a Glue Dot on his one leg. This gives him the illusion of popping out. The two streamers are cut in Pumpkin Pie and Mango Melody card stock and are attached to the inside of the window. This also contributes to the diorama style and feel.

IMG_3579.jpg

I finally I just love the belly band on the Mini Paper Pumpkin box. I just love these boxes. They are the perfect size for giving Gift Cards and little treats and fit our Basic White Notecards perfectly!

I created the Poppy Parade belly band to be 2 inches wide and stamped ‘Hey Chick’ in the coordinating ink randomly along the band. I used the chicken wire die again, this time in Coastal Cabana cards stock to add a bit of detail. The chicken with the balloon is colored with Stampin’ Blends and I couldn’t resist giving him a little bowtie! I love that the Birthday Chick dies have a die that cuts Happy Birthday! It was a fantastic addition to this project with the little cupcake trimmed from the Hey Chick stamp set.

If any of these projects have inspired you and you live in Canada, please consider shopping with me. I would love to get to know you and help in your creative stamping journey! I teach a lot of classes and facilitate a number of monthly groups!

Artisan Design Team February Share!

Hello friends! I am so excited to share a few more details on my Artisan Design Team projects for February! My focus was on the A Touch of Ink stamp set and the Golden Garden Acetate Specialty Paper. I knew right away that I wanted to use this acetate paper on a scrapbook page and share an easy tip for coloring it.

The design is printed on a thick window sheet or acetate and is gold on one side and silver on the other! You can feature either side by just coloring on the opposite or backside of what you want to feature.

The design is printed on a thick window sheet or acetate and is gold on one side and silver on the other! You can feature either side by just coloring on the opposite or backside of what you want to feature.

The easiest way to color our acetate sheets is to use our alcohol based Stampin’ Blends markers in the DARK option. Some of the alcohol inks depth is lost on the window sheet so I found I had better success using the dark option and then you can layer on a bit of color by adding in a different shade on top like I did on some of the leaves with Old Olive and Mossy Meadow.


You also want to make sure that you peel off the protective layer that is on the silver side of the acetate sheet.

Once you have done this you can start coloring with your Stampin’ Blends.

I also decided to hand trim around the flowers of the 12x12 sheet.

final (14).jpg
closeup.jpg
You can use this easy coloring technique embellish a scrapbook page or a card!

You can use this easy coloring technique embellish a scrapbook page or a card!

IMG_2442.jpg

I used Basic White Note Cards for the two cards that I designed. I added a bit of the Gilded Leafing to both my butterfly on the note card and the hummingbird on my scrapbook page. I also stamped with the Gilded Leafing on the butterfly card and hand trimmed some of the florals from the Fine Art Floral DSP.

On the second note card I colored a strip of the acetate that I had left over from my scrapbook page and added it to a piece of the Fine Art Floral Designer Series Paper.

I hope you are inspired to try coloring the Golden Garden Acetate paper and adding into onto one of your crafty projects! Make sure to check out the whole Artisan Design Teams creations on Stampin’ Up!’s Facebook and Instagram accounts!

IMG_2439.jpg

Artisan Design Team January Share!

OMG friends! I can’t believe I can actually TYPE the word ARTISAN…its literally been a dream of mine for the last few years and a GOAL (big difference) over the last 18 months. I started my blog with the purpose of having a platform to apply for the team and to create a digital archive of things I love. Scrapbook pages, recipes, cards and experiences. I joined some blog hops which has been exciting and has helped me grow and develop, meet deadlines, improve my photography and so much more! My blog is a place where I can be somewhat interactive with you (I love comments) and I am still learning and wanting to add more features!

So when I got the call on September 16th, yes I know the date as it was my 20th wedding anniversary, I cried. Like ugly cry and was so so happy. My daughter was in the car with me and had no idea what was going on!!! Haha! My biggest hope for my kids is they can set a goal, work and strive toward it with vision and purpose and achieve it. It is actually quite amazing. So I am SO HAPPY to be on the 2021 team and to share my creations with you!

My very first Artisan project featured the In Bloom Bundle and Paper Blooms Designer Series Paper (from Sale-a-bration 2021).

My very first Artisan project featured the In Bloom Bundle and Paper Blooms Designer Series Paper (from Sale-a-bration 2021).

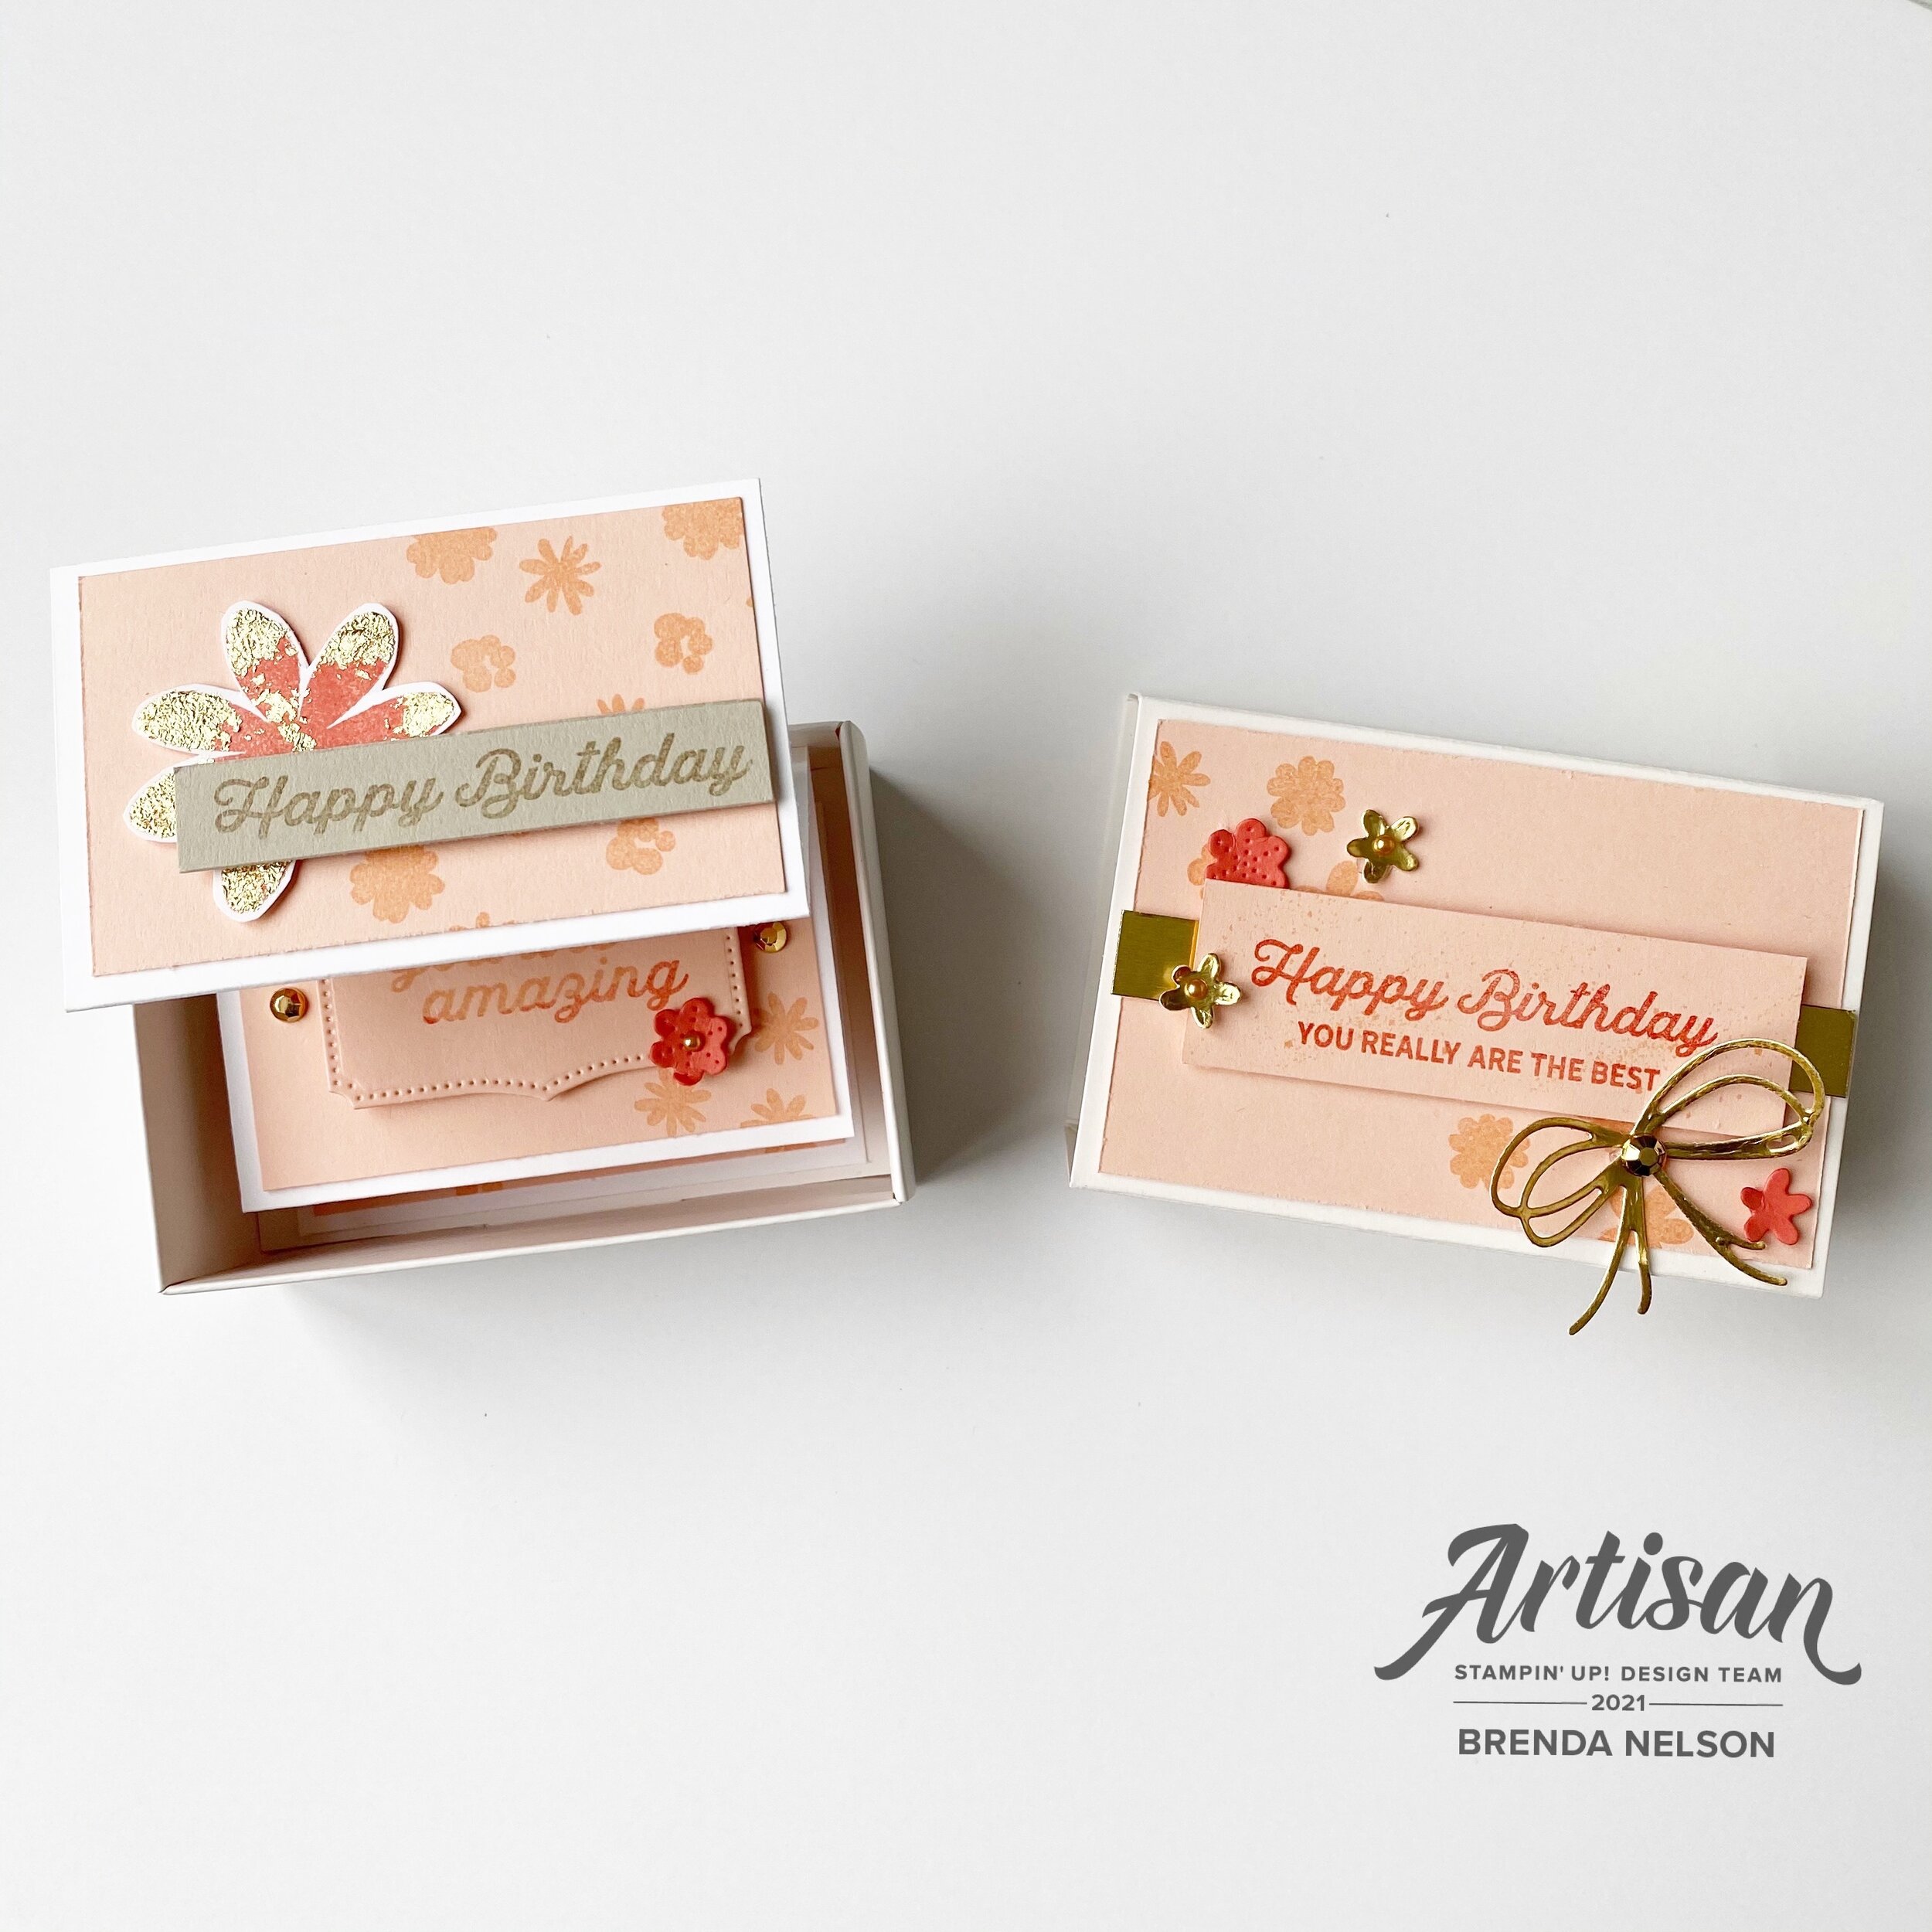
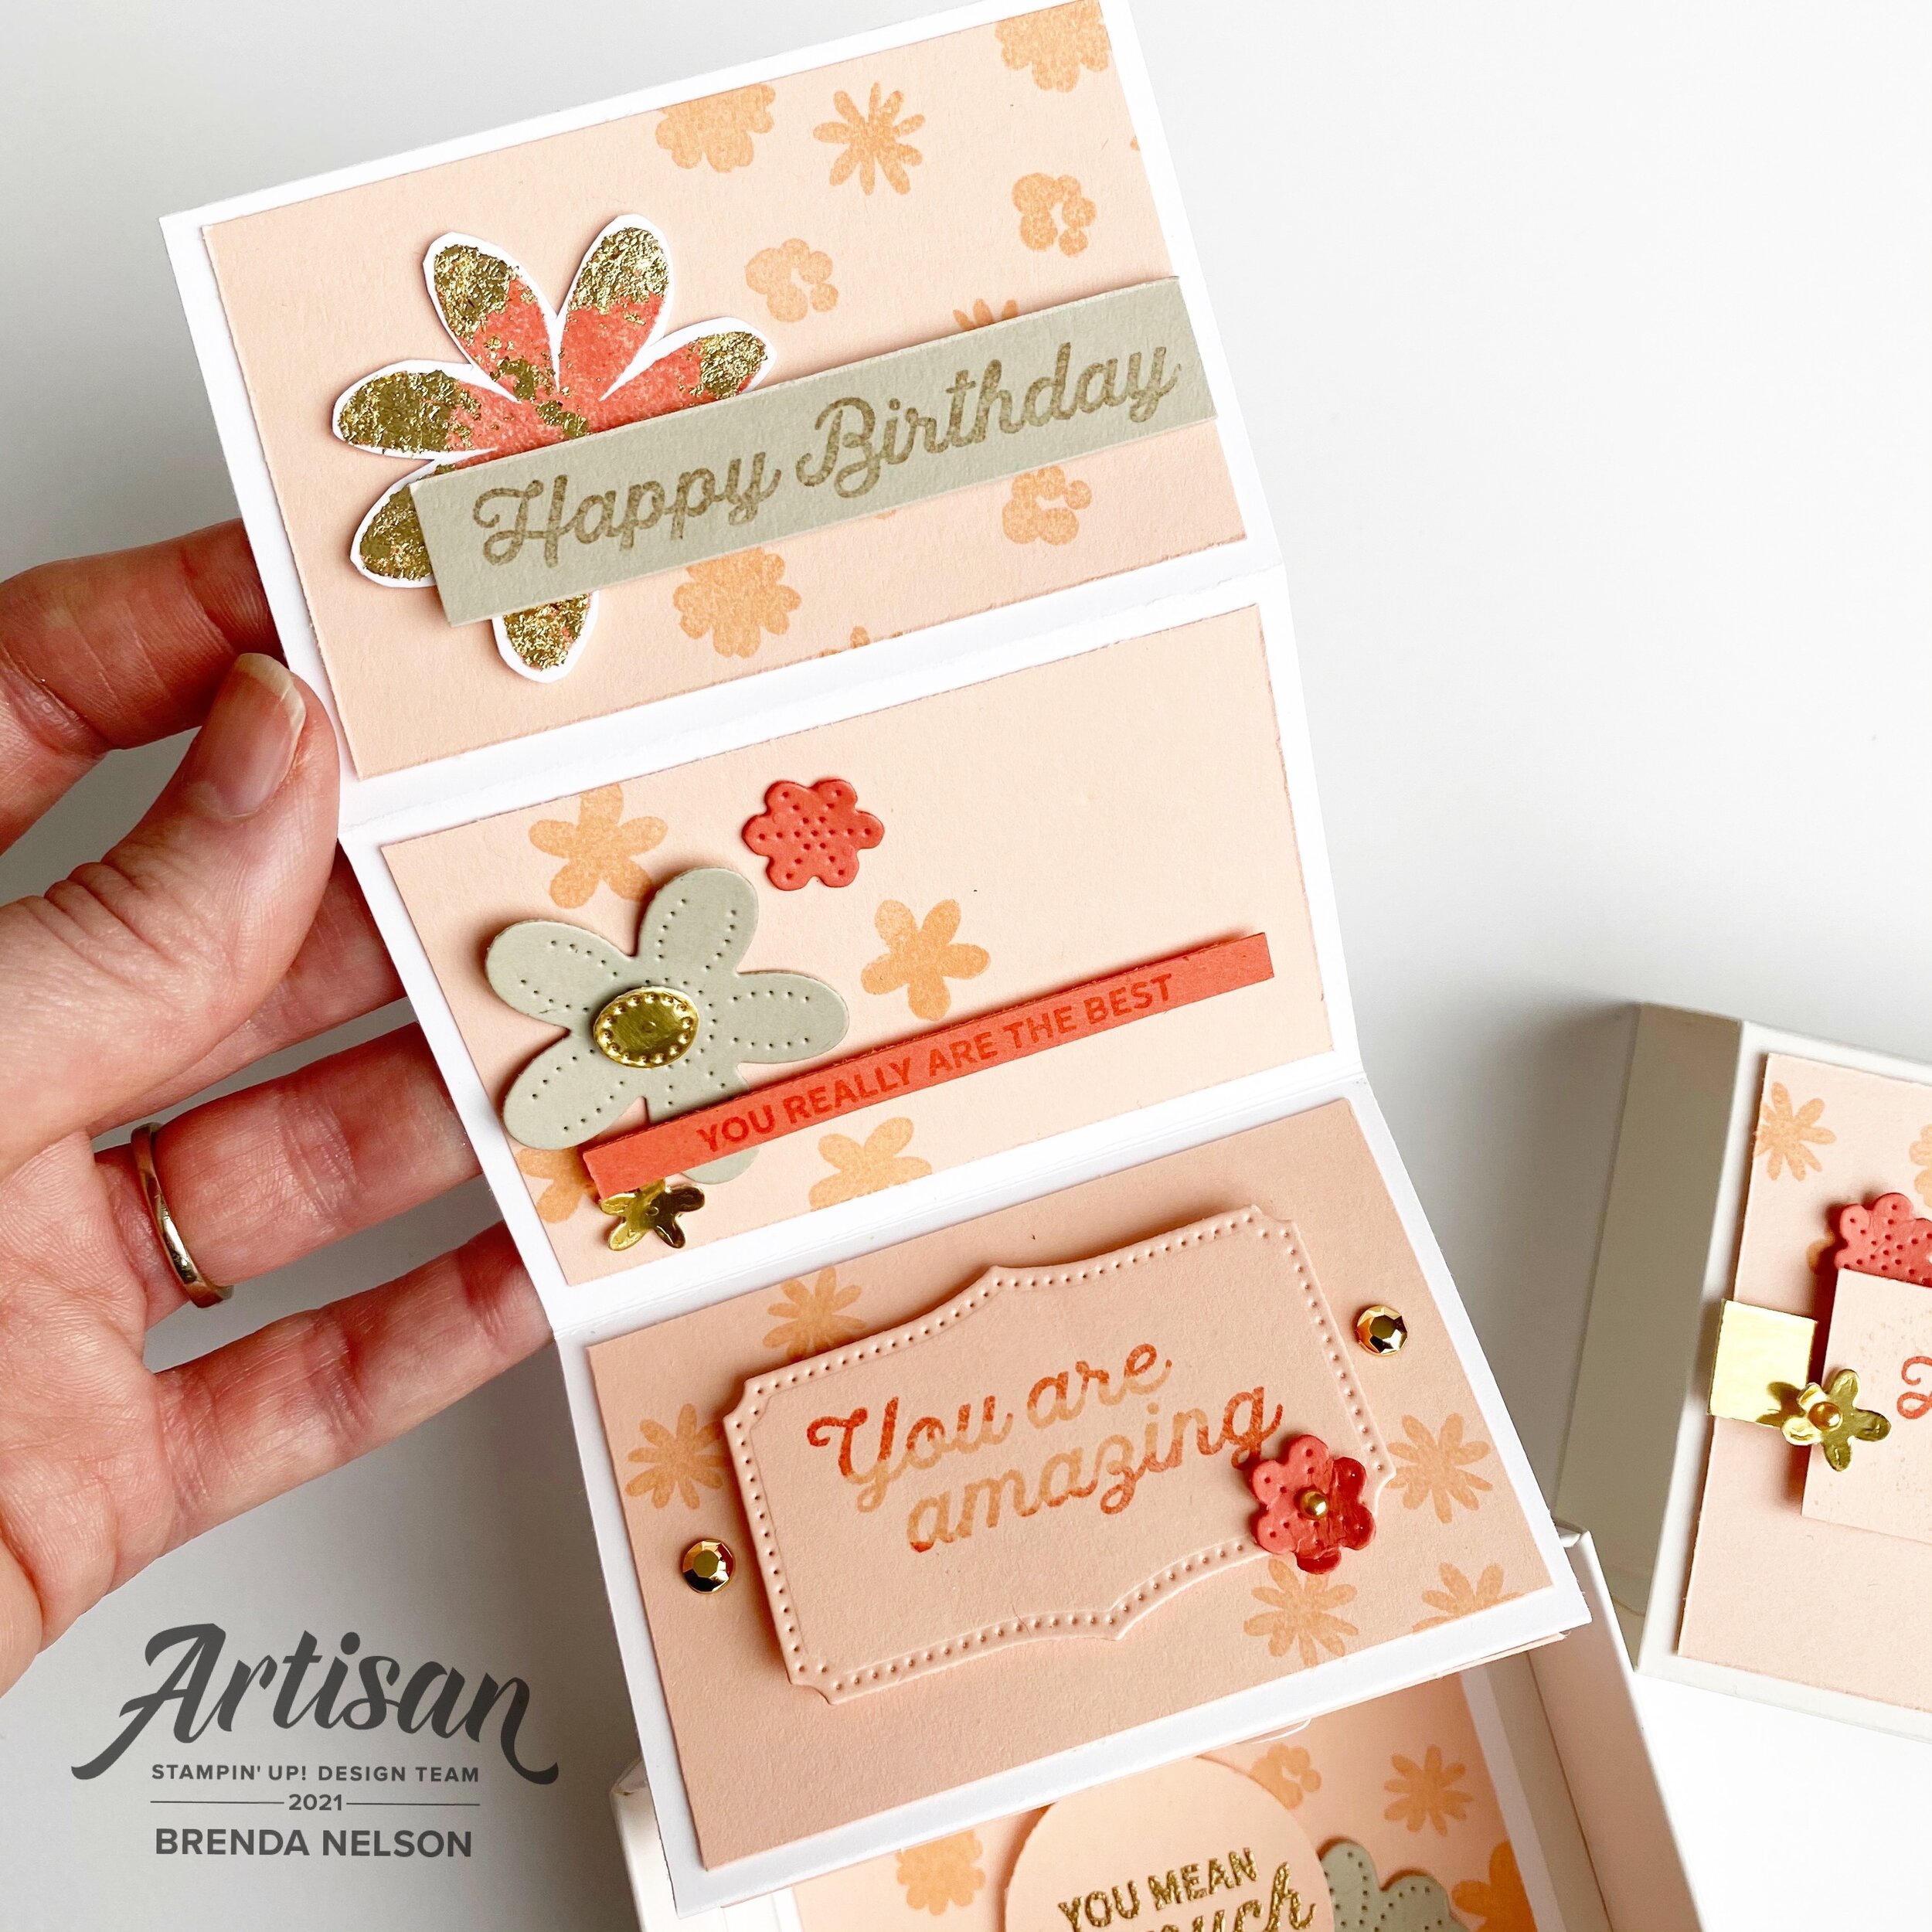
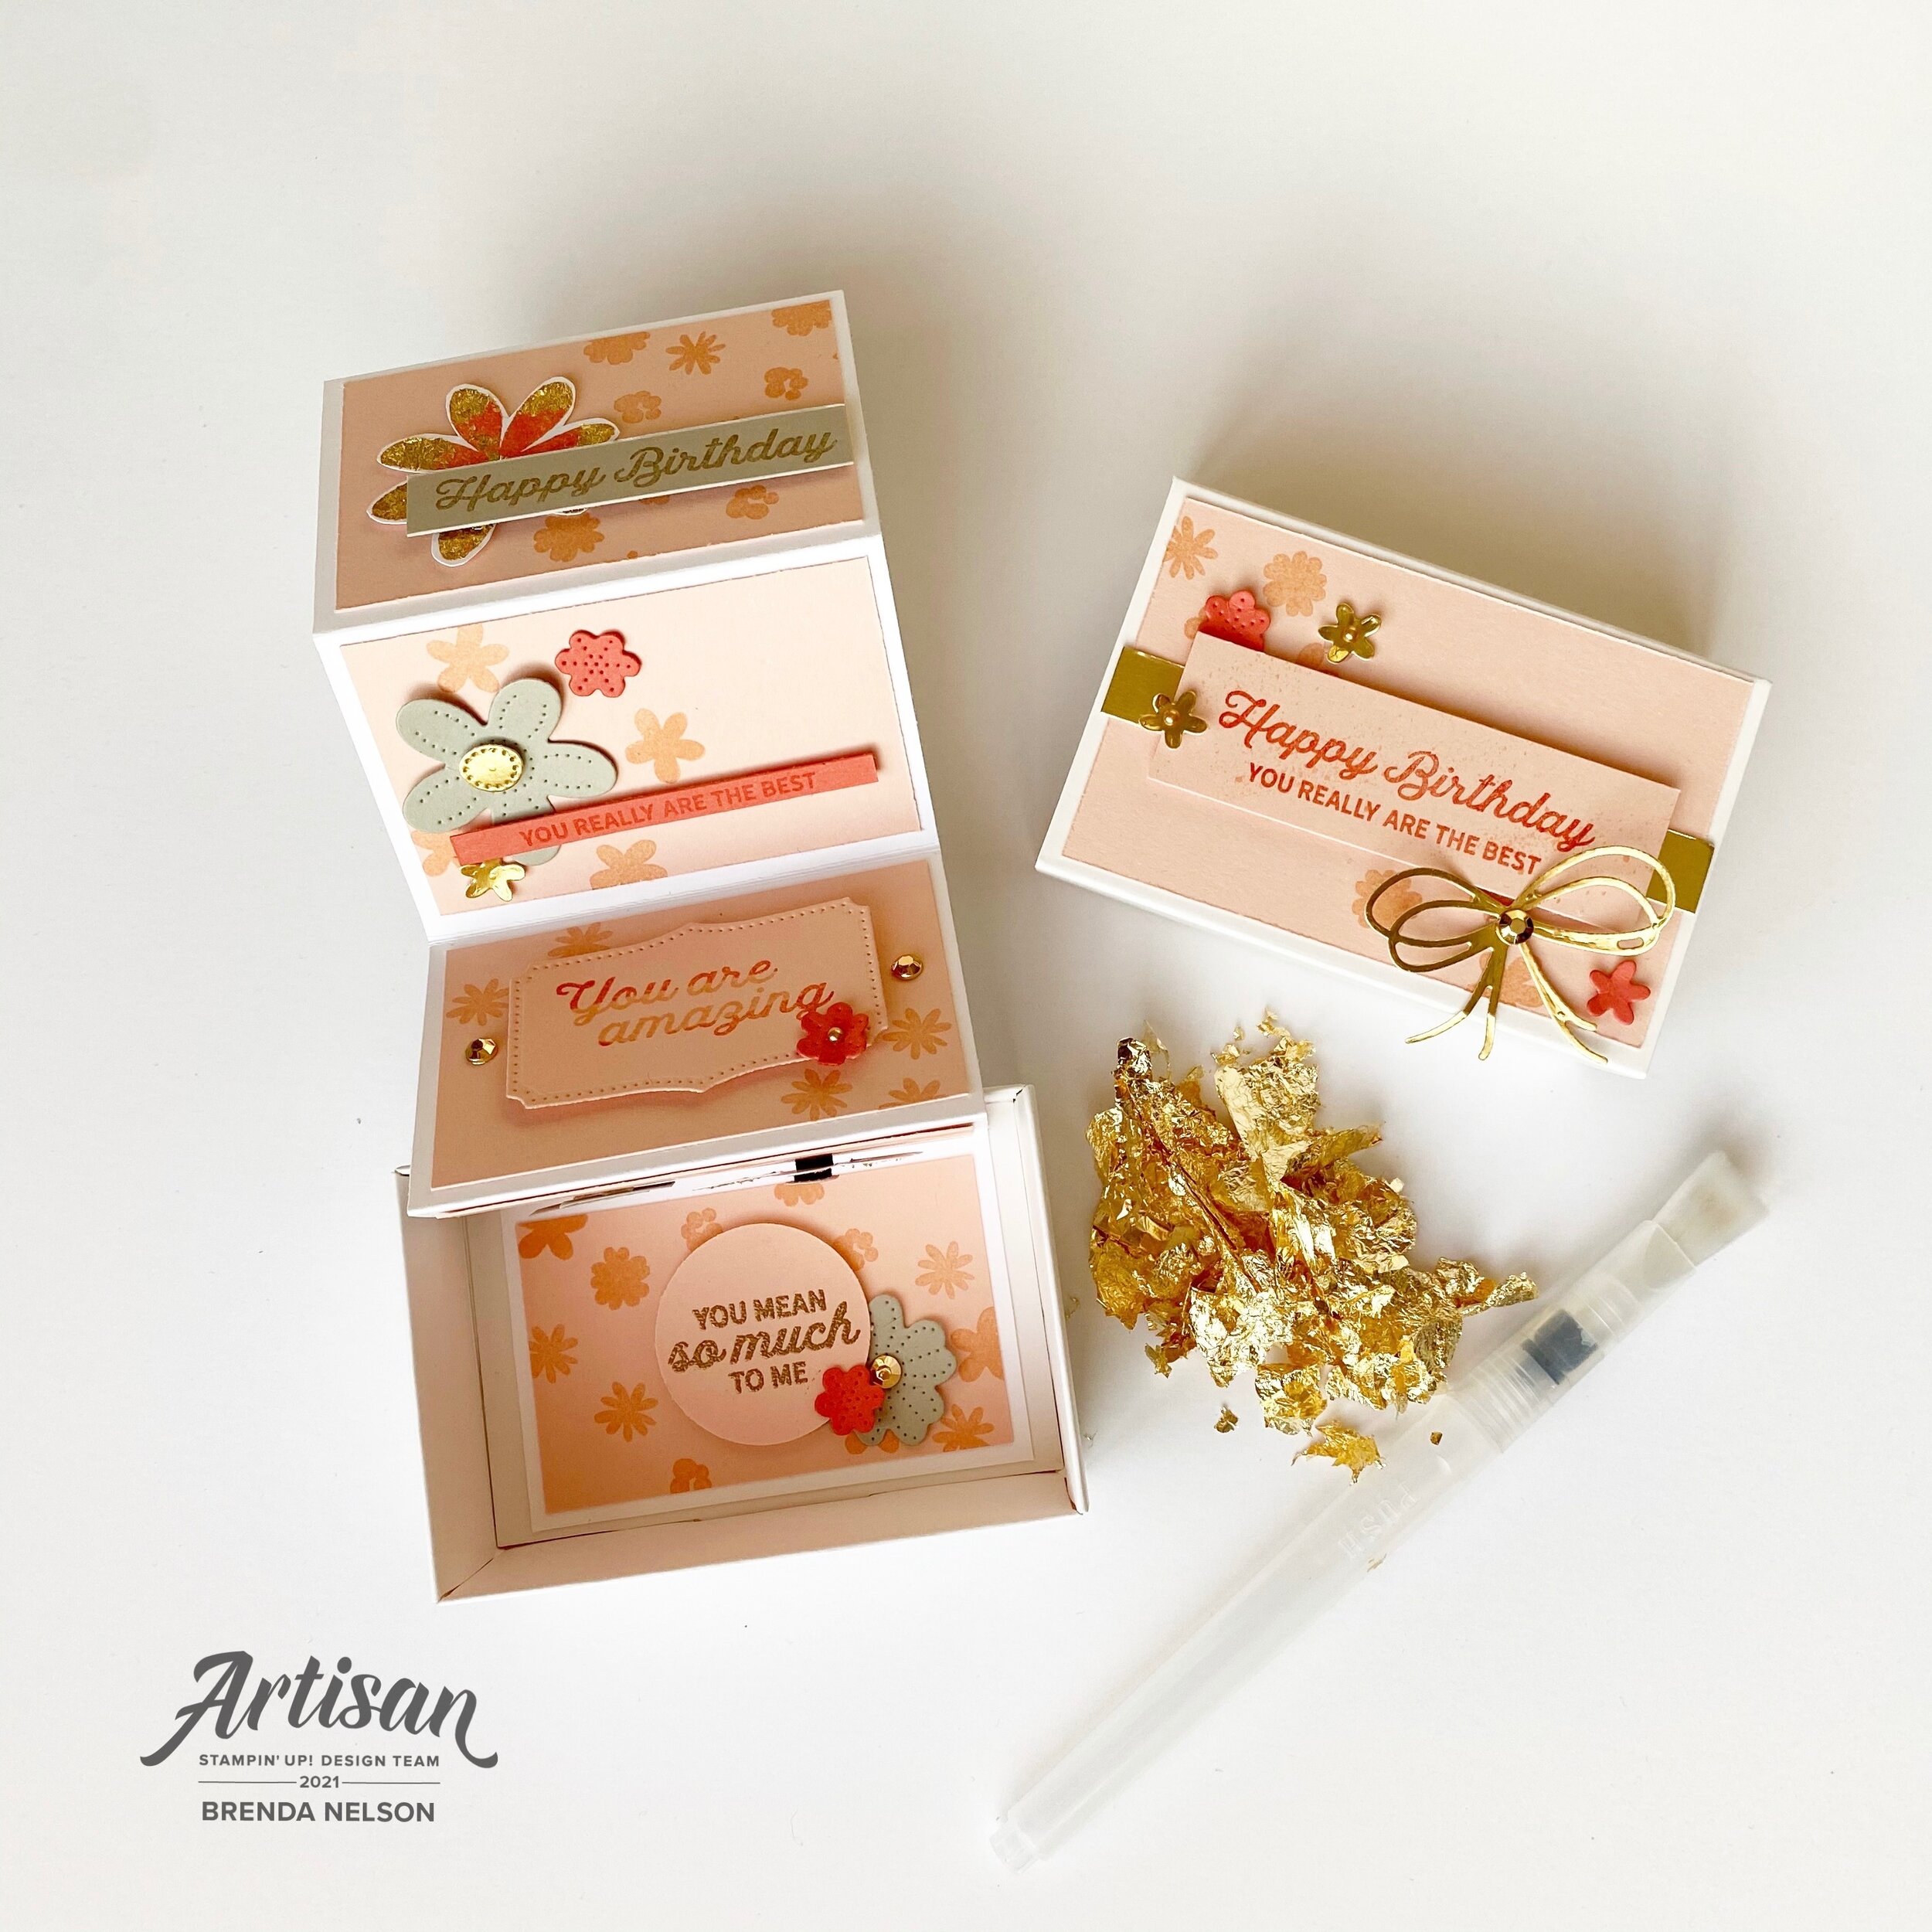
Let’s start with the fun pull out birthday card in the Love You Always Treat Boxes! As soon as I saw how these treat boxes worked I knew I wanted to create some kind of pull out project. I decided on a birthday card after seeing all the fantastic sentiments in the In Bloom stamp set.

The boxes are easy to assemble which is awesome. To create the pull out feature you need a piece of Basic White card stock measuring 3 1/2 x 11 1/4. Score at 2 1/4, 4 1/2, 6 3/4 and 9. Accordion fold it and add the Petal Pink panels on measuring 2 x 3 1/4. You need 5 panels.

Then you can stamp and embellish as desired!

The colors I used to create this pull out birthday card are Petal Pink, Calypso Coral, Sahara Sand, and Gold Foil accented with the Gilded Leafing. To add the Gilded Leafing to my flowers I used Heat’n Stick Powder with a finger dauber. The dauber allows you to have more control over where you want to apply the Heat’n Stick powder. Once you heat set the powder (do not over heat as it will lose the stickiness) press it into your Gilded Leafing and use the large Water Painter to brush off the excess and reveal the details.

Of course I also had to create a scrapbook page to feature this fantastic Paper Blooms Designer Series Paper and my sons 16th birthday!

Of course I also had to create a scrapbook page to feature this fantastic Paper Blooms Designer Series Paper and my sons 16th birthday!

I chose the dark pattern from the DSP because I thought the Night of Navy would really pop against a Basic White background. I flanked each side with strips of Calypso Coral card stock. I didn’t want to use 12x12 paper (I covet for page bases) so I cut the strips from 8 1/2 x 11 and pieced them together behind the photo mat. I also popped the Gold Foil photo mat up on Dimensionals.

You may notice some circles on the layout and those are cut with punches from the DSP.

I applied the same technique to the flowers on this page as the pull out birthday card with the Gilded Leafing.

final 3.jpg

This layout combines flowers cut using the Pierced Bloom dies, stamped flowers and flowers cut from the DSP. You will notice in this picture that I stamped the “You are Amazing” right on the circle cut from the DSP and embossed it in gold. I love this feature!

I used the new Resin Hearts, Gilded Gems and Gold Metallic Pearls as accents on the page. I love the fun bow cut with the dies and Gold Foil paper.

I hope you enjoyed my first official Artisan Design Team showcase projects! Make sure to check out Stampin’ Up!’s Facebook page to see everyone’s creations and follow me over on Instagram @stampwithbrenda

I hope you enjoyed my first official Artisan Design Team showcase projects! Make sure to check out Stampin’ Up!’s Facebook page to see everyone’s creations and follow me over on Instagram @stampwithbrenda

If you live in Canada and would love to create these projects yourself you can shop my Online Store or use the Hostess Code to have items sent direct to you! Just confirm it says “Shopping with Brenda Nelson” in the shopping bag :)