Joy of Sets--Christmas 2020

Welcome to the last official post of the Joy of Sets Blog Hop. This was the FIRST blog hop I joined and I have learned so much since then. I need to give Angie McKenzie a special shout out for all of her behind the scenes assistance she gave me in the beginning! I look forward to sharing creativity with her in some new future projects, so stay tuned for details!

joyofsets.jpg

This month our theme is Christmas songs and it works well as I have been sharing a Card a Day in December all month long, so this will officially also make my 12th holiday card share! One of my favorite Christmas songs is from Michael Buble and his version of White Christmas. We love a good cup of hot chocolate in my home and I always give my husband a Tim Horton’s gift card during the holiday season. I love to listen to Christmas songs together with the fake fireplace on the television and drink yummy drinks together!

My project is a card and a gift card holder. I can be one or the either and is a card design that I use over and over!

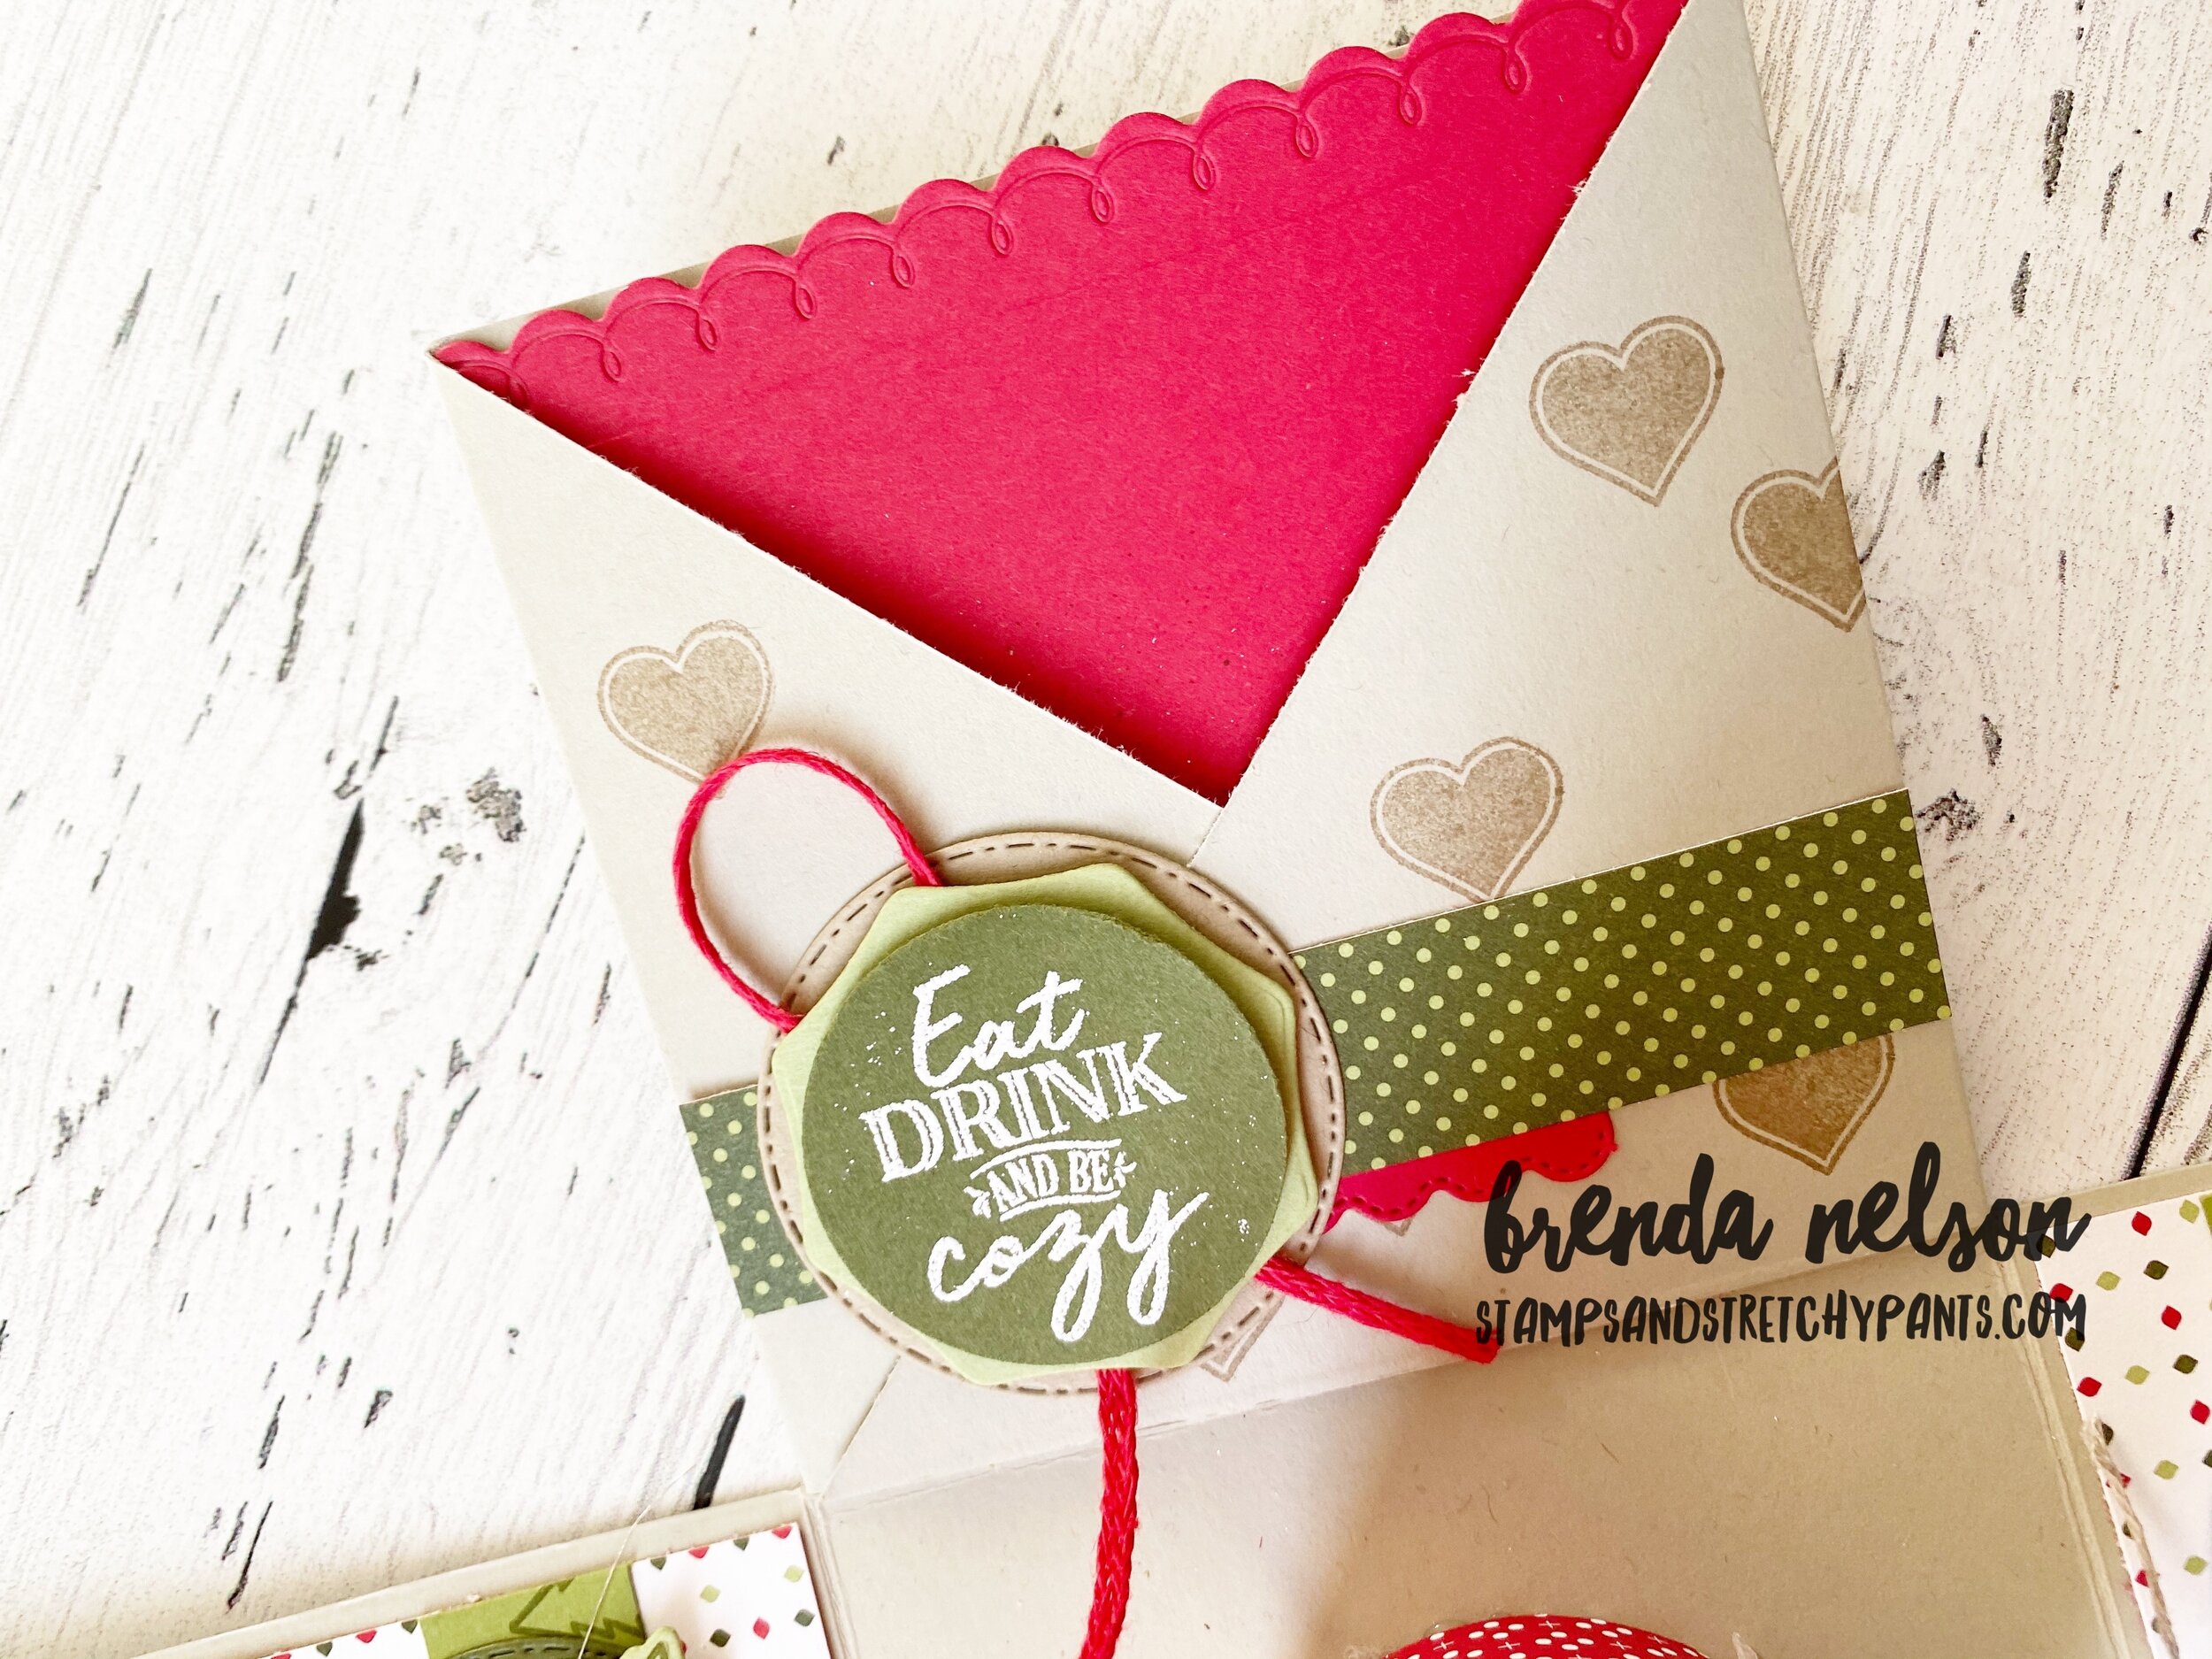
You start with your typical card base. 8 1/2 x 5 1/2. Score in half at 4 1/4 and then on one side make a score line at 1 1/4. This become the panel that you will flip forward to create a pocket.

There is no adhesive keeping this pocket closed, however you need to use a ribbon or in this case, Linen Thread, to keep it closed.

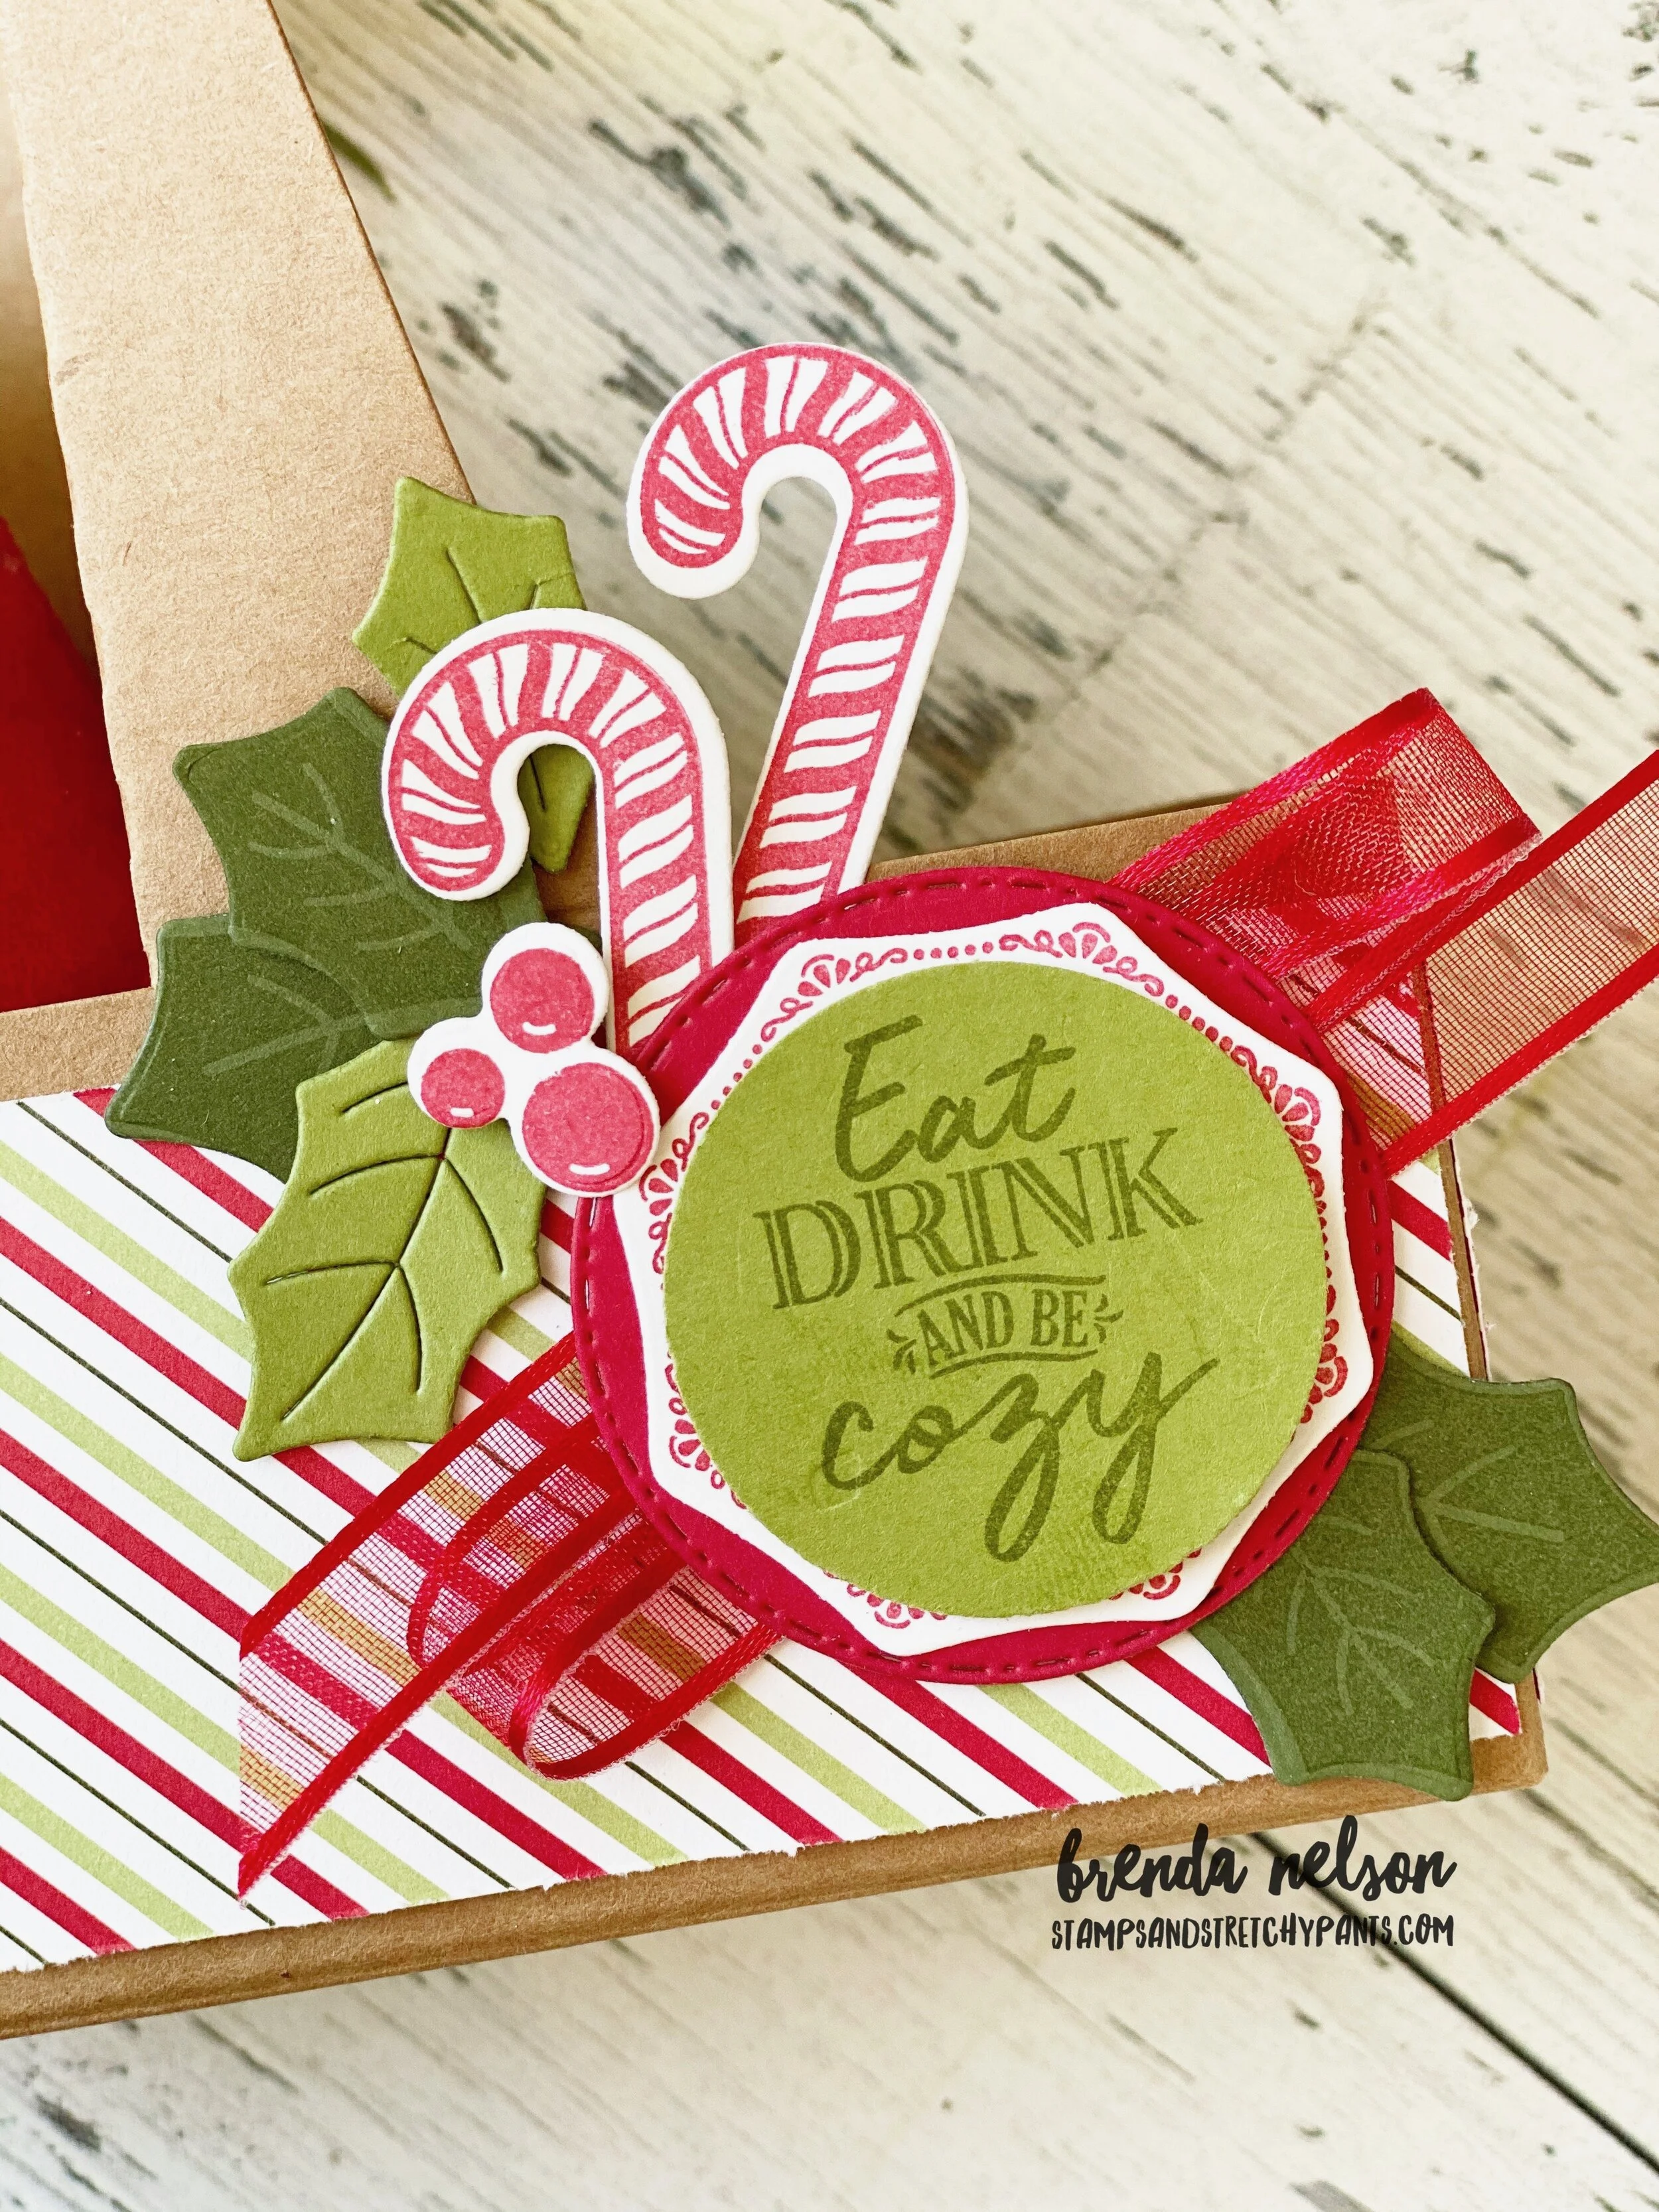
I rounded all four edges with the Detailed Trio punch and added a strip of Designer Series Paper from the Heartwarming Hugs to the panel. I also rounded the edges on this.

final (22).jpg

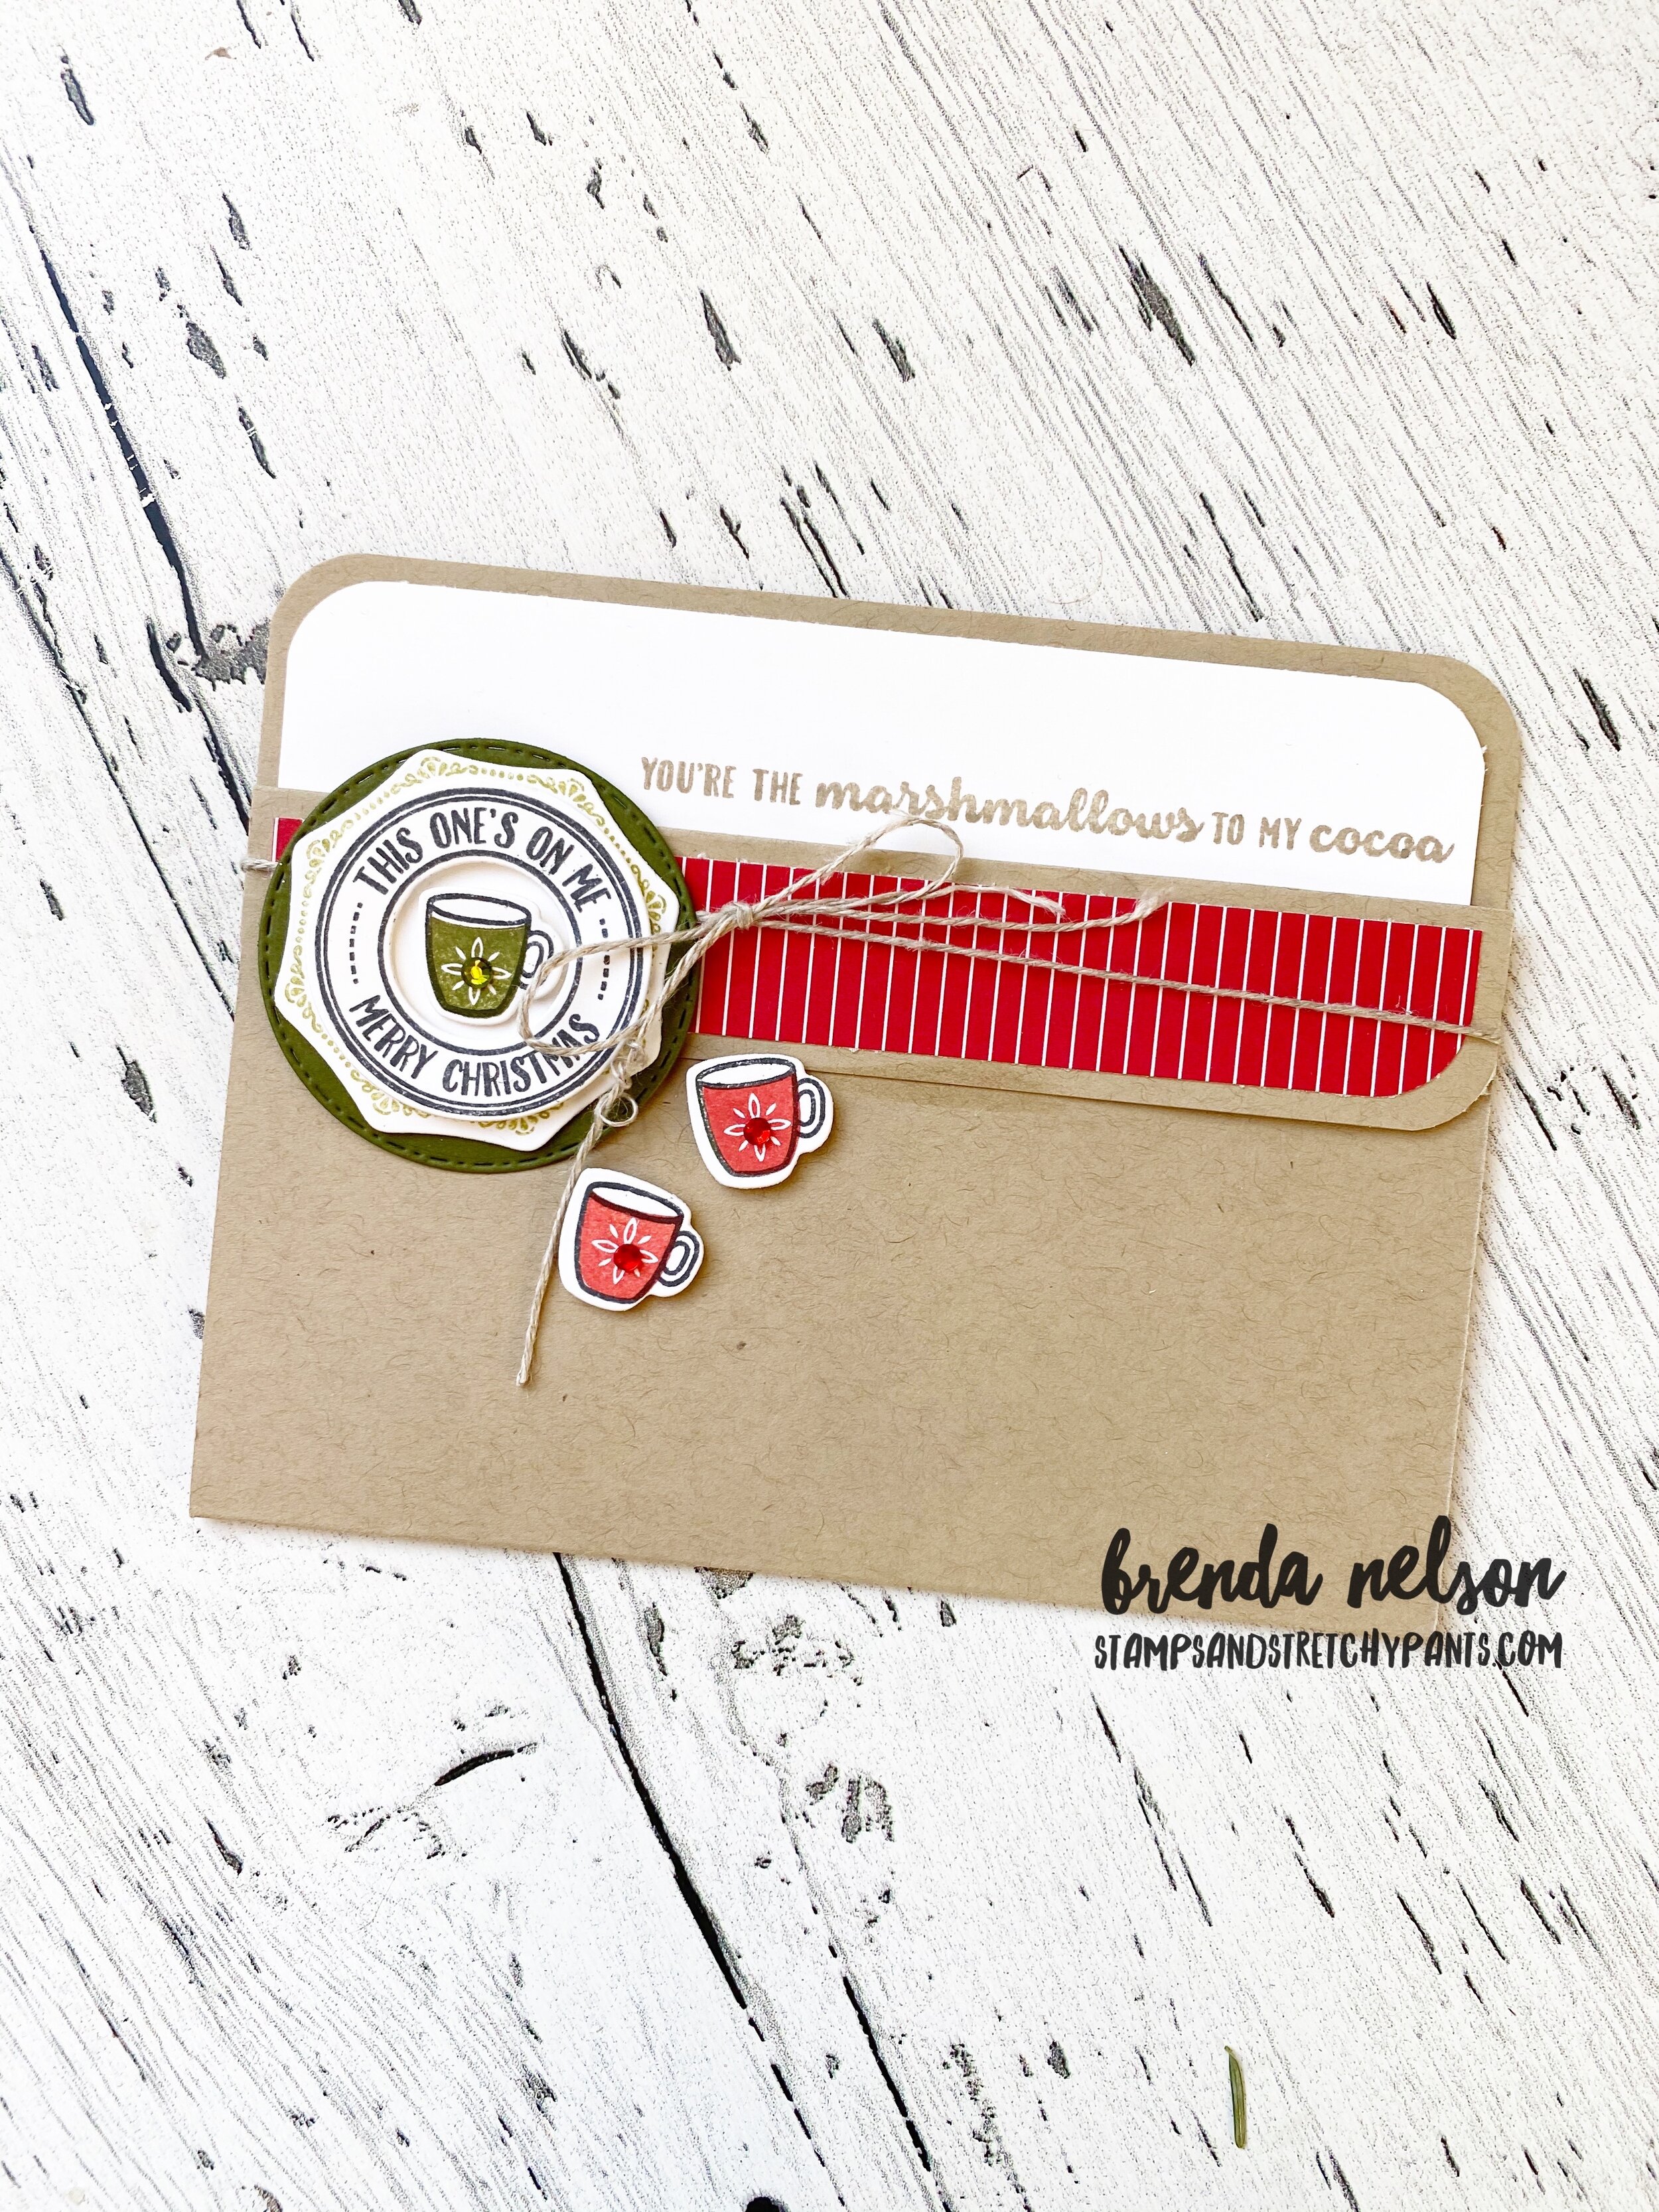
I absolutely loved the sentiment, “You’re the Marshmallows to my Cocoa”, and I knew I needed to add it to the Whisper White card stock pull out piece. It is cut to 4 x 5 1/4. I stamped the sentiment in Crumb Cake ink.

final (23).jpg

The best thing about the Warm Hugs Bundle are the teeny tiny coffee mug, candy canes, and christmas tree that all have little dies to cut them out. I love the layering options in this bundle too and the variety of sentiments.

I added a bit of bling to the middle of the little coffee cups for some glitz! This is the perfect card or gift card holder for those warm drink loving friends or family members in your life.

Thanks for hopping along today! You can keep on going by clicking the button below and to see what Alejandra has created for us today!

Create with Connie and Mary--Christmas Favor

Hello friends! I really love the holiday season as its such a fun opportunity to share little gifts and treats with everyone. I know this season looks very different for many of us, but I was still able to make a few fun things to give away!

Design Team.png

One of my favorite things in the Handmade for You catalogue are the mini coffee cups and little carrier! I have used them for so many things. The possibilities are just endless!


I just knew I had to dress one of these carriers up using a combo of the Heartwarming Hugs Suite (one of my favorite of all time!) and the Sweetest Time Bundle. I just love a good candy cane image!

final (8).jpg

I started in covering the carrier on all four sides with a pattern from the Heartwarming Hugs Designer Series paper. I loved the stripe pattern as it allowed me to use both reds and greens in my design.

I embellished the left side with “Eat Drink and be Cozy” and layered it using the Warm Wraps Dies. I just loved all the possible combinations with this die set. I think it will be a keeper for me! The Real Red Sheer ribbon was a great addition to this layer because it is still light and airy with a wonderful texture to the ribbon.

I added in some stamped and die cut candy canes and some leaves, both stamped and some just die cut. I just love how it all came together.

final (7) 2.jpg

One of the great features of these coffee carriers is that they are sturdy enough to hold a mini bottle of champagne! Whoo Hoo! On one side of my project I have a decorated champagne bottle and on the other I have a mini coffee cup full of Baileys Irish Creme chocolate (you know, for your ‘coffee and baileys’ ).

I wrapped some of the Mossy Meadow Diagonal Stripe ribbon around the bottle neck and added “A Little Something for You” which I embossed with White Craft Ink and embossing powder on Real Red card stock. It is also cut using the Warm Wraps dies.

I wrapped some of the Mossy Meadow Diagonal Stripe ribbon around the bottle neck and added “A Little Something for You” which I embossed with White Craft Ink and embossing powder on Real Red card stock. It is also cut using the Warm Wraps dies.

final (11) 3.jpg
 

Of course I had to decorate the lid of the Coffee Cup and I made a custom coffee cozy using the Festive Felt (what a fun product offering) and the Warm Wraps dies.

On the lid I wanted to keep things traditional red and white, candy cane colors, and I added little candy cane stamps to the top. So cute!

final (11) 2.jpg

I was easily able to cut the Festive Felt with the dies and assemble everything together using a hot glue gun. I think this custom coffee cozy is the best!

I know the other gals have created some amazing projects as well! You can go BACK to see what Melissa has created or you can go NEXT to see what Connie has designed. Please feel free to leave comment! I love getting your feedback!


Christmas Coffee Explosion Box

This project is definitely in my top ten favourite things I have EVER made! I just couldn’t love it any more and definitely know its the gift I am making for my kids teachers this Christmas!

If you haven’t tried making an explosion box, don’t be intimated, its actually quite simple. You can look at each panel as a mini card and let your design inspiration go from there! This overhead shot shows you what it looks like once you take off the top and the sides ‘explode’ down.

There are tons of tutorials out there and almost all of them start with a 12x12 piece of card stock which is what I used here. I scored it at 4 inches on all sides and then cut some of the panels at a diagonal to create the two ‘pocket’s. I wanted a couple spots to add in some gift cards (one for coffee, one for booze!).

final.jpg

I used the two stamp sets Warm Hugs and Wrapped in Christmas from the Heartwarming Hugs Suite to decorate and embellish this project. These two sets work so well together!


This is the top of the box. I just love this mini coffee cup that fits inside the For You… it gives a little hint of what might be inside.

You can also use the Glitter Star Ornaments as a stationary embellishment by cutting the string and tucking the hook behind something.

final.jpg

I used the Heartwarming Hugs DSP and used the same pattern on the lid and on the inside panels and decorated the box with colors that coordinate with the DSP. I love the options of using Mossy Meadow, Old Olive, Crumb Cake, and Soft Suede. I used white embossing powder on many of the sentiments to help them ‘pop’.

The pull out pockets also have some stamping and you easily have enough to add a gift card.

I sacrificed one of the cups by carefully taking it apart to trace it onto the DSP so that the shape would be perfect to wrap around the cup. I used Tombow adhesive so it would stay adhered until the end of time! I decided to hot glue the cup to the base of the box. This way you can add some little treats inside the cup too and won’t move around in the explosion box.

I love how the Warm Wraps dies have such great layering options. The top of the coffee cup illustrates this perfectly and I used this layering option on all of the panels.

final.jpg

I would love to share this project with you! I will be offering it as a class on October 21st at 12:30 and October 23rd at 7pm. If you are in the Edmonton area please feel free to reach out if you would like to come stamp with me, or order any of the supplies by following the link to my store. Click on the button below to contact me to sign up for this class!


Coffee Carriers--not just for coffee!

The very first suite I ordered from the Handmade for You catalogue was the Heartwarming Hugs suite. Once I saw those mini coffee cups and that carrier I was SOLD! Hahaha! I have been crafting with them all month long in preparation for a display I was putting together and let me tell you, they are for so much more than coffee!

This cute little project is home to a little coffee bean plant! Isn’t that fun? I went to a local greenhouse and they told me it would maybe grow a bean in like a decade! hahaha! Keeping it alive for that long is actually more of a challenge!

final.jpg

To create the DSP wrap I sacrificed one of the cups by gently dismantling it. I then traced it onto the Heartwarming Hugs DSP so that the shape would be exactly the same to wrap around a cup. I used Tombow to keep things glued down. I love the color palette of this DSP as it allows you to bring in several brown and green tones and the patterns are so versatile and easy to mix together! I wrapped this carrier in DSP. I want to mention that you cannot wrap one strip of 12x12 around the carrier. It isn’t long enough so you need to cut individual pieces for the 4 sides. I wrapped it with the Real Red Braided Trim which is also a part of this suite.

I decided to add in a couple mini cards alongside my mini plant. I cut them to 2 1/2 inches wide so they could slip in the other side.


The Heartwarming Hugs Suite includes two stamp sets, Warm Hugs and Wrapped in Christmas. I used the Wrapped in Christmas set to make these mini cards and accented them with images from the Warm Hugs set.

The suite also includes two slim embossing folders which are great for adding in some texture like in this card shown.

final.jpg
final.jpg

Don’t all these patterns look awesome together? I love the Mossy Meadow Diagonal Stripe ribbon and the Glitter Star Ornaments in this suite. They help make the perfect tag! You can also see on this tag how fabulous the Warm Wraps Dies are as they have shapes that layer on top of each other! I always love when that is a component of a die set.

final.jpg

I actually ended up giving away both of these carriers as gifts so I wish the recipients luck in keeping these little coffee bean plants alive! hahaha! I also hope they are able to put the mini cards to good use and find themselves inspired.

I will be posting more coffee carrier projects so keep checking back so you don’t miss out! And if you need any supplies to make these projects, please shop my online store!