A Card a Day in December--Day #23

Can you believe we are only 2 days away from Christmas? I do feel like this month went by quickly! And if you are a mom you know that Christmas is like planning a big wedding once a year :)

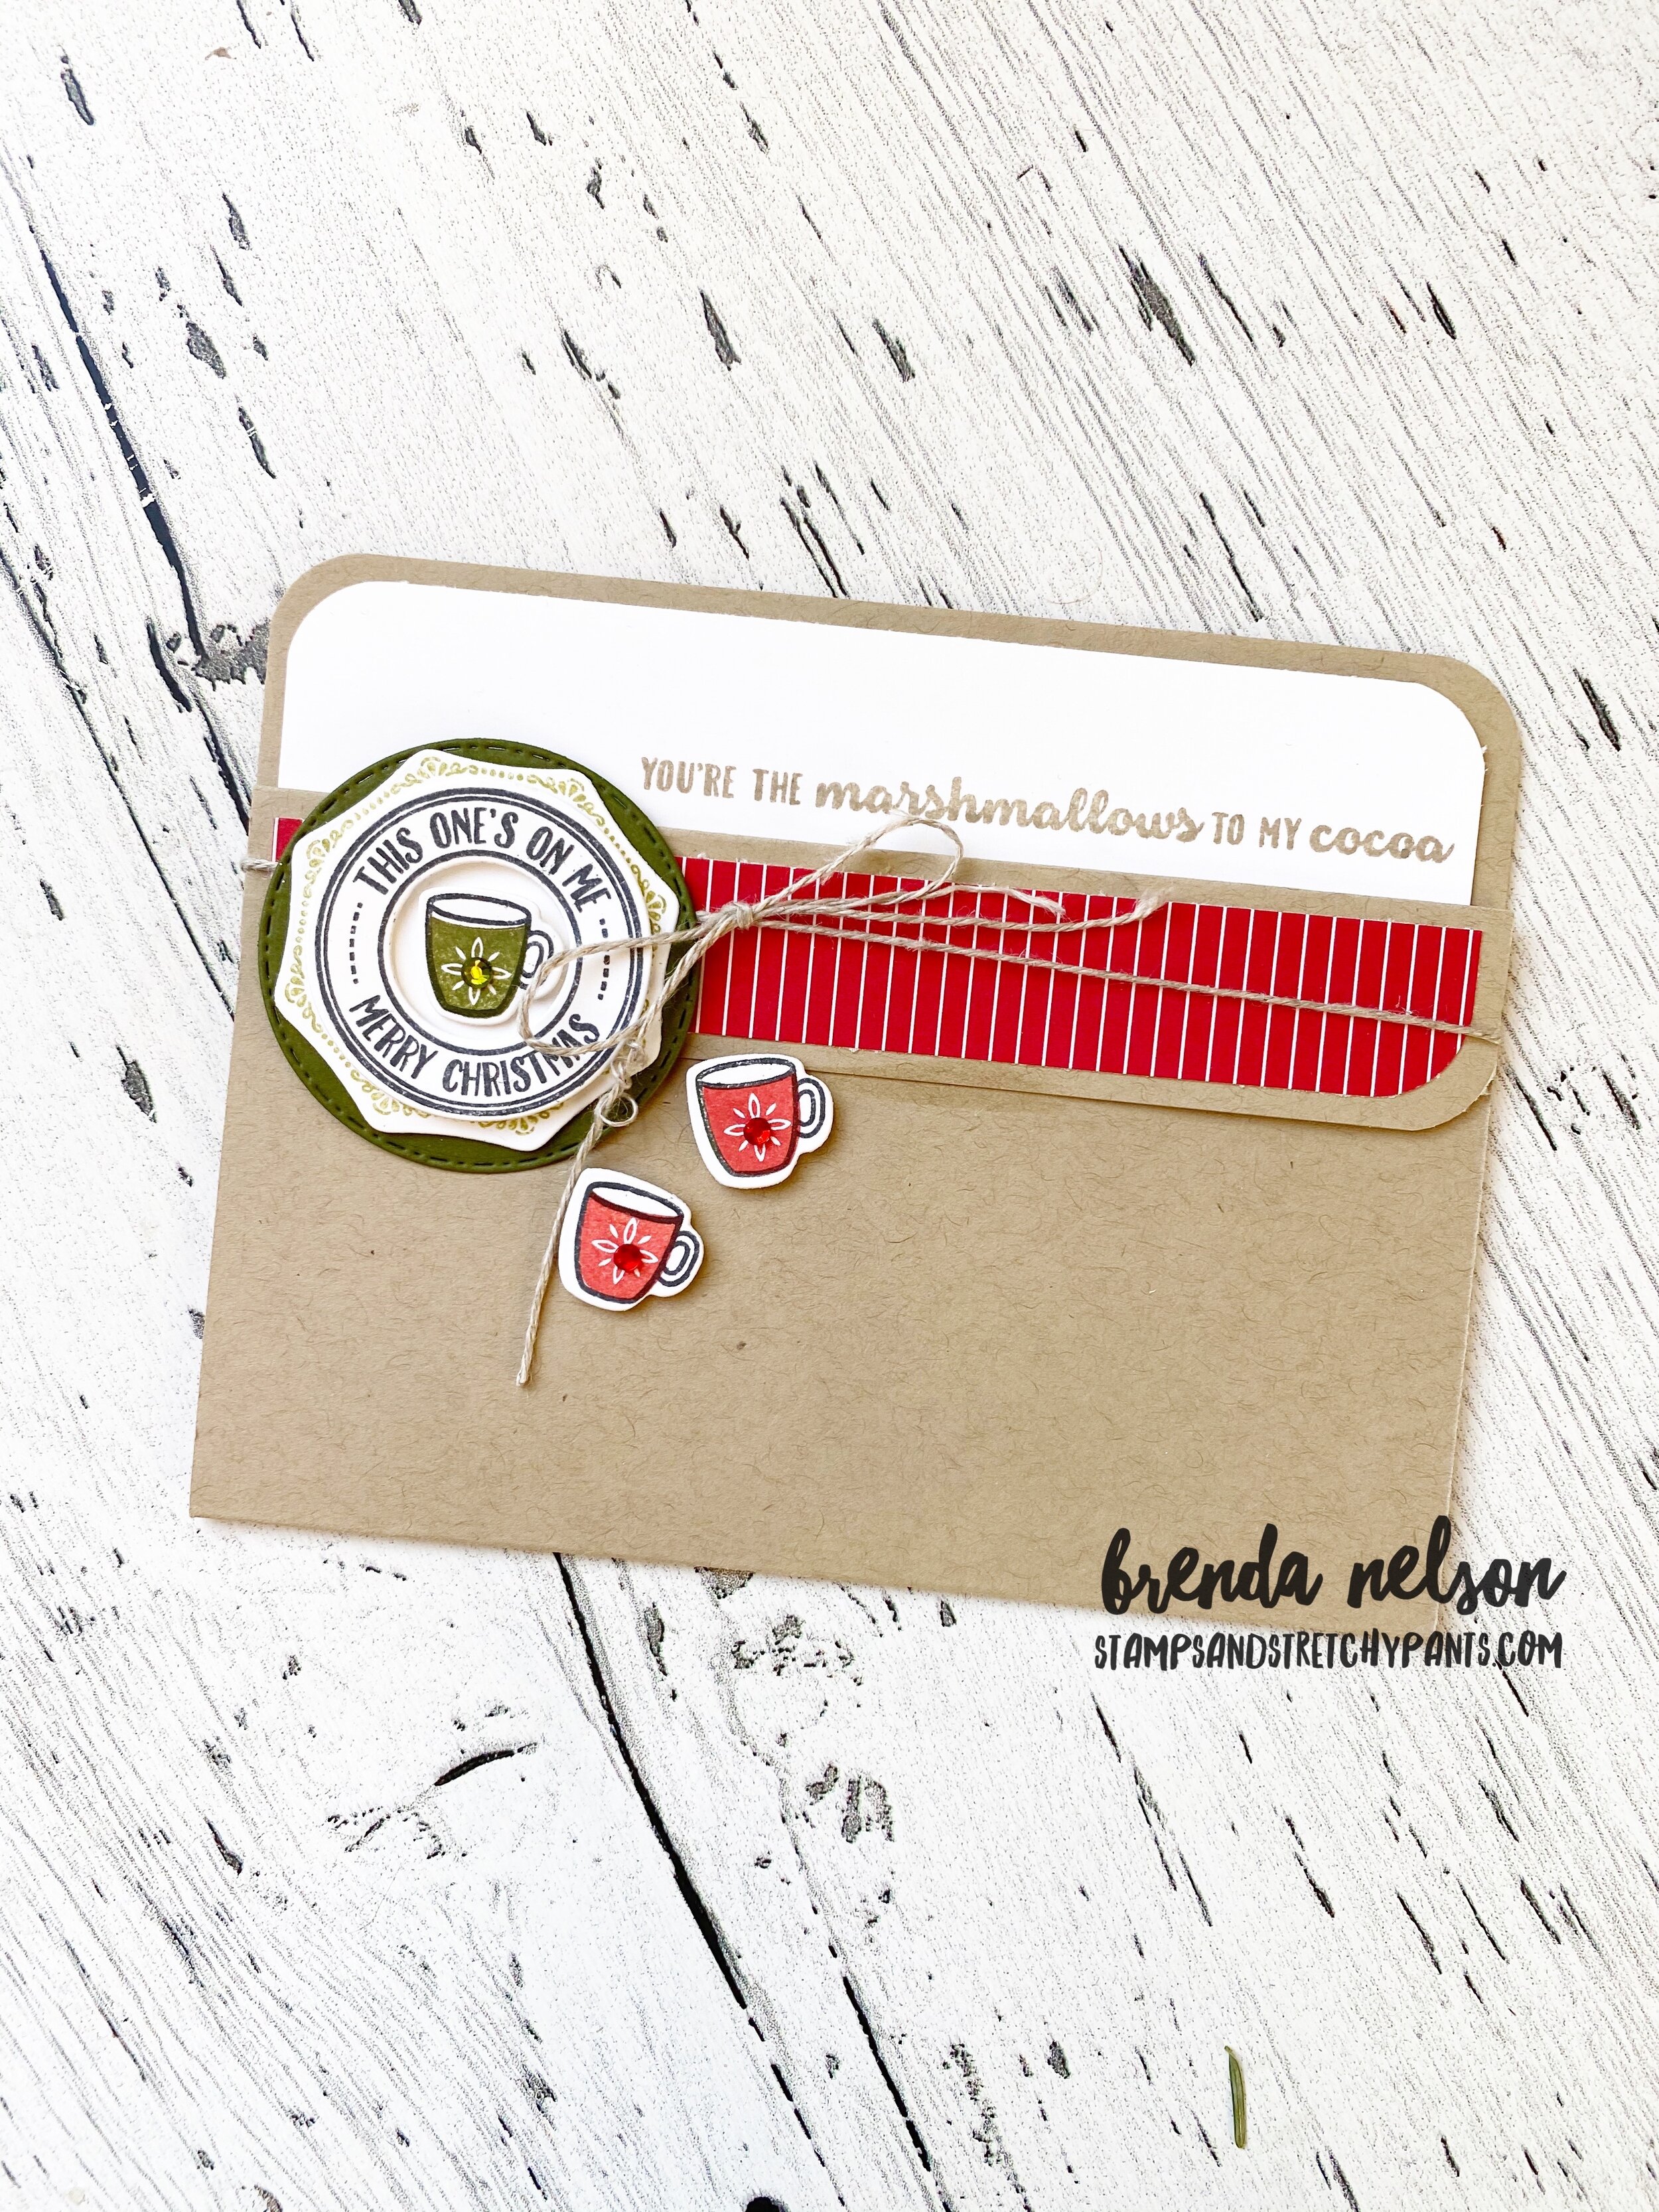
For my card project today I am sharing a pretty traditional card in the sense of the color scheme. In fact red, white and a bit of green are the holiday colors I use to decorate my house for the holidays.


This card is on a Real Red card stock base and on the first layer I stamped the little mini Christmas trees from the Warm Hugs stamp set and then flicked my Real Red marker over the background. This fills the top of the card base.

The bottom section is embossed with the Wrapped in Texture folder.

I added a strip of Heartwarming Hugs Designer Series paper over top and cut a cute scallop border with the Festive Felt and the Peony Dies.

final (7) 13.jpg

I stamped the sentiment in Old Olive ink on Pear Pizzaz card stock and layered it with a die from the Warm Wraps dies. The fun touch is the Glittered Star Ornament. I cut off the string and tucked the top part in between the layers so it looks more like an embellishment than a hanging ornament. It was easy to keep attached with the use of a few Glue Dots.

This card is pretty simple which I like because the design of the card can easily be recreated with birthday stamps or Valentine’s Day.

final (17).jpg

So if you need to make a couple of last minute holiday cards this one will not take you much but has alot of charm to it! I hope you have been inspired this whole month!

A Card a Day in December--Day #20

Hey friends! Today I decided to take a break from cards and show you some cute little stocking stuffers I made for my kids and hubby. We are some serious hot chocolate and chocolate lovers over here so I dressed up some fun treats Stampin’ style!

Thank you for visiting my blog today, my 20th share this month!

final+%285%29.jpg

The mini acetate boxes fit a Keurig pod perfectly and I was able to find some hot chocolate ones..the best part is the color coordinates perfectly with the Heartwarming Hugs suite! It is the little things!


This suite is one of my favorites and one that I will keep around for future projects. I just love how the Warm Wraps dies have so many layering combinations.

The Warm Hugs stamp set is perfect for all of your latte, coffee and hot chocolate giving needs.

And really, what is cuter than a mini coffee cup?

If you do not have the Press On stamp set—add it to your shopping cart! It is the perfect accompaniment to this suite!

final (9).jpg
final.jpg

The Rectangular Tins are the perfect size to hold some chocolates! I added the Heartwarming Hugs Designer Series paper to the inside and outside of the tin and was able to round the edges with the Detailed Trio Punch.

I tied it shut with a little bit of Real Red Braided Linen Trim.

The Warm Hugs stamp set has a variety of sentiments and works fantastically with its partner stamp set Wrapped in Christmas.

I really enjoyed making these fun little treats to add to my families stockings!

Create with Connie and Mary--Favourite Christmas Project!

Welcome to our weekly blog hop! If this is your first time joining in make sure you go around the whole group! Everyone is so talented and has unique and distinct crafting styles. I tend to make variety of projects including scrapbook pages, memory albums, 3D projects and cards. In fact today for our “Favourite” Christmas project I have created a Christmas Mini Album!

Design Team.png

This mini album is created using 5 pieces of 5 1/2 x 8 1/2 pieces of Crumb Cake card stock. Instead of scoring the card stock in half to make a card I just kept as is.

final (7) 15.jpg

The album is kept together with two 1 inch binder rings that are found easily at any office supply store and are jazzed up a bit with a variety of ribbons. I love how many options Stampin’ Up! has for us to choose from.

I added a Soft Suede piece to mimic a book binding. The scallop edge is created using the Peony Dies.

What is really awesome about this album is the whole project uses only ONE stamp set! The Wrapped in Christmas stamp set was perfect for this project!!


I used two different stamps to create a lovely cover page. My idea was that this album could become a piece of holiday decor that the recipient (yes, I made this for my mom) could have on display year after year.

I used some of the Mossy Meadow Diagonal Stripe ribbon paired with Linen Thread and some Red Rhinestones to bring the sentiment “Let the Joy..” come to life. It is stamped on a shape from the HIppo & Friends dies.

final (2) 4.jpg
final (20).jpg

I added in elements from the Pine Woods Dies and the Warm Wraps Dies throughout the album. The color palette is paired to the Heartwarming Hugs Designer Series Paper.

final (1) 4.jpg

I love how you can layer up elements from the Warm Wraps dies and add in a few simple embellishments such as the Real Red Braided Linen Trim and Linen Thread.

final 6.jpg

The Stitched Stars Dies were another great choice to embellish this album. I also stamped out many of the images and cut by hand certain words that I wanted to highlight or isolate. A perfect example of this is pictured above on the JOY page (right hand side).

final (11) 10.jpg

I was able to use every stamp in this set except for one…can you figure it out?

I hope this project inspires you to think about making a mini album! They don’t have to be complicated or require a ton of time. I really just looked at this project like designing card fronts!


You can go BACK to see what Melissa has created or NEXT to see what Connie has designed. Please feel free to leave a comment :)

Joy of Sets--Christmas 2020

Welcome to the last official post of the Joy of Sets Blog Hop. This was the FIRST blog hop I joined and I have learned so much since then. I need to give Angie McKenzie a special shout out for all of her behind the scenes assistance she gave me in the beginning! I look forward to sharing creativity with her in some new future projects, so stay tuned for details!

joyofsets.jpg

This month our theme is Christmas songs and it works well as I have been sharing a Card a Day in December all month long, so this will officially also make my 12th holiday card share! One of my favorite Christmas songs is from Michael Buble and his version of White Christmas. We love a good cup of hot chocolate in my home and I always give my husband a Tim Horton’s gift card during the holiday season. I love to listen to Christmas songs together with the fake fireplace on the television and drink yummy drinks together!

My project is a card and a gift card holder. I can be one or the either and is a card design that I use over and over!

You start with your typical card base. 8 1/2 x 5 1/2. Score in half at 4 1/4 and then on one side make a score line at 1 1/4. This become the panel that you will flip forward to create a pocket.

There is no adhesive keeping this pocket closed, however you need to use a ribbon or in this case, Linen Thread, to keep it closed.

I rounded all four edges with the Detailed Trio punch and added a strip of Designer Series Paper from the Heartwarming Hugs to the panel. I also rounded the edges on this.

final (22).jpg

I absolutely loved the sentiment, “You’re the Marshmallows to my Cocoa”, and I knew I needed to add it to the Whisper White card stock pull out piece. It is cut to 4 x 5 1/4. I stamped the sentiment in Crumb Cake ink.

final (23).jpg

The best thing about the Warm Hugs Bundle are the teeny tiny coffee mug, candy canes, and christmas tree that all have little dies to cut them out. I love the layering options in this bundle too and the variety of sentiments.

I added a bit of bling to the middle of the little coffee cups for some glitz! This is the perfect card or gift card holder for those warm drink loving friends or family members in your life.

Thanks for hopping along today! You can keep on going by clicking the button below and to see what Alejandra has created for us today!

Create with Connie and Mary--Halloween Favors!

Halloween is definitely my favourite holiday, I just love the home decor and seeing all the little kids dressed up, and making fun treats! This year we are still hosting our annual halloween party and I have been making some special treats for the MOMS to take home! Why should kids get all the fun?

I can’t wait to see what everyone creates this week as I know there will be some good ideas I can use too!

fullsizeoutput_12d57.jpeg

I am absolutely LOVING the mini coffee cups! The possibilities are endless with what you can create featuring these fun cups and the carrier! So I knew that I wanted to use them to create a spooky treat!

I think this project is just so fun and the cups can be filled with so many things! Candies and chocolates or for a more mature audience mini alcohol bottles :)

I think this project is just so fun and the cups can be filled with so many things! Candies and chocolates or for a more mature audience mini alcohol bottles :)

I used the Magic in this Night Designer Paper to decorate the coffee carrier and the cups. You can deconstruct a coffee cup and use it as a tracer to get the shape right to wrap around the cups. And we literally have a plethora of options we can use to decorate these cups Halloween style!

final.jpg

I used a variety of stamp sets to decorate a literal TOWER of cups! Once I got started I couldn’t stop! I used the Celebration Tidings, Festive Post and Banner Year stamp sets plus a variety of dies to decorate and embellish these cups. I used the Autumn Essentials, Playful Alphabet and Celebration Labels dies.


The black glitter spider is cut using the Little Treat Box dies and is just the perfect little touch. I also added some rhinestones from the Holiday Rhinestones beside the BOO (which is cut from Gold Foil paper and the Foam Adhesive Sheets)

final.jpg
 

You can see from my tower how much fun I was having decorating all of these cups. I used twine from the Playful Pets trim combo and coloured (with Stampin’ Blends) the Crinkled Seam Binding ribbon along with some wraps cut using the Warm Wraps dies to help dress up the cups. I even cut some bats right from the Magic in this Night DSP!

final.jpg

I can’t wait to share these with my friends at Halloween! I have turned the carrier option into a kids class, and I am so excited to have some kids back in my studio stamping and being creative! I hope you are inspired to see what you can create with these cups! I have some awesome ideas in mind for Christmas too!

Enjoy the rest of the Blog Hop today! Thanks for stopping by. You can head BACK to see what Melissa has created and NEXT to see what Connie has created.