Pink Pumpkins and Golden Webs!

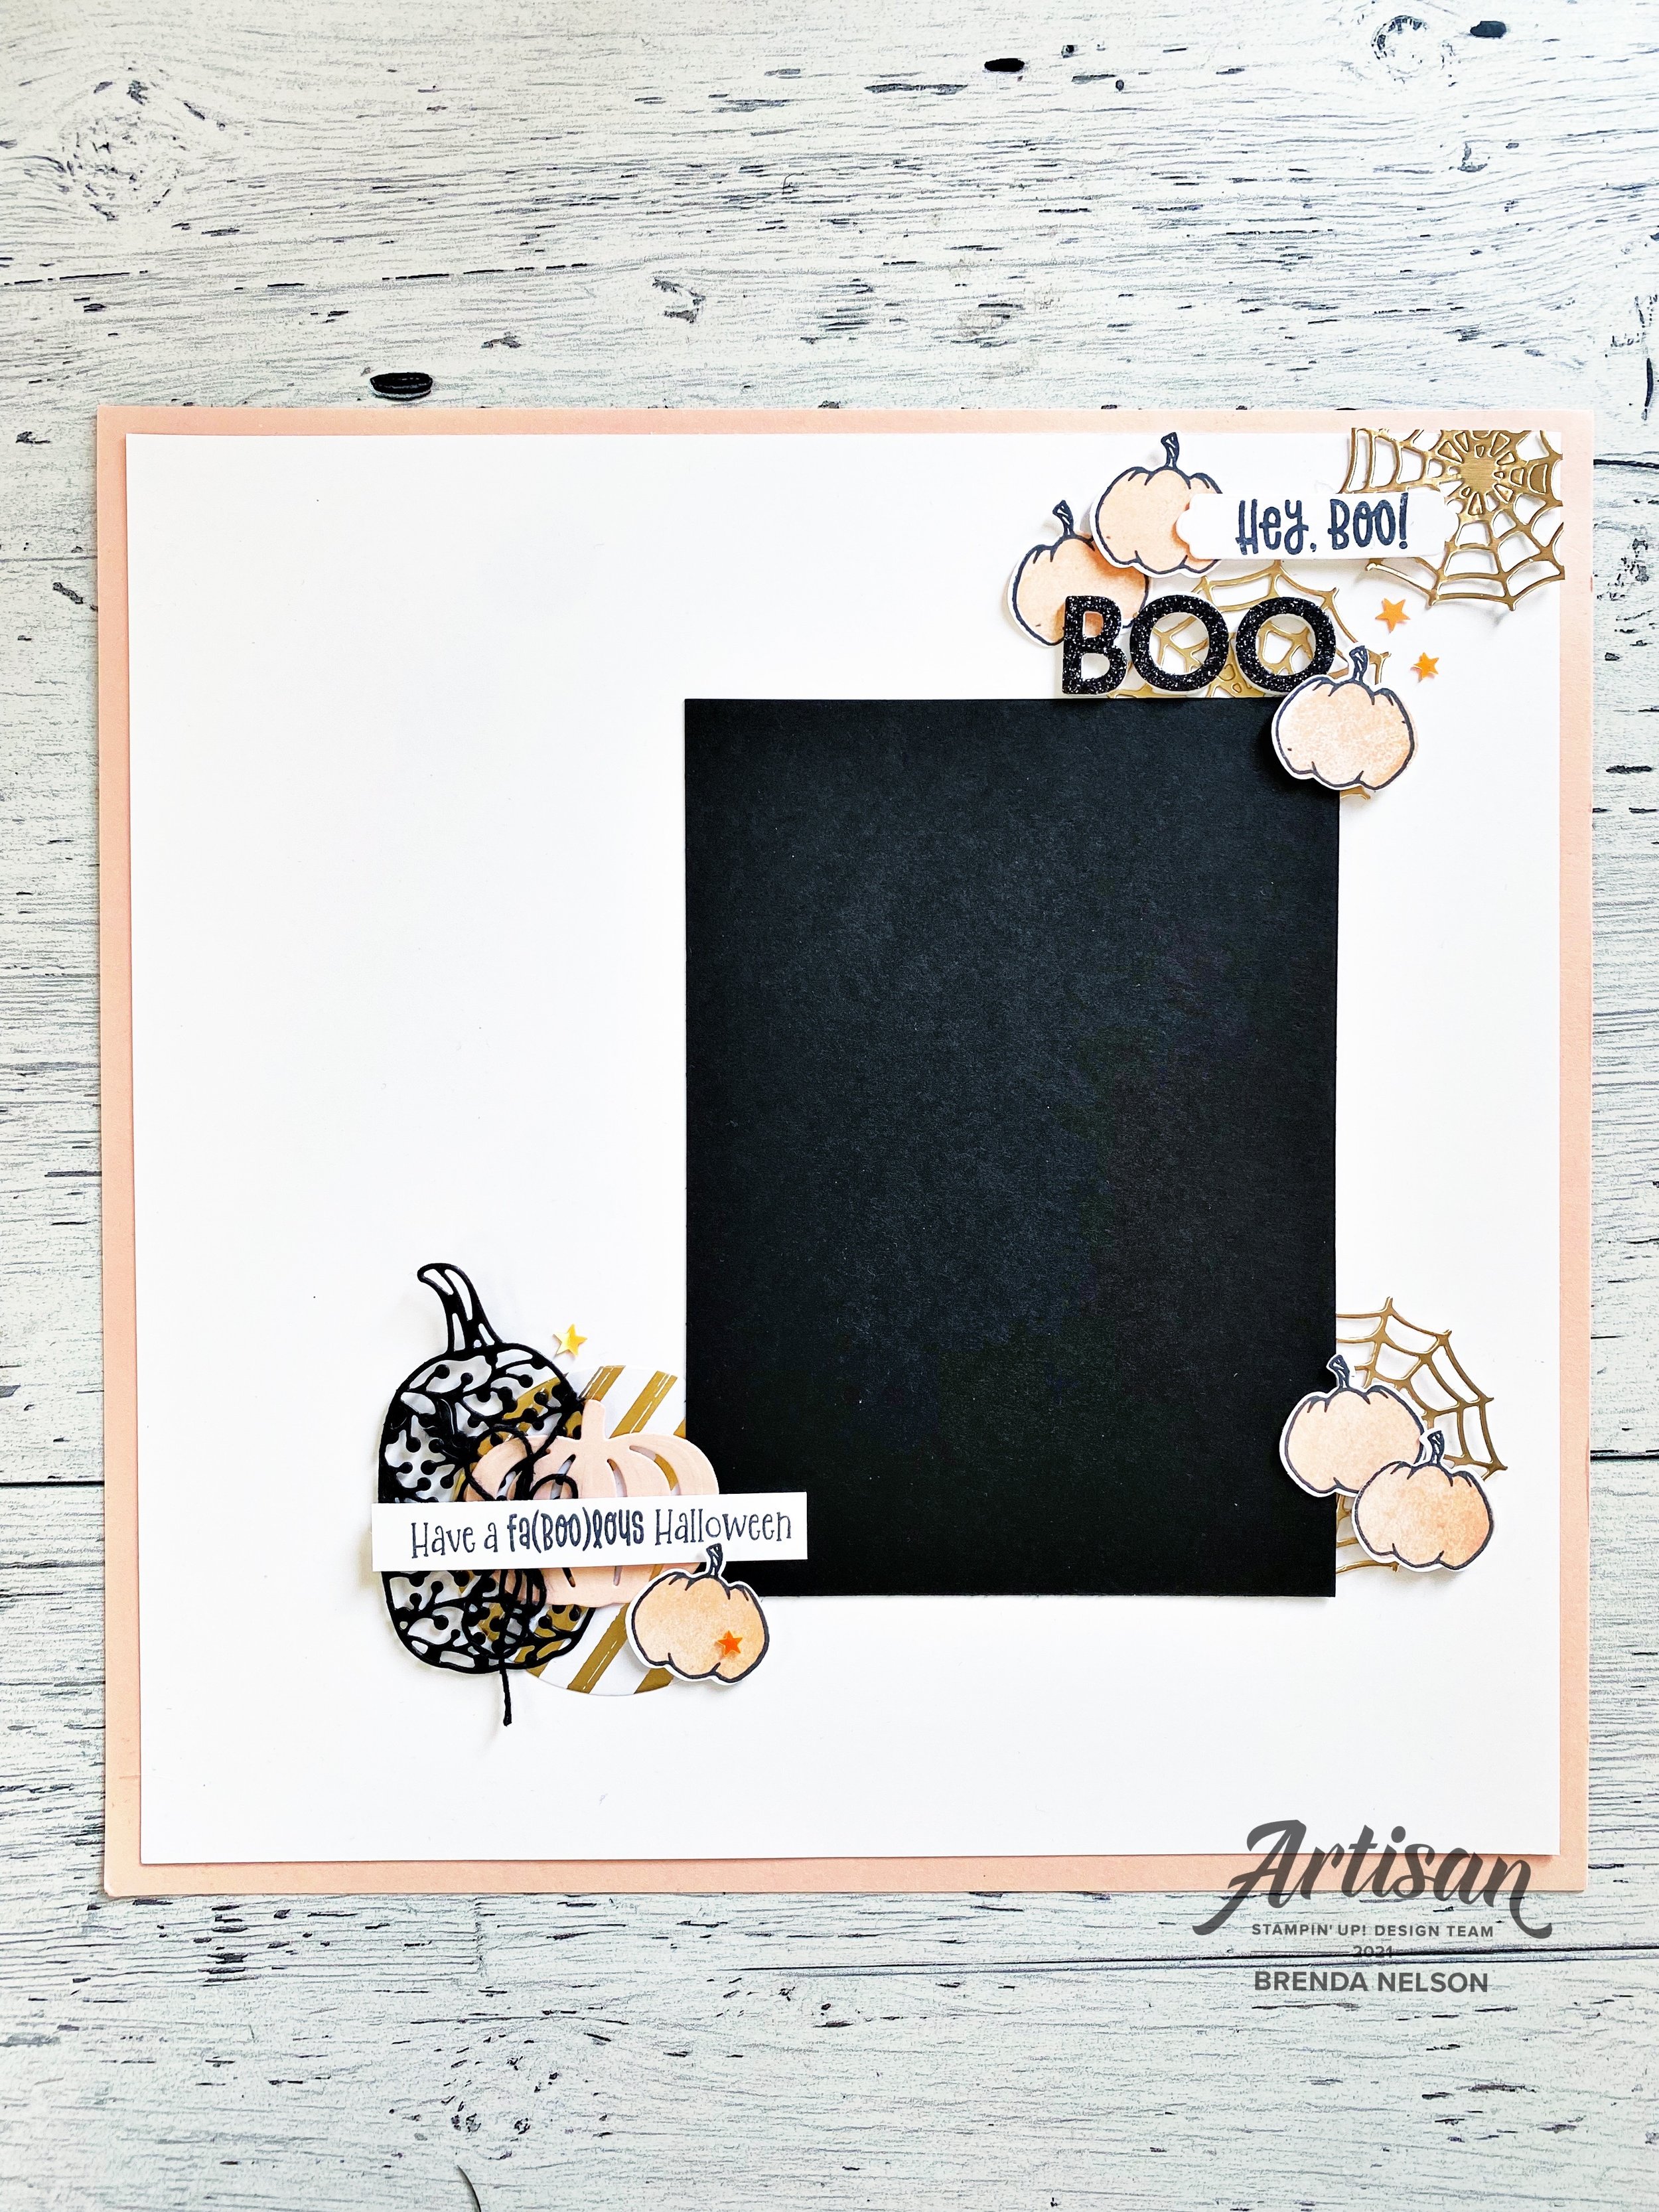
Here is a Halloween scrapbook page with a twist! Who doesn’t love the sophisticated colors of pink and gold? I decided to use them here for a unique color palette for this scrapbook page!

final (4) 6.jpg

I started with a base of Petal Pink card stock in 12x12 and added a layer of Basic White over top. There is actually no background stamping on this page, which is a little unusual for me! I let amazing dies do all the work to bring this page to life!

I used the stamp set Cutest Halloween for my pink pumpkins and the sentiments “Hey Boo” and “Have a fab(boo)lous Halloween”. I thought they were the perfect sentiments for this page.


I love this fun little area or vignette on the top right of my page. I used the Brushed Metallic Cardstock and the Frightful Tags Dies to cut out the spider webs and I love that they are incomplete webs—meaning you don’t see a full web.

Hey Boo! is cut using one of the label dies from the Seasonal Labels Dies.

Boo is cut from our Black Glitter Paper, Foam Adhesive Sheets and the Playful Alphabet Dies.

I also added a few of the Cute Stars Adhesive-Backed Sequins as an extra fun embellishment!

final (5) 4.jpg

The pumpkin outline is stamped with Momento Ink and filled in with the Petal Pink ink. You can punch these out using the coordinating Halloween Punch! One is added flat to the page and the other two are elevated with Dimensionals. I think this whole little area has so much texture and interest to it!

final (1) 16.jpg

For this bottom left little vignette I wanted the feel of an elegant pumpkin patch. I started with a large circle but from the Expressions in Ink Designer Series Paper and layered pumpkins from the Detailed Pumpkins Dies in Basic Black and Petal Pink. Of course you want to tie in elements on your page together so I used another stamped pumpkin and some of the Cute Stars embellishments again.

The sentiment also has some black twine from the Bakers Twine Essentials Pack behind it as well. Have you noticed I love me some twine?

final (4) 6.jpg

I hope this page inspires you to create a scrapbook page with colors that you don’t normally associate with Halloween! I absolutely LOVE how it turned out and I can’t wait to add a picture to this page after this years festivities!

If my design has inspired you, please consider shopping with me if you live in Canada! I would love to keep doing what I love!
Color Fusers--October Blog Hop!

Hello friends! Welcome to the most SPOOKTACULAR month of the year! Our Color Fusers Blog Hop this month is featuring the color combo of Just Jade, Evening Evergreen and Cajun Craze and it was a good challenge to create a Halloween Project—since that is the theme of my blog this month!

colorfusers oct.jpeg

The project I created to share this month is a mashup of the Detailed Pumpkins Dies, the Adorning Designs Decorative Masks and the Banner Year stamp set. All of these elements came together to create a unique Halloween card!

final (1) 7.jpg

I started with a card base of Just Jade and used one of the masks or stencils with my Just Jade ink pad and Blending Brush to create a fun tone on tone design on my card front. I also angled the mask so that it was a diagonal for something a little bit different!

I cut a thin strip of Evening Evergreen card stock and attached it following this diagonal to bring more attention to that detail. After I stamped out the sentiment, Happy Haunting (in Evening Evergreen ink) I used the same stencil over top with Just Jade ink. This is a really fun way to jazz up your sentiments and to blend these two greens together. I added some retired Cajun Craze Twine (I seriously need to quit being a hoarder) and some of the new awesome Chevron Evening Evergreen Ribbon behind the sentiment.

final (4) 5.jpg

The two Cajun Craze pumpkins are from the Detailed Pumpkins Dies. Both of the dies, in their original form, have area that you can ‘see’ through. I wanted my big pumpkin to be more solid so I glued it to another piece of Cajun Craze card stock and then trimmed around the edges with my paper snips!

final (1) 8.jpg

Bling makes everything better of course, so I couldn’t resist adding some In Color Jewels in Evening Evergreen for a little sparkle!

If you are just joining our awesome hop here you can go back to see what my fellow Artisan Design Team member, Tami Hewlett, has designed or you can keep going forward and loop around. Next up on the hop is the amazing Melanie Hockin!!! Whatever route you take I hope you visit everyone along the way!

Color Fusers--September Blog Hop

Well hello there! It has been a hot minute…and I am happy to say that I am back! I took a little blog siesta to enjoy the summer and work on some other things! So I am happy to be back especially with the Color Fusers as I absolutely LOVE this monthly creative challenge. I am always excited to try and created with different color combos as I find I do tend to get stuck in a rut sometime. This month our challenge was to use Basic White, Basic Black and a color of our choice…immediately I thought of Halloween! How can you not? It is the best holiday ever!

color fusers september.jpeg
Are you someone who gives crafty gifts at Halloween? I love a good reason to give candy and my kids teachers definitely have been spoiled over the years with some fun gifts! What I am loving this season—these Kraft Gift Boxes!

Are you someone who gives crafty gifts at Halloween? I love a good reason to give candy and my kids teachers definitely have been spoiled over the years with some fun gifts! What I am loving this season—these Kraft Gift Boxes!

So I may have cheated a little bit by using this Kraft Gift Box for my project…but really, its a non color? Haha, and I really focused on Basic Black for that spooky Halloween feel. I left my Basic White minimal and only added in some Pumpkin Pie cardstock to die cut my pumpkin.

final (10) 3.jpg

If you haven’t assembled a Kraft Gift Box yet, it does come with some pre-sticky tabs, however I always want to keep a box reusable in a sense. By creating a belly band for your box it means you don’t have to add any permanent adhesive to your project. And who can resist a sparkly belly band!

I cut a 2 x 12 inch strip of the Black 12x12 Glitter Paper and shaped it around the box. I also don’t want this to be permanently glued to the Kraft Gift Box so I cut a long length of the Crinkled Seam Binding Ribbon. Using my Black Stampin’ Blend I colored the ribbon. I honestly hope this ribbon never retires as it really like having access to all of our colors as you can customize it using our Stampin’ Blends, a Stampin’ Write Marker or even with a Blending Brush and an ink pad! Its fabulous!

I die cut two black wreaths using the Seasonal Swirls Dies and off set them from each other using Glue Dots. The pumpkin is die cut from the Detailed Pumpkins Die and added on with a Dimensional. The sentiment is from the Sparkle of the Season stamp set but is cut with a label die from the Frightful Tags Dies.

final (13) 2.jpg

I am absolutely loving the Frightful Tags Dies, in fact, I don’t even bother putting them away as I keep reaching for them! The spider web is the perfect Halloween image and I have been using it on so many things already! In this case I decided to cut one in half and use each half to peek out at the top and the bottom of the project. I thought it was a really fun edition to this!

Now here is the real question…who actually eats Candy Corn? I mean, enough people must that they keep making it every year! Haha! I thought it was a fun filler for this Kraft Gift Box AND it matched my color scheme!

I am super curious to see how the rest of the team used this color combo! I am always so inspired by what everyone makes!