12 Days of Christmas--Day 8!

Hi friends! So happy you are here and hop you have been following along each day so far!

My card for sharing today is super cute, if I don’t say so myself! It features the Sending Cheer Bundle and the Merry Bold & Bright DSP for a super fun cheery Holiday Card!

The base and first layer are Poppy Parade and then I added a square of the ‘Falalalala’ DSP and a torn strip of the star pattern from the Merry Bright & Bold collection. This is a fun way to create a bit of a peek a boo element and use some of our fabulous DSP #usethatstash!

The tag is cut from the Sending Cheer Dies in Coastal Cabana and I added a bit of the White Iridescent Ribbon (cut in half) through the tab. Its secured with a little bow of Linen Thread.


I found the best color for stamping the gingerbread man was Pecan Pie. I am so happy we have this awesome color!

The present is also stamped but the ribbon/bow is actually a die cut in Granny Apple Green card stock.

The sentiment is in Daffodil Delight and then just hand trimmed to fit the card. I few Iridescent Adhesive Backed Disks and this fun little card was complete!

I am excited to see what Melanie has crafted up to share today! Please feel free to leave us both encouraging comments!

If this adorable card has inspired you, please consider shopping my online store! It really helps me love what I do!

12 Days of Christmas--Day 7!

Hello friends! And welcome back to Day 7 of 12 Days of Christmas with myself and Melanie @melsinkyfingers! Really, you are getting 24 awesome projects for inspiration!

Today I have something fun and on trend to share with you—some cards made with the Stack Cut & Shuffle technique! It is so fun and such a great way to use our amazing Designer Series Paper!

To create these cards using the Stack Cut & Shuffle technique you will need 3 standard card bases. I cut my bases to be the ‘tent’ style option of 4 1/4 x 11 (score at 5 1/5). I decided to keep my card bases all uniform, although you certainly could mix up the base colors.

You also need a base layer that is 4 x 5 1/4 —for all 3 of my cards, I used Basic White.

Your DSP layers are 3 3/4 x 5—-you can choose 3 different DSP’s and mix and match for endless possibilities.

The idea is you ‘stack’ your DSP, cut once and mix up the patterns, layering them down almost like putting a puzzle together! This particular method of Stack Cut & Shuffle is great because you can just start along the 3 3/4 inch side, angle your DSP outwards towards the right and cut.

TIP: Start with the 3 3/4 side rough along the 1 inch mark and angle the bottom right corner out. This piece stays as is.

The second piece, which is a bit larger, can be cut from the bottom left corner through the middle

I decided to cut the large tree from the Merriest Trees dies and stamp some little stars on top for two of the three cards.

The light bulb stamp is from the Merry & Bright bundle as are the little stars and the sentiment on each of the cards, ‘Oh, What Fun!’

I think these two bundles work so well together!

The fun, bright and cherry DSP is from Merry Bold & Bright.

For the third card option, I cut the large tree from Shaded Spruce and ran it through one of the 3D Basics Embossing Folders for a bit of texture.

Each one of the cards uses some ribbon behind the sentiment as well for a little extra touch.

TOP TIP: The Holographic Trio paper in the Annual Catalogue is perfect for making toppers for the light bulbs!

If you haven’t given this fun technique a try, you really should! It is easier than it looks and quite a bit of fun to mix and match up the DSP pieces to create some unique cards!

I can’t wait to see what Melanie is sharing with you today! Make sure to check back tomorrow and each day until Nov 12th!

If my projects have inspired you, please consider shopping my online store!

12 Days of Christmas--Day 6!

Happy mid-point friends! If you have been following along so far, thank you so much! If you are just joining today, make sure to go back and see what you have missed from myself and Melanie @melsinkyfingers

Switching gears a little bit today—I mean I LOVE card but I also like to use my supplies in other ways. My friend Cindy Schuster shared a version of this project a while back and I fell in love! THIS is what I love about our Stampin’ community! Sharing and inspiring each other!

Cindy’s original project had a photo in the center and was a bit of a different color scheme. I liked the idea to be a tag for a gift bag or box or something pretty to hang on your tree.

I started with the Christmas Classics Dies—truly, they are a must have! You should definitely #addtocart if you have not already!

I started with a base of Shaded Spruce for the main panel. I added the another layer with a different die from the set, cut in Basic Black. I love how I was able to incorporate black into this design by using the Black & Very Vanilla Large Check Ribbon as the hanger.

I added a panel/square of DSP from the Joy of Christmas collection. Using Very Vanilla as a base I stamped the large image from the Joy of Noel stamp set in Memento ink and used the ‘lazy watercoloring’ method to color the image in Shaded Spruce and Cherry Cobbler ink.

Once done coloring with the Shaded Spruce and my Water Painter, I flicked it across the background. I could not love it more!

The shape is die cut using the Classic Christmas dies. Fun FACT: I also cut a back piece to cover up and finish off the back of this piece using the same die in Shaded Spruce. This way if the project gets flipped on its back, it has a more professional finished feel.

Joyous is stamped with White Craft Ink and embossed. I fussy cut it out with snips and added it with a couple Mini Dimensionals.

My intention with sharing this project is that you are inspired to use your supplies for MORE than just cards! Who would not love to have this hanging off of their gift?

What does Melanie have to share today? Let’s head on over to check it out!

Please consider shopping my store if you are thinking you want to make these too for your family and friends! You order allows me to keep doing what I love! Thank you in advance!

12 Days of Christmas--Day 5!

5 Days down friends—we are almost halfway through 12 Days of Christmas! I have so many great things to share, its almost hard to decide!

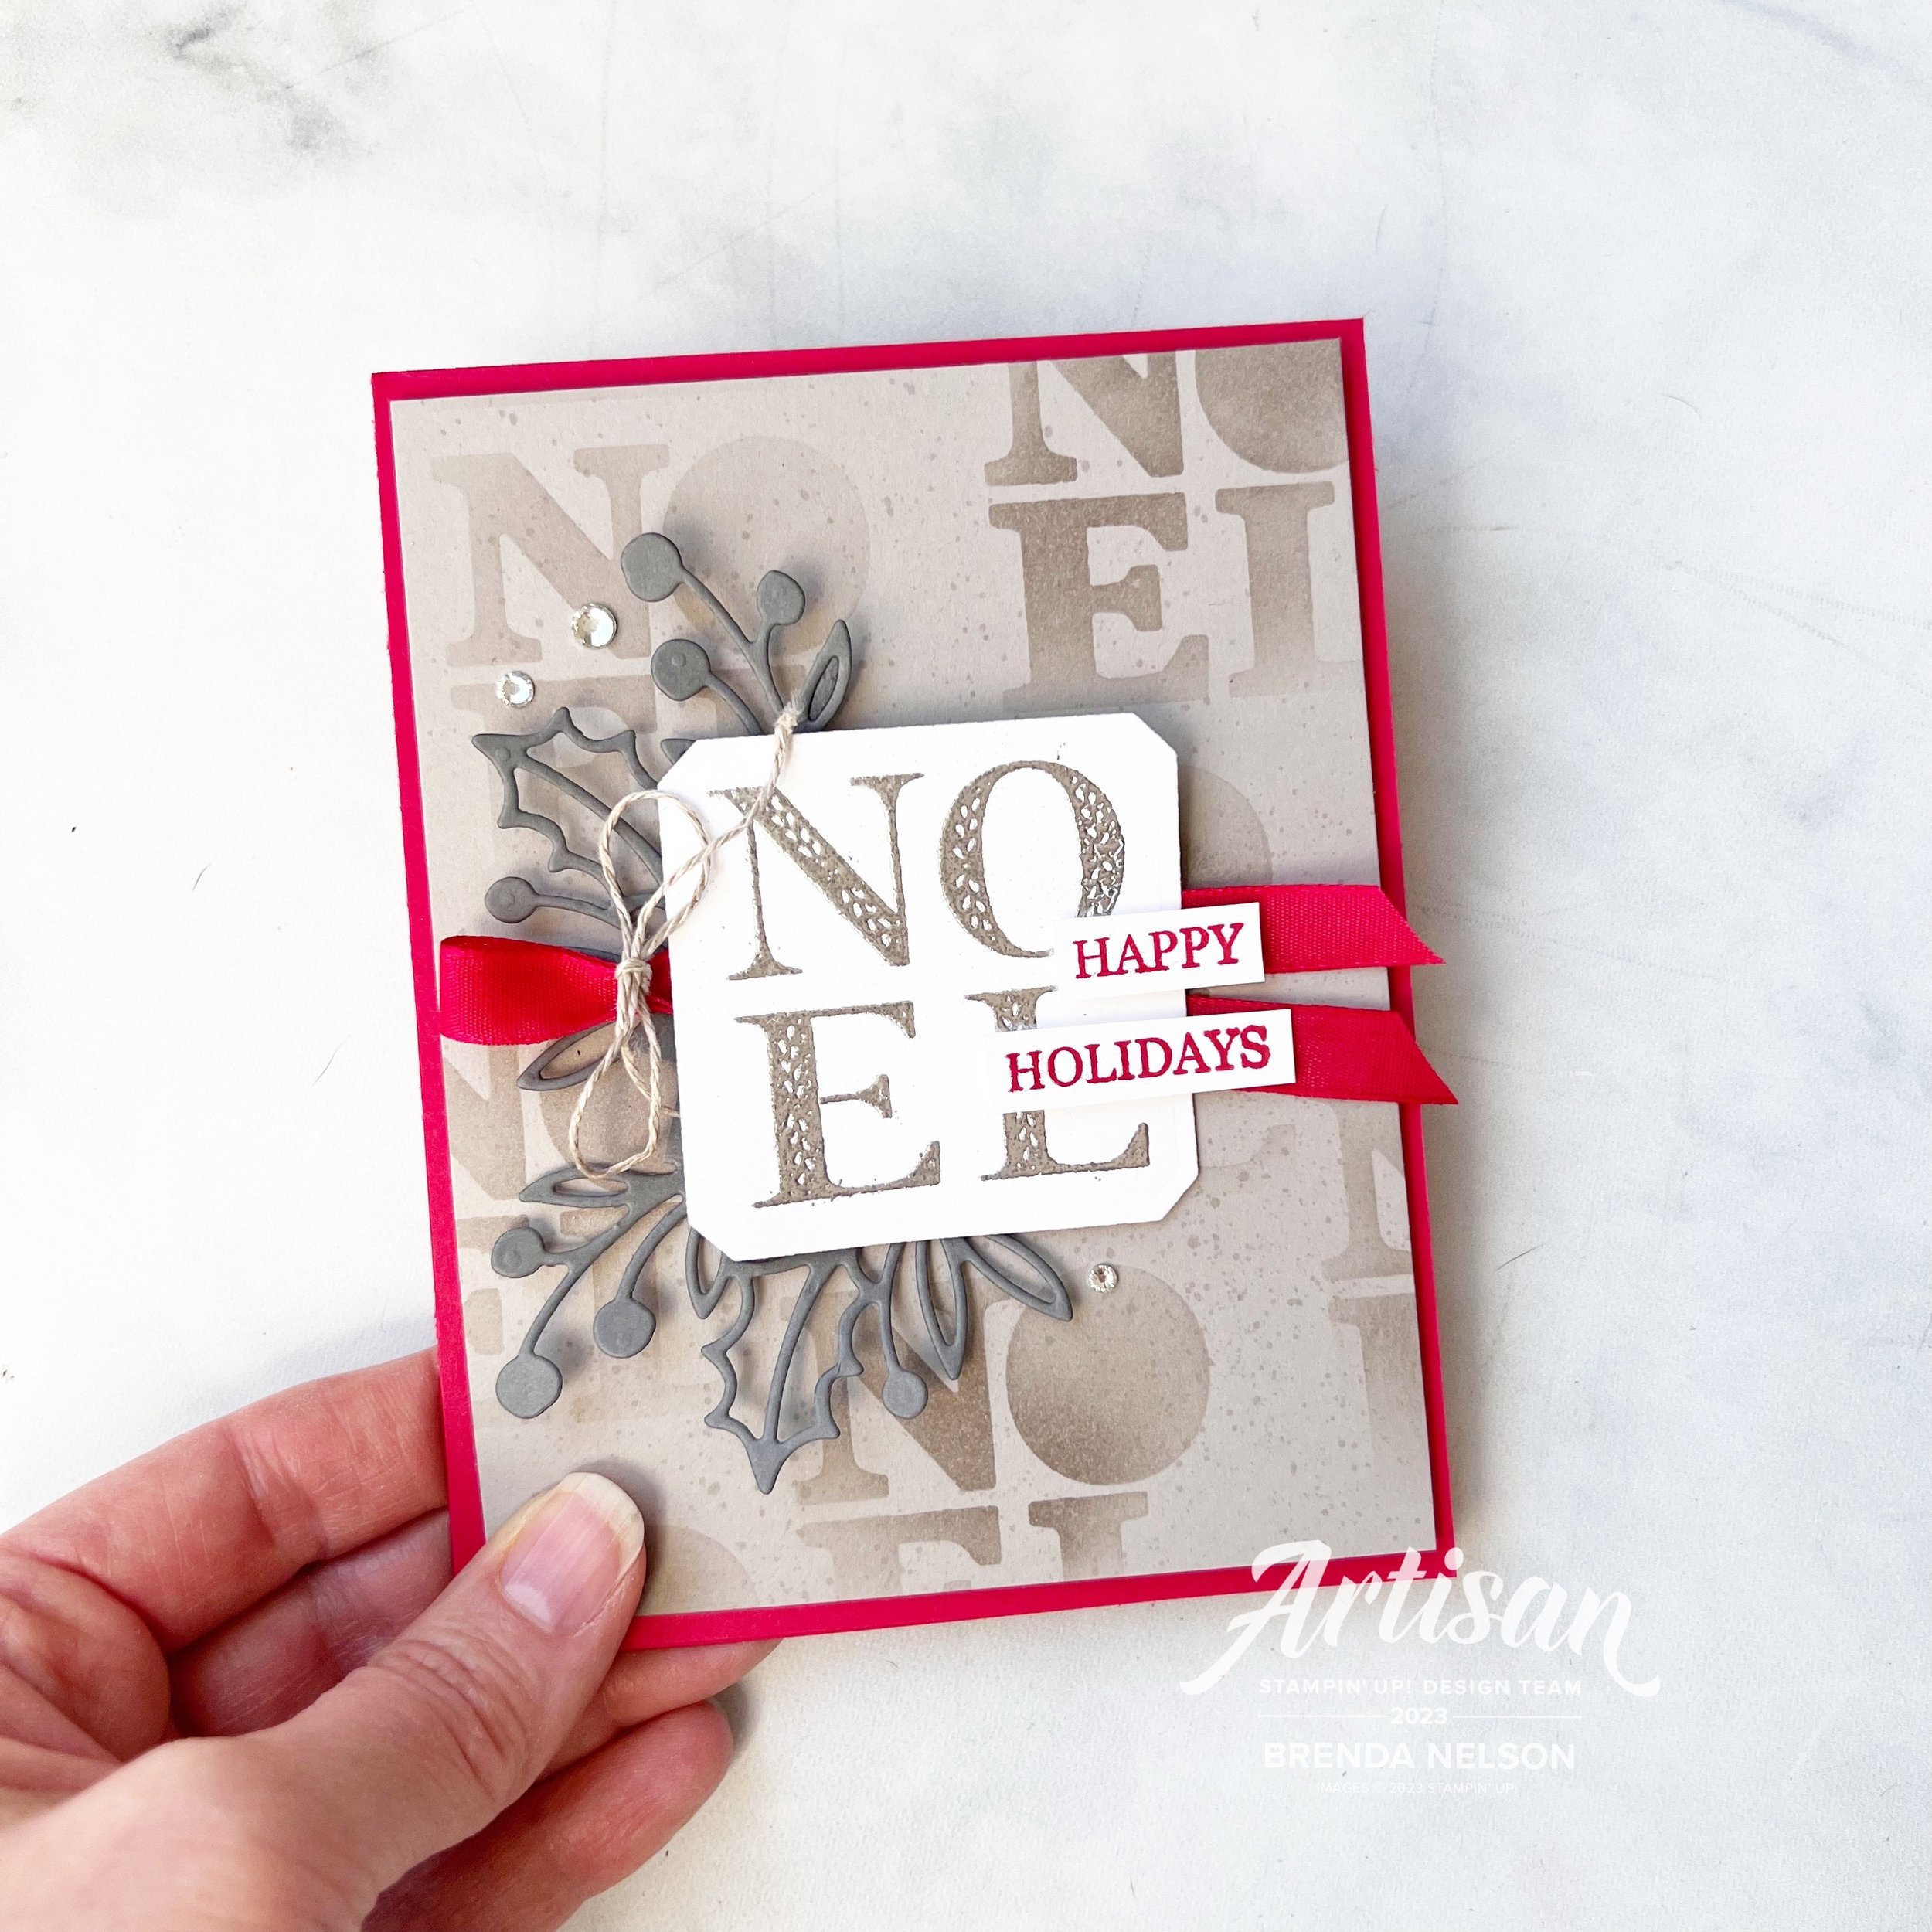
Today’s project might send you to look back at my FIRST card that I shared during 12 Days of Christmas. Remember the ‘Noel’ on my card? Well it gave me the idea to use the negative image as a stencil. Check this out!

The base of my card is Real Red and my first layer is Grey Granite. I used the ‘stencil’ of the work NOEL to create this fun background for my card with Grey Granite ink and a small Blending Brush. I then used a Grey Granite Stampin’ Blend to do a little flicking on the background. Just another easy way to add interest and texture!


To play off the grey tone in the background, I stamped Noel in Versamark and covered it with Silver Embossing Powder. Noel can be found in the Joy of Noel stamp set. However, Noel is die cut using the Christmas Classics dies. I love this square die with the nipped corners. I appreciate that it elevates this basic shape!

Behind the Noel I layered some more retired ribbon—let’s #useourstash friends. We all love new, but we all have retired too right?

‘Happy Holidays’ is from the Classic Christmas stamp set and is stamped in Real Red to play off the card base and ribbon.

I used the Christmas Classics dies to cut the sprigs behind the sentiment in Basic Grey card stock. This die is actually intended to be used as a sentiment holder but I love to cut it up into two pieces and use it as an accent. I added a few Basic Rhinestones to finish off this card! I LOVE it!

I hope this card gives you inspiration to think about shapes that can act as stencils. The sky is the limit with our extensive die and punch options!

Melanie no doubt has a fantastic project to share with you today! Please go check out what she has created by clicking the image below!

Please consider shopping my online store if this project has inspired you to need any Stampin’ supplies. It allows me to continue to love what I do!

12 Days of Christmas--Day 4!

Hello my friends! Welcome back for another day of inspiration from myself and Melanie! We are so happy you are here!

Today I want to share a card that was inspired by a Creative Color Challenge from Stampin’ Up!—I love the colors of Bubble Bath, Fresh Freesia and Petal Pink together. And I am embarrassed to admit this was the first time I have used the Abundant Beauty Decorative Masks!

The base of my card is Fresh Freesia and the first layer is Bubble Bath. I used the snowflake stencil and the three mentioned ink pad colors. I love how soft and lovely this background is. Thank you SU for the inspiration!


I love the softness of the background so I knew the sentiment I picked also had to feel more feminine. I found the perfect fit with ‘Merry Christmas’ from the Stars at Night stamp set.

After stamping the sentiment I used two Deckled Circles to bring life to the sentiment. I added some retired ribbon behind #usethatstash and added a teeny heart on top of the linen thread from the new Bee Mine punch. This punch will be available in the upcoming Occasions Catalogue in the new year.

I added a few sequins from the Pastel Sequins Assortment on the top circle for a little bit of a different look.

I really enjoyed making this card and I think you could easily switch up the color palette and recreate this card in a variety of color combinations.

I am so excited to see what Melanie is going to share with us today!

Please shop my online store if you are inspired and need some supplies! Your support allows me to keep loving what I do!