Be Inspired Blog Hop-Holiday Time!

Hi friends! Welcome to the Be Inspired Blog Hop! We have added some new members to our monthly Blog Hop and I am so excited! So make sure you go and visit all of the wonderful projects being shared and leave us some happy comments!

The theme for our Hop this month is HOLIDAY TIME and of course that meant that I had to share something Christmas related in the form of a scrapbook page. As much as I love to make cards, I really do love to scrapbook as my first passion.

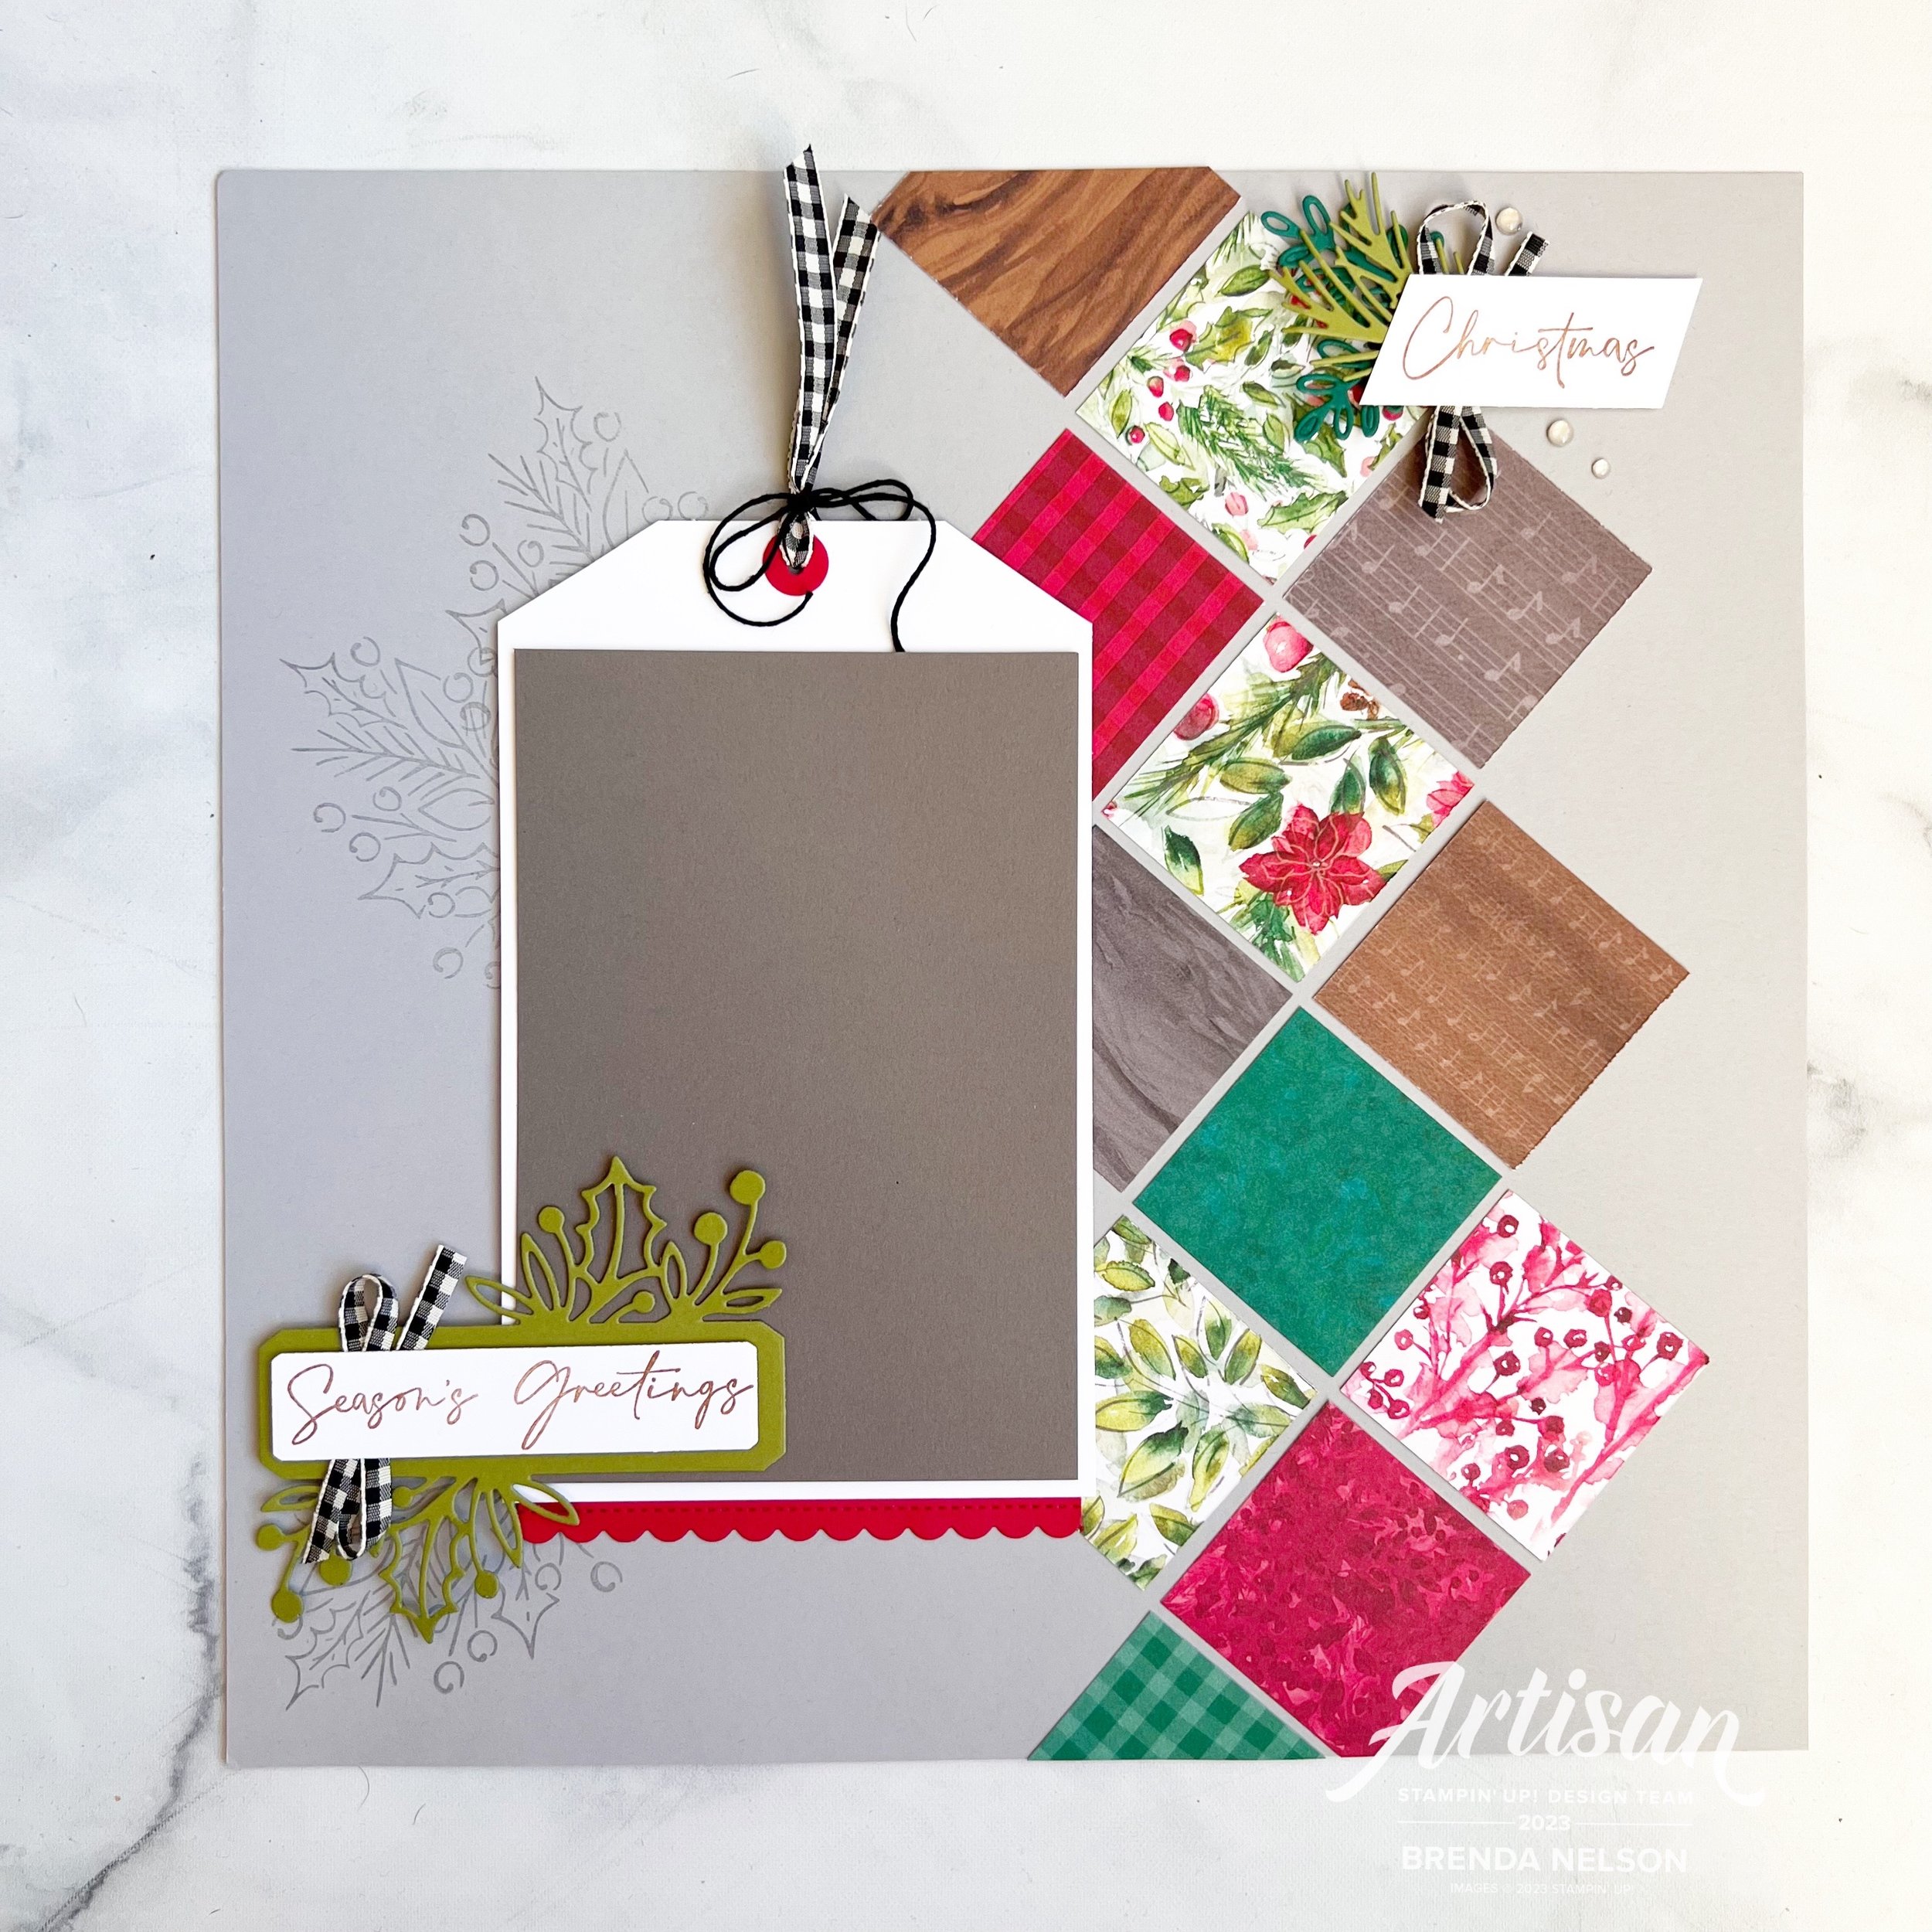
When thinking of Christmas I was thinking of gift tags so I decided to make an oversized gift tag as a photo mat, and I am so happy with how it turned out!

I cut my standard 4 1/4 x 6 1/4 photo mat in Pebbled Path—this color choice was a direct result of the Joy of Christmas DSP—I LOVE this paper! I love the unconventional use of grey and brown tones in with classic Christmas colors.

I cut the tag portion of my photo mat after gluing the Pebbled Path layer to some Basic White. I added a scallop border to the bottom with Real Red and some Black & Very Vanilla Gingham ribbon to the top portion.

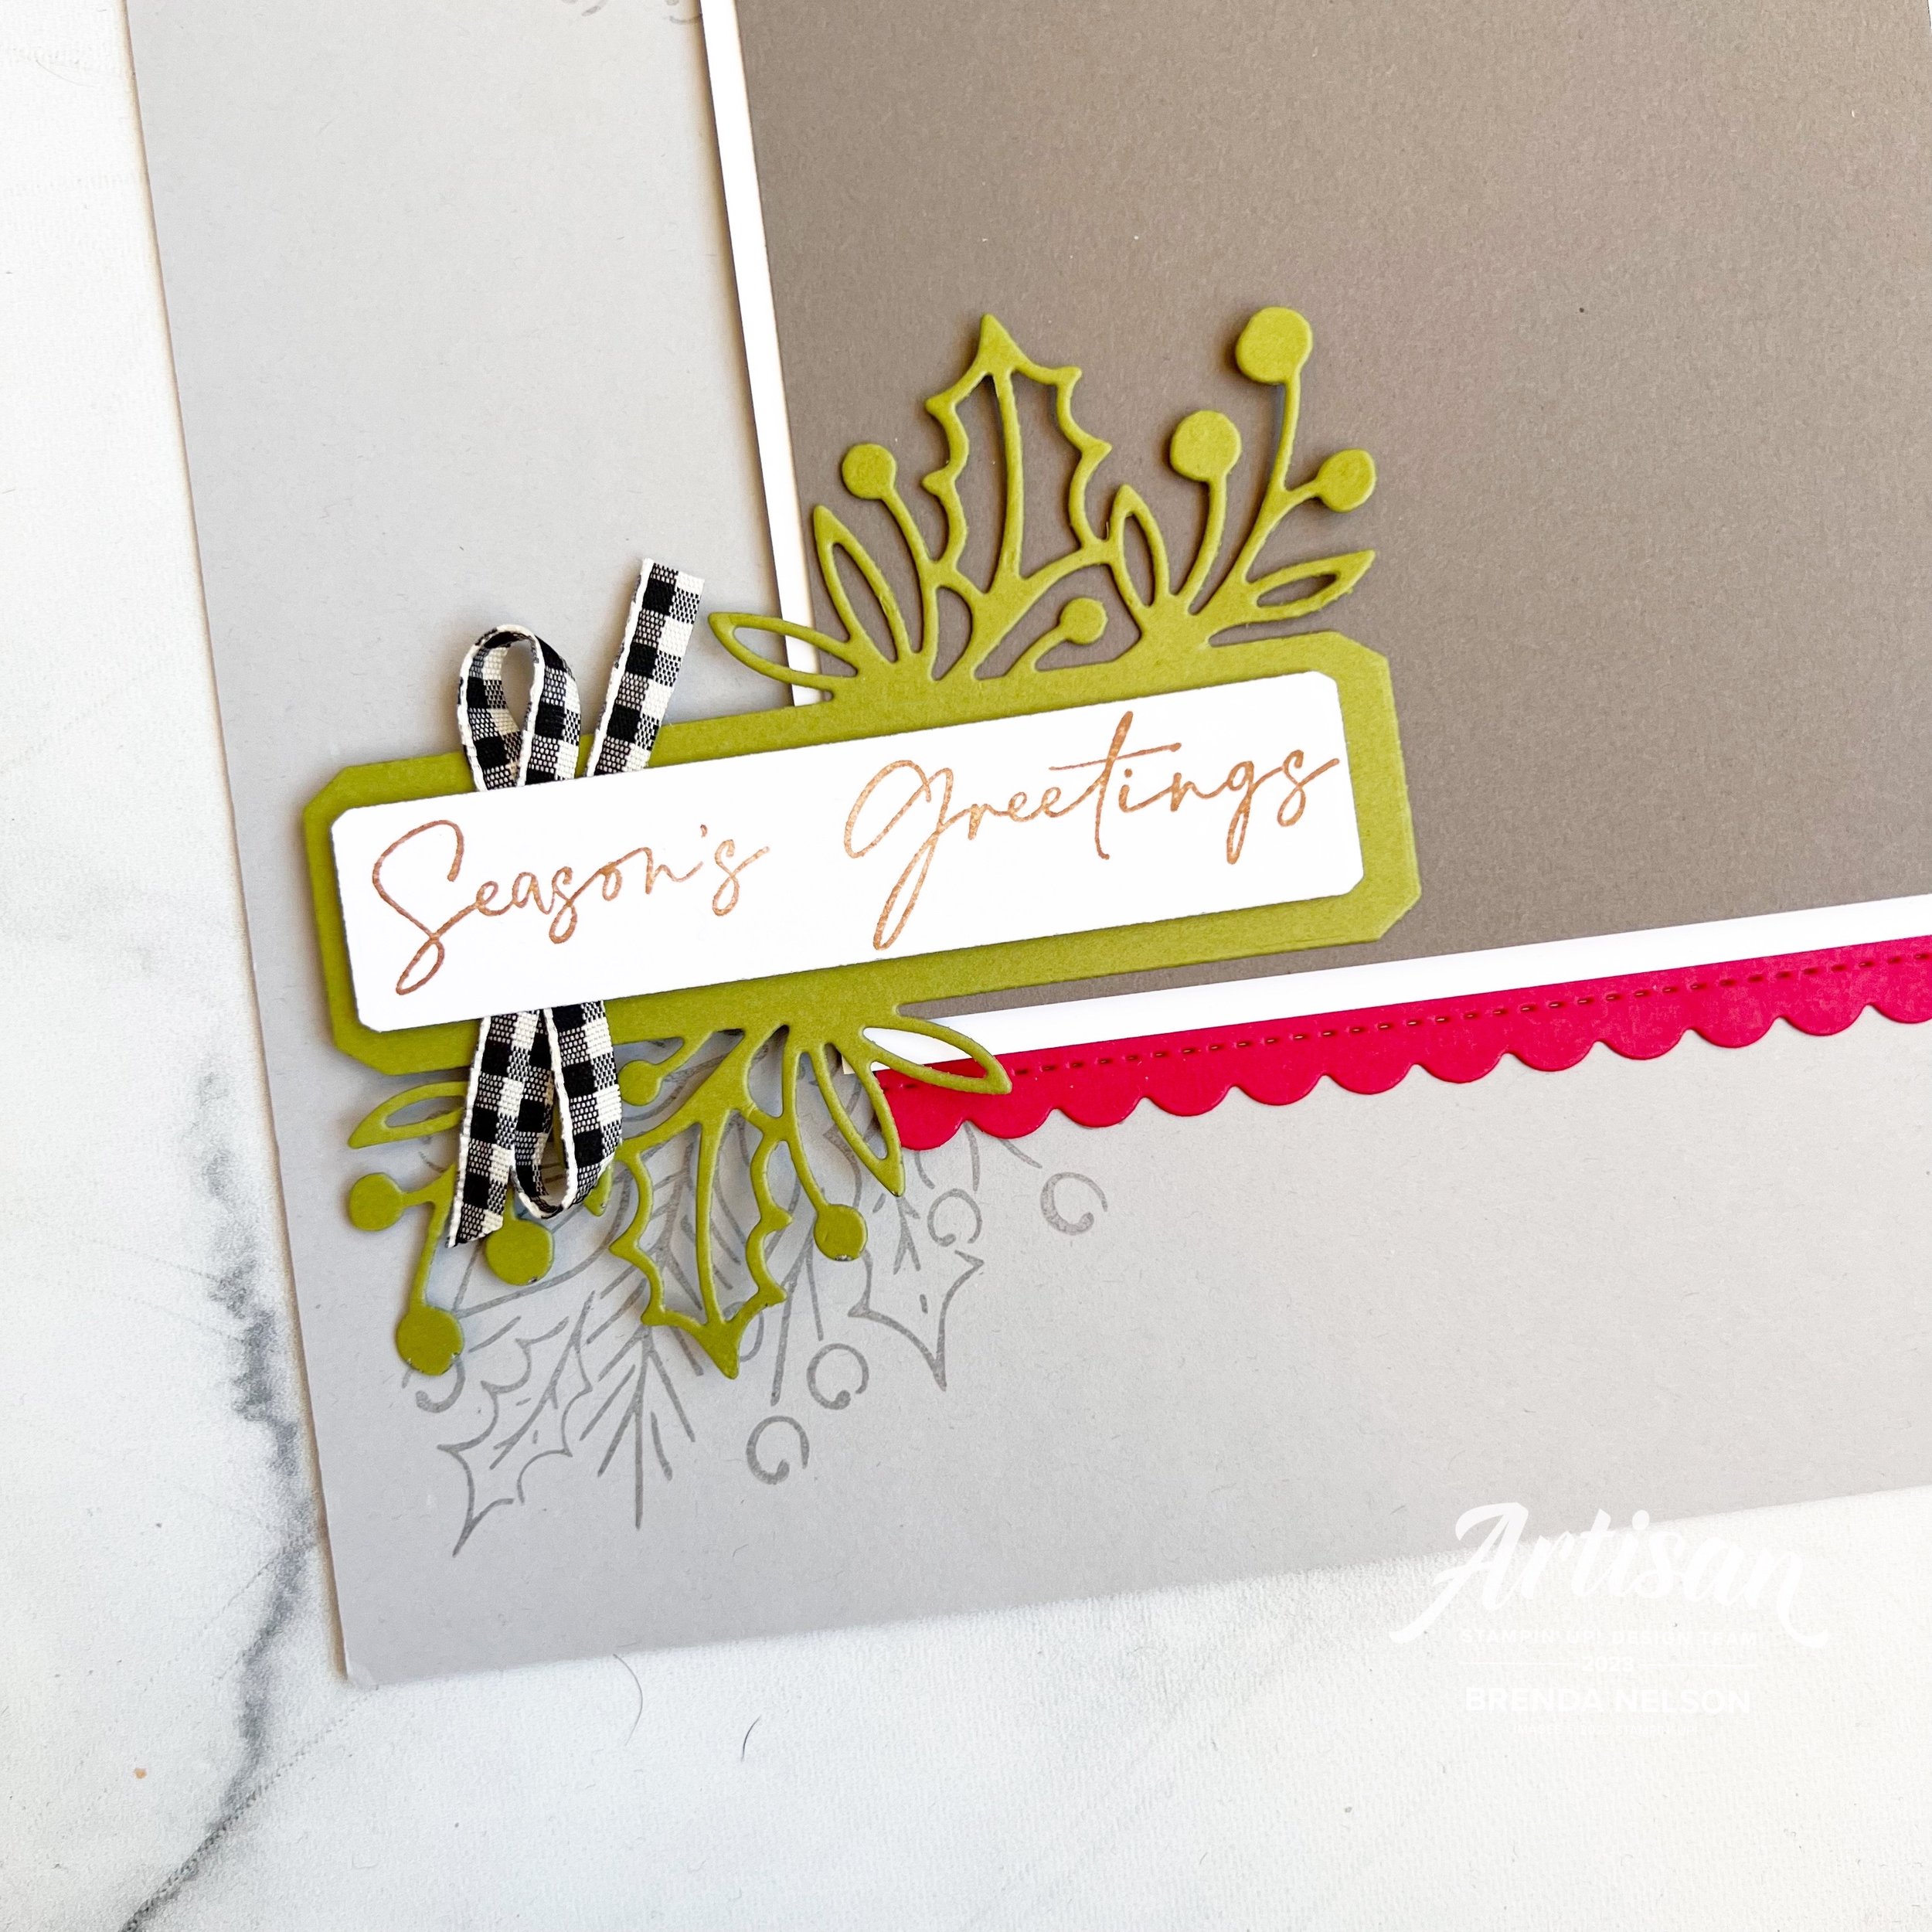
I used the Classic Christmas Dies to add in ‘ Season’s Greetings’, stamped in Pecan Pie ink. I used the large image from the Joy of Noel stamp set, to add some background stamping in Smoky Slate at is the base of my scrapbook layout.

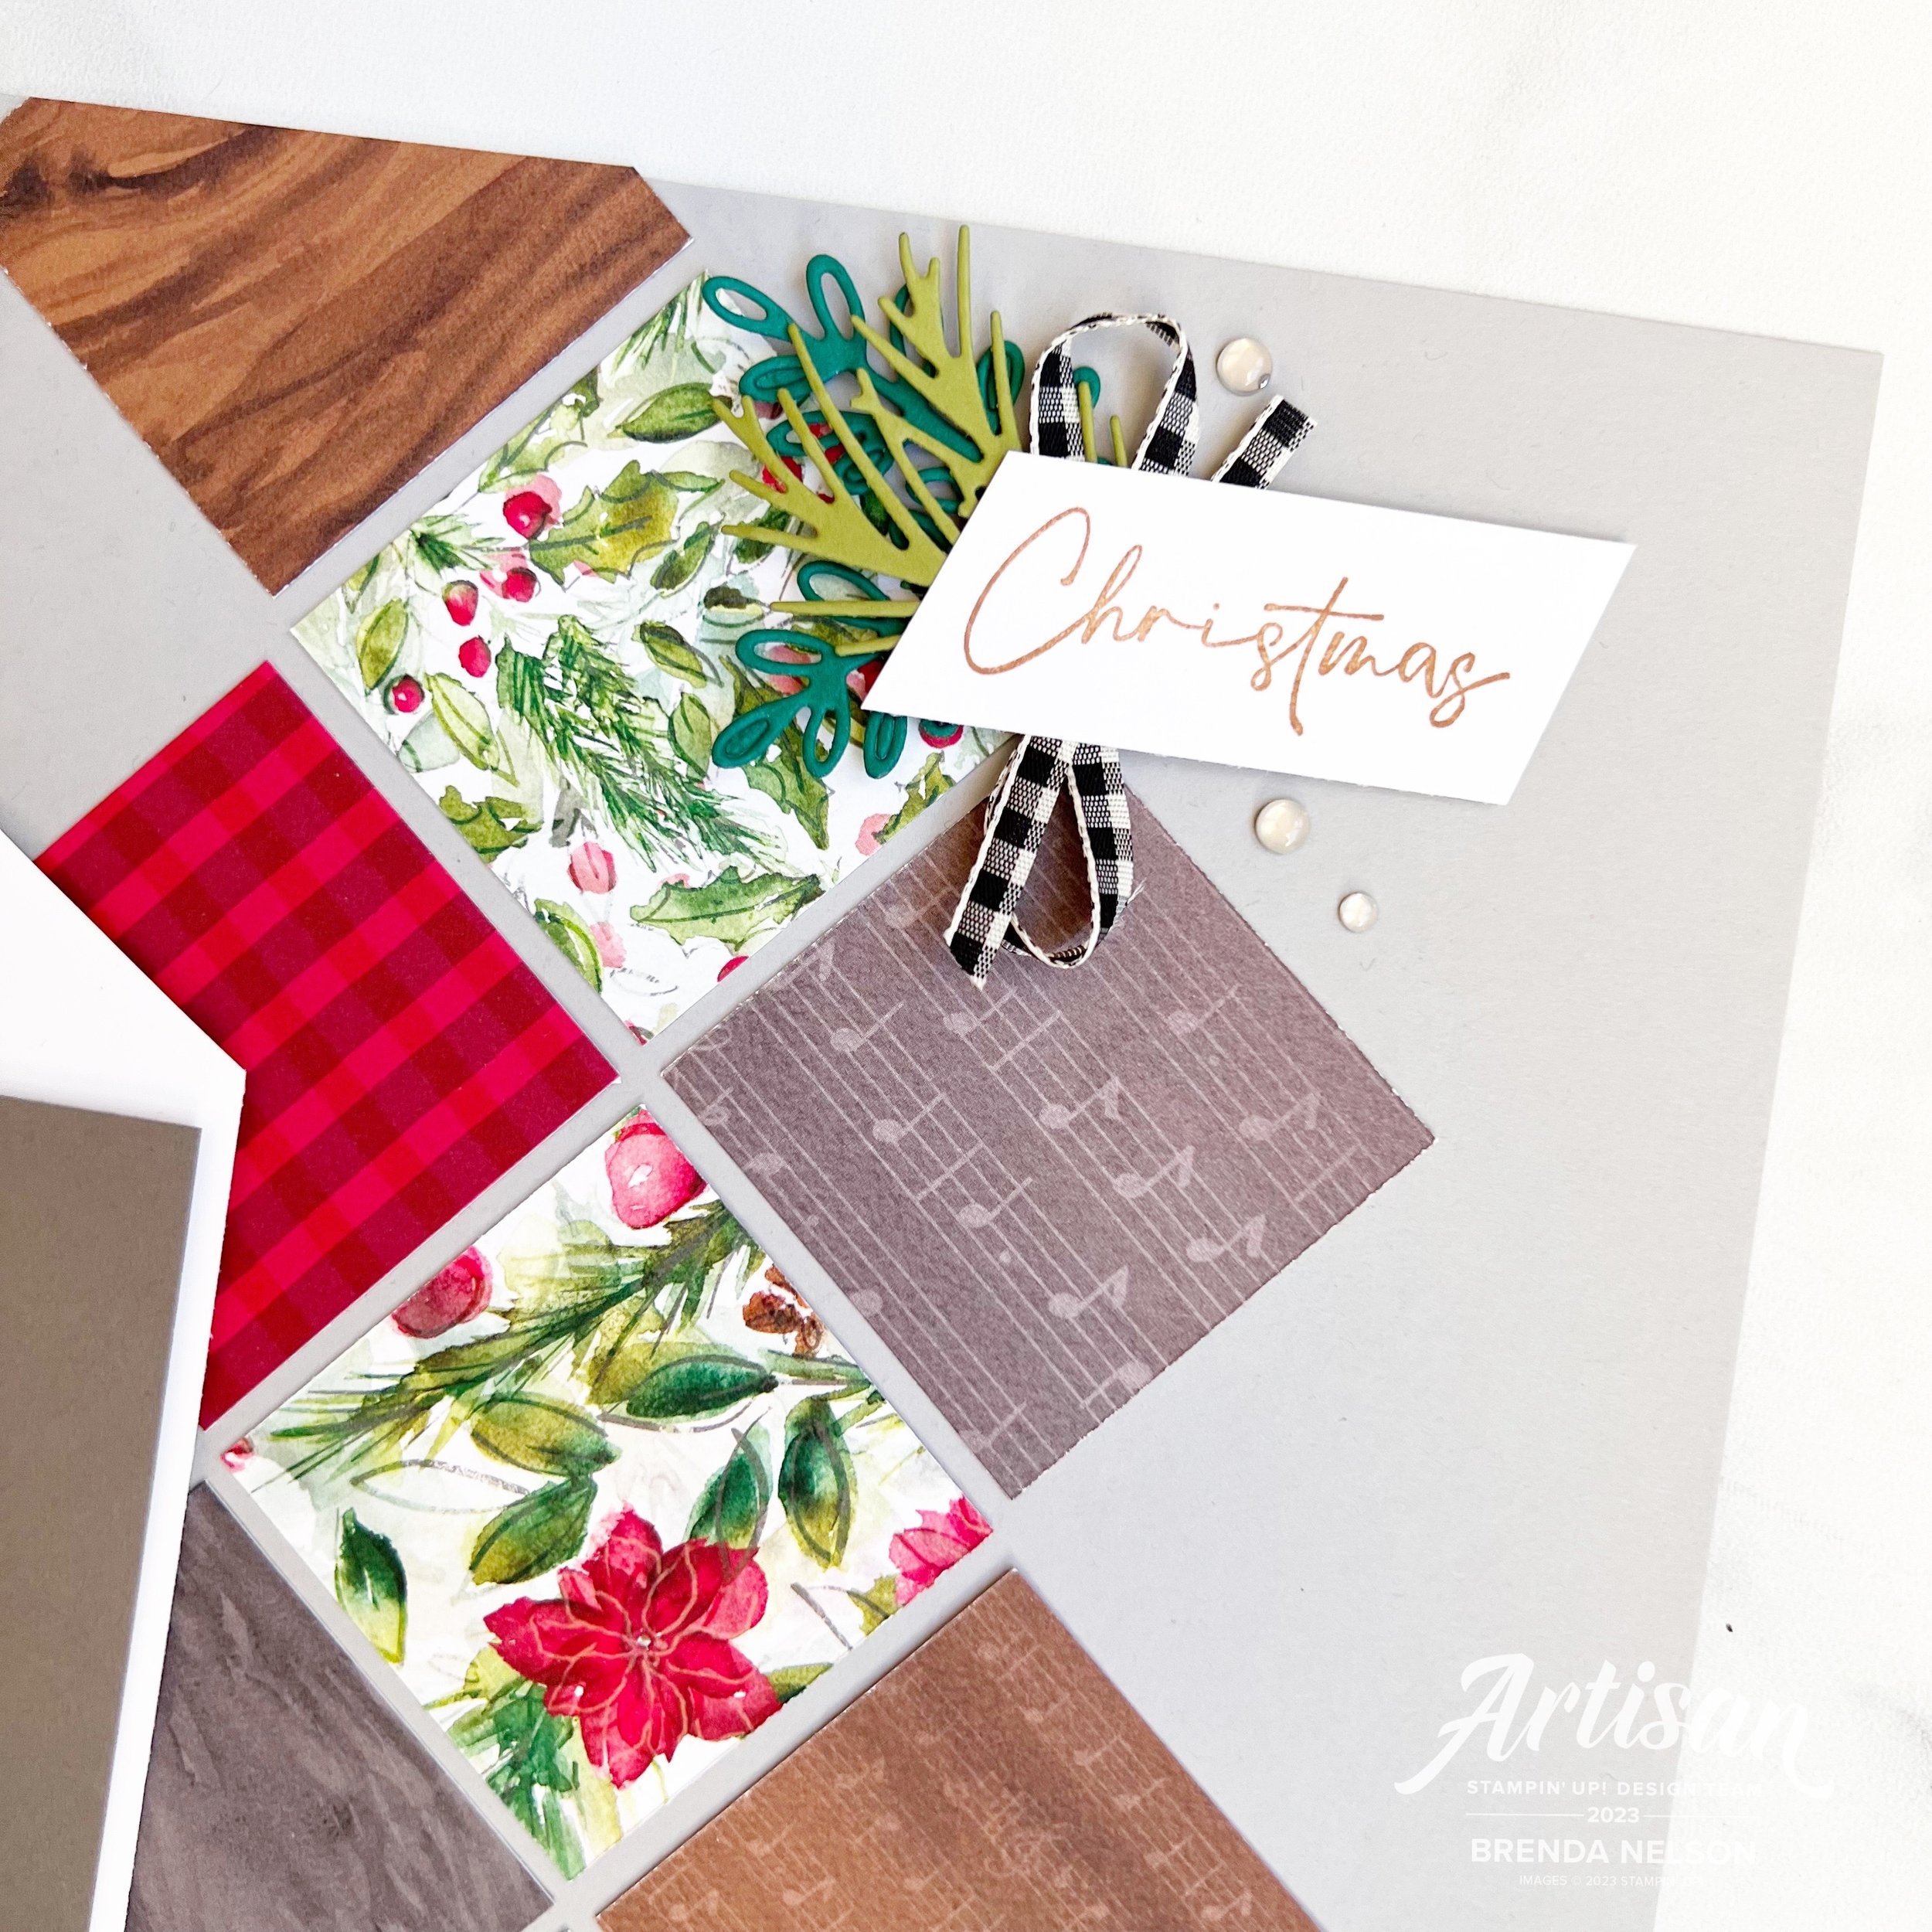
I cut a variety of 2x2 squares of the Joy of Christmas DSP to add in a diamond format to the base of my page. This is such a good way to highlight and incorporate DSP into your page designs.

It also gave my another opportunity to add a sentiment and I decided to focus on ‘Christmas’ also stamped in Pecan Pie ink for continuity. Some greenery in behind in Shaded Spruce and Old Olive helps tie in the color scheme found in the DSP.

I used a little more gingham ribbon behind both sentiments as well so that everything feels connected on the page.

I love how this page is a mix of modern with the grey tones and traditional with the red and greens. Its one of my favorite scrapbook pages I have made lately and I can’t wait to add a holiday photo to it!

I am so excited to see what the rest of the Be Inspired Blog Hop team has created with our theme of ‘Holiday Time’!

You can get to Janneke’s project by clicking the link below!

If my project has inspired you, please consider shopping my online store! You can do so by clicking any image below!

12 Days of Christmas--Day 6!

Happy mid-point friends! If you have been following along so far, thank you so much! If you are just joining today, make sure to go back and see what you have missed from myself and Melanie @melsinkyfingers

Switching gears a little bit today—I mean I LOVE card but I also like to use my supplies in other ways. My friend Cindy Schuster shared a version of this project a while back and I fell in love! THIS is what I love about our Stampin’ community! Sharing and inspiring each other!

Cindy’s original project had a photo in the center and was a bit of a different color scheme. I liked the idea to be a tag for a gift bag or box or something pretty to hang on your tree.

I started with the Christmas Classics Dies—truly, they are a must have! You should definitely #addtocart if you have not already!

I started with a base of Shaded Spruce for the main panel. I added the another layer with a different die from the set, cut in Basic Black. I love how I was able to incorporate black into this design by using the Black & Very Vanilla Large Check Ribbon as the hanger.

I added a panel/square of DSP from the Joy of Christmas collection. Using Very Vanilla as a base I stamped the large image from the Joy of Noel stamp set in Memento ink and used the ‘lazy watercoloring’ method to color the image in Shaded Spruce and Cherry Cobbler ink.

Once done coloring with the Shaded Spruce and my Water Painter, I flicked it across the background. I could not love it more!

The shape is die cut using the Classic Christmas dies. Fun FACT: I also cut a back piece to cover up and finish off the back of this piece using the same die in Shaded Spruce. This way if the project gets flipped on its back, it has a more professional finished feel.

Joyous is stamped with White Craft Ink and embossed. I fussy cut it out with snips and added it with a couple Mini Dimensionals.

My intention with sharing this project is that you are inspired to use your supplies for MORE than just cards! Who would not love to have this hanging off of their gift?

What does Melanie have to share today? Let’s head on over to check it out!

Please consider shopping my store if you are thinking you want to make these too for your family and friends! You order allows me to keep doing what I love! Thank you in advance!

12 Days of Christmas--Day 1!

Hello friends! I am so excited to welcome you back to our 2nd 12 Days of Christmas event! Melanie and I started this last year and have decided to make it a tradition! Each day for the next 12 days you can visit both of our blogs for some Holiday Inspiration! We plan on sharing some great card, project, 3 D and scrapbook inspiration with you!

Melanie and I finally got a chance to meet each other in person this past August when we attended Backstage (a leadership conference held by Stampin’ Up!) and here are a couple of my favorite pictures!

We went on a really awesome horseback ride in the desert and of course had to exchange some gifts with each other!

And here we are a few months later gearing up for the holidays!

It was actually really hard to decide what project to kick the 2023 edition of 12 Days of Christmas off with but I finally decided to share a card made with the Joy of Noel Bundle.

I decided to create a holiday card with a classic color palette of Real Red, Pecan Pie, some Old Olive on the ribbon and crisp Basic White.

I stamped the large image from the Joy of Noel stamp set in Real Red ink on the background/first layer. I colored in the Very Vanilla & Black Gingham ribbon with my Old Olive Blend Marker to give the ribbon a green hue. This is such an easy trick to incorporate or match a color to your project with the ribbon.

I thought it would be fun to use the negative image from NOEL as the focal point for this card. I layered it on top of a piece of DSP from the Joy of Christmas in the Pecan Pie music print using Dimensionals.

I cut the ribbon in half to. make a double bow to tuck in beside the NOEL and give the illusion of it being tied around the card. A few Neutrals sequins and this card was perfect!

I can’t wait to see what Melanie has created and I am looking forward to sharing some amazing things with you over the next 12 days! Click this image to visit Melanie’s blog—Mel’s Inky Fingers!

Creative Convention--Day 6!

Welcome back friends! I hope you are enjoying everything I am sharing so far! I have had some much fun preparing all of these “Creative Convention” project ideas for you in anticipation of the new upcoming Holiday Catalogue! We are getting so close to the happiest time of year (which is my world is Sept-Dec!)

My project for today is a card with a fun fold that I make EVERY SINGLE YEAR! Its just one of my go to favorites as its a great way to give a gift card inside or hide some money or even a flat little chocolate.

This project is a combo one that uses both of the stamp sets from the Joy of Christmas Suite collection!

I love how these bundles work together so that you can build off of each one of them and I do appreciate the traditional aspect of this suite. I knew I wanted to add the Shaded Spruce gingham pattern from the Joy of Christmas 12x12 paper so I decided to make the card base the same color.

This is a standard card that is scored at 4 1/4, and then you score one side at 1 1/4 to make the flap that folds down creating the ‘pocket’. I also rounded the pocket on the flap and base for a little extra touch.

I added a 2 1/4 x 5 1/4 layer of Shaded Spruce that I ran through the Exposed Brick 3D folder in the annual catalogue—if you do not have this folder you need #addtocart now as its awesome and works with SO MANY things!

Both the Joy of Noel and the Christmas Classics stamp sets are a part of a bundle and the Christmas Classics dies have all the labels and some greenery, while the Joy of Noel dies of the word ‘Noel’ and some larger greenery. I am going to say that you will just need them both, hahaha!

The fun part of this card for me is the greenery that you see emerging from the top and bottom of this fold. I die cut this shape, which is really designed to be a label with the greenery and I cut it in half!


I then tucked this greenery under the DSP on the right and under the flap more in the middle leftish.

I sealed the card with 2 staples that you don’t see, to make the pocket. The I sealed the flap down with some Dimensionls.

Sometimes to keep the card closed I will use twine or ribbon. However, this time I wanted the Pecan Pie ribbon to be more of an accent in between the layers of my sentiment.

The sentiment is stamped in Cherry Cobbler and then I used one of the large images from the Joy of Noel set to stamp some imagery behind the sentiment. I used Crumb Cake ink that I stamped off on my scratch paper (or grid paper) so that it would be faint. I added the sentiment onto of a 2 1/4 inch circle of DSP to bring in a few color just peeking from the outside ring.

Lastly I added some embellishments, Adhesive-Backed Star Trinkets, from the O Holy Night suite. I thought they were a more unique touch to this project than just a gold sequin or such.

I am really really pleased with how this card turned out and I will no doubt be sharing it at my upcoming ‘Joy of Christmas’ Virtual Stamp Camp/Retreat.

Joy of Christmas Stamp Camp —co hosted with Tricia Schaelow from @stampint—if you are not following her, please do!

When: Saturday, Oct 21 at 10:30 am on Zoom (which is awesome as anyone from Canada can join in the fun with us)

Fun Stuff: The stamp camp is $75 and includes everything you see below —Joy of Noel stamp set, full roll of Black & Very Vanilla ribbon, and half a pkg of the Joy of Christmas 12x12 paper PLUS a special guest demonstration from my friend Julie @thepaperhaven and 6-8 make’n takes! These won’t be your ordinary make’n takes either—they will be a mix of 3D, holiday decor and cards!

Registration closes on Sept 30th for this event and your kit can be shipped anywhere in Canada at your expense! Please reach out if you are interested in registering (one of these days I will figure out how to take payment through Squarespace!)

I have one more project to share with you tomorrow as a part of my ‘Creative Convention’ weeklong extravaganza! I hope you will come back and please feel free to leave any comments!