12 Days of Christmas--Day 11

Fun Fact—I actually designed this card in JULY! And I have not shared it anywhere, I don’t know what I was waiting for but this feels like as good a time as any! This is my 11th project share over our 12 Days of Christmas Hop between myself and @melsinkyfingers! I hope you have been enjoying everything so far!

I actually really love this card and am so glad I came across it on my camera roll again so I can share it with you! Hopefully it will inspire you to recreate it, especially if you still have a few holiday cards left to stamp for the holidays.

I used the Spruced Up Bundle to create this fun and whimsical holiday card. The color combo of Garden Green, Sweet Sorbet, Pool Party and Coastal Cabana has probably been my 2022 holiday card favorite! I am sure if I scroll my Instagram @stampwithbrenda I will see a lot of variations of this color combo!

For this card, I used Garden Green as the base and the first layer was also run through the Timber 3D folder. One of my favorite folders!


I stamped out the two different tree shapes in two colors and die cut one tree that I stamped little stars on top. I love the mix of stamped and die cut trees and baby stars on this page.

I love stars, they are my favorite shape of all time so I couldn’t resist these two options that are included in the die set.

The sentiment is a mix of 2 individual stamps and is die cut with the label from the Stylish Shapes dies (another craft room must have). I added some rhinestones and Sweet Sorbet Bakers Twine for a couple embellishment touches. I am pretty sure the rhinestones are from the retired Holiday Rhinestones but you can always color our Basic Rhinestones with a Stampin’ Blend to create any color of bling you want! Isn’t that fun?

Please make sure to click the link to Melanie’s blog today to see what she has created for Day 11 of 12 Days of Christmas!


12 Days of Christmas--Day 4

Welcome to Day 4 of 12 Days of Christmas! I hope you have been inspired so far! I am curious to know what your favorite thing has been? I am torn between my first project and the North Pole Sacks!

Every year I have to create at least one Christmas card that is on a black card base! This year I decided to pair up Basic Black with Orchid Oasis, Night of Navy and Silver Foil. I think it has a really unique look for a holiday card! I hope you like it too and will consider making a black Christmas card as well.

I added a first layer to this card in Basic Black and used a Water Painter with Whisper White ink to spray it it across the card front. If you mix the reinker with some water to make the consistency of milk, it will spray nicely over top of the card base. I was sort of going for a stars in the night sky look.

I added 3 3/4 x 3 1/2 strips of the Brushstroke 12x12 Specialty Paper to the base. If you haven’t order this paper yet—add to cart! You can get a piece of Blushing Bride, Soft Succulent and Night of Navy. It has this gorgeous swirly texture to it, but its nice and lightweight.

I die cut the large sprig from the Decorated Pine Dies in Silver Foil paper and added it directly over top of the Brushstroke paper. The sentiment is from the Christmas to Remember stamp set and I stamped it in Orchid Oasis ink and used the light Smoky Slate Stampin’ Blend to highlight the words ‘Christmas’ and ‘Cherish’. Its cut out with the Stylish Shapes Dies. A definite craft room must have!

Behind the sentiment I added the Silver Metallic Edge Cotton Ribbon that I tied with the Orchid Oasis Bakers Twine.

I hope you like this dramatic holiday card and make sure to visit Melanie and check back tomorrow to see what we are both sharing!


Color Fusers June 2022--Day 6 of Seven Days!

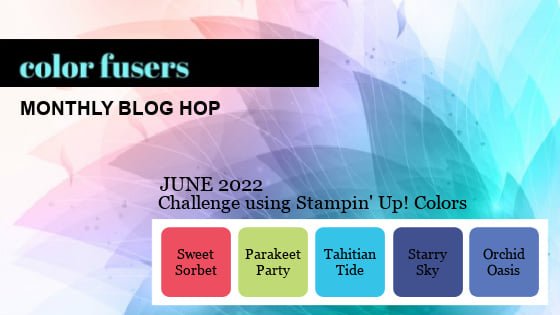
Today is really a double whammy! The Color Fusers Team is creating with the NEW In Colors and some of my Artisan Alumni friends are spending a week sharing scrapbooking projects so of course I combined these two concepts into ONE project!

Each month this awesome design team created projects featuring a color scheme, of course this month we are featuring our 5 new In Colors—Parakeet Party, Sweet Sorbet, Orchid Oasis, Starry Sky and Tahitian Tide!

My current favorite new In Color is Starry Sky? What is yours?

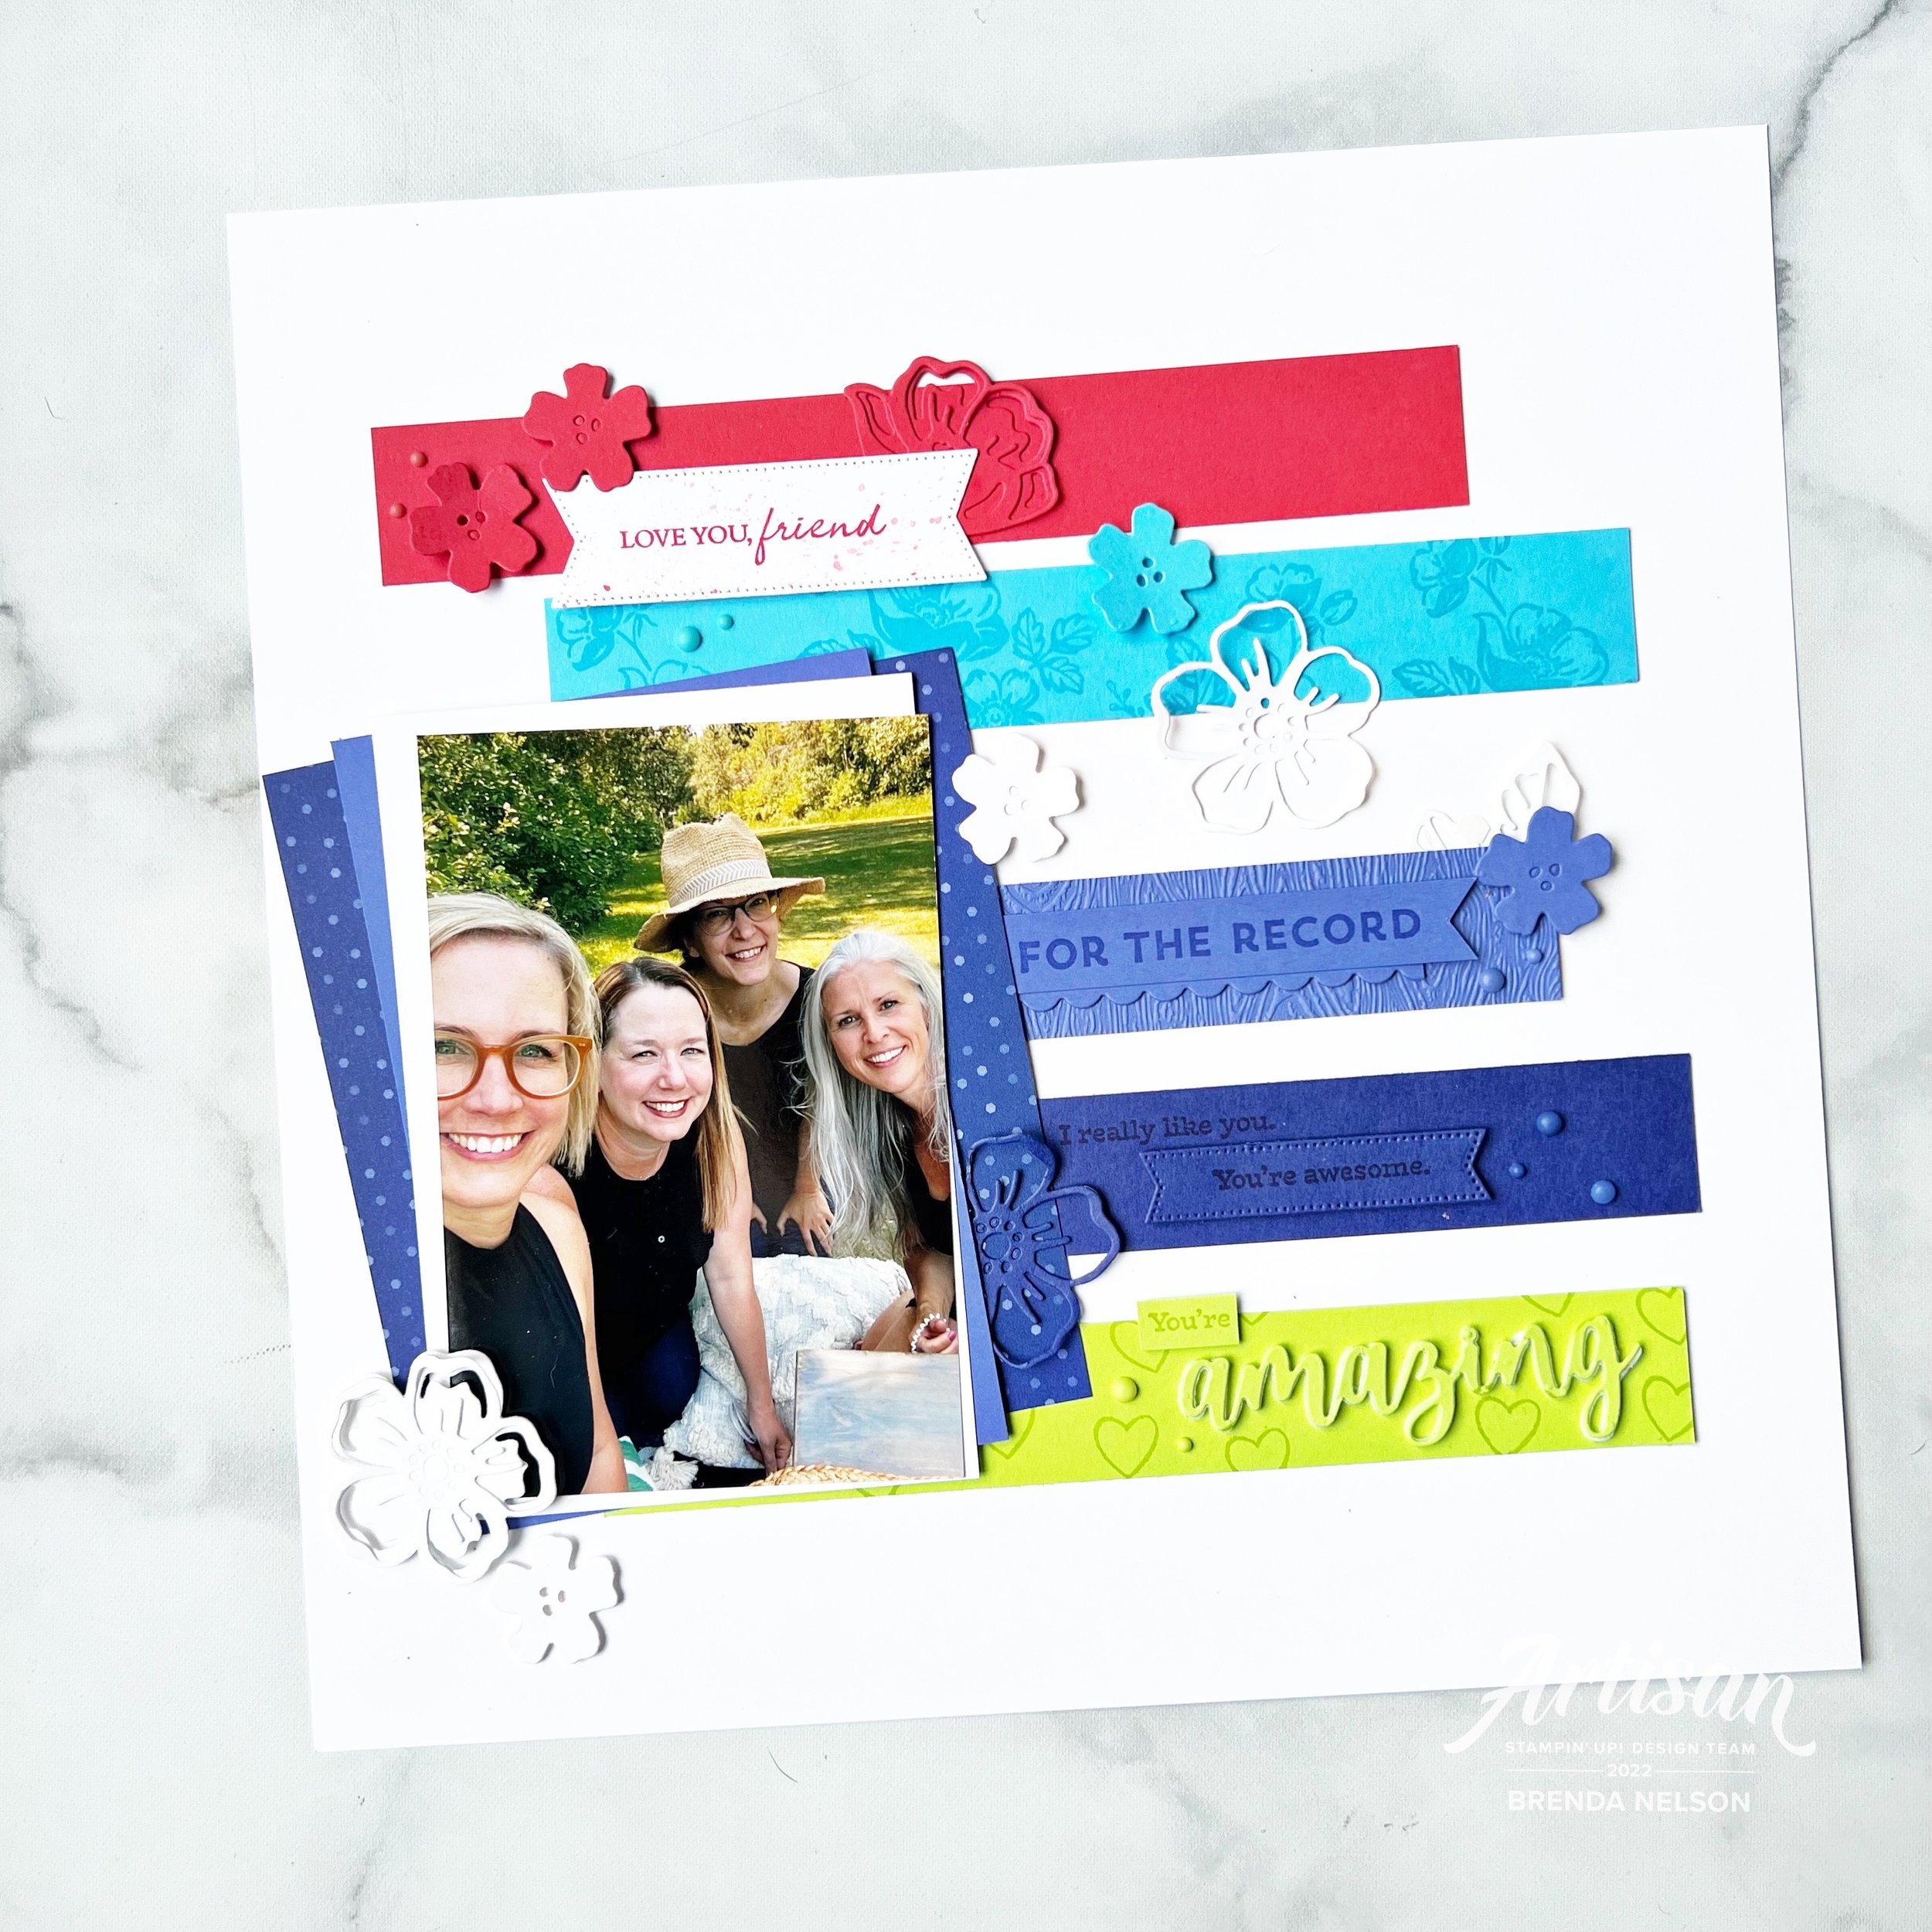
This is my project featuring all 5 of the new In Colors—I love how it turned out! Each year I do try and create a scrapbook page that incorporates all the new colors together. Sometimes its a challenge and sometimes its easy and in this case, its easy as these 5 new colors look absolutely spectacular together! What do you think?

I started with a base of Basic White and used Basic white elements along with the new colors. I feel like they really pop on this crisp base. Last summer a couple of my long time bestie’s and I got together for a girls weekend and besties photo shoot. Our awesome photographer is also a friend so of course I had to snap my own girlfriends selfie and I thought it was a fun picture to add to this page. I layered our picture on Basic White, Orchid Oasis and a piece of the Starry Sky DSP from the In Color 6x6 stack.

I have known these amazing gals for over 20 years. It is a blessing to have such fantastic lifelong friends!

I mashed up a whole bunch of products on this page! That is my favorite thing to do! I used the For the Record stamp set, Summer Shadows Dies, Shaded Summer stamp set, Stylish Shapes Dies and the Amazing Thanks Dies. I even ran the Orchid Oasis card stock through the TImber 3D folder.

Each row of color has a stamped and die cut element to bring it to life along with some of the Matte In Color dots. And each row of color is working to build the story of this page, starting with the sentiment ‘Love You, Friend’.

and ending with “For the Record, I really like you, You’re Awesome and You’re Amazing”. I love taking a bunch of individual sentiments and building them into a broader more encompassing phrase.

I can’t wait to see what every one else on the Color Fusers team has created this month using one or all of the new In Colors—and if you are following along with #sevendaysofscrapbooking then you know you are going to see some amazing projects shared today! Make sure to check things out in my Instagram Stories.

The keep going with our Blog Hop you can go NEXT to see what my awesome former Artisan Design Teammate (#artisanalumni) Janneke has created. And if you want to go in reverse you can see what my current Artisan teammate, Tami, has designed. Make sure to hop all the way around and see what everyone has designed using our amazing new In Colors!

Thanks so much for following along on this Blog Hop and make sure you scroll back through my blog for some scrapbooking and card inspiration!

Seven Days of Scrapbooking--Day #2

Hello friends and welcome back! If you missed the dozen amazing scrapbooking projects shared yesterday on my Instagram Stories just search the hashtag #sevendaysofscrapbooking and you can see all of the amazing projects! I am really excited to share my page today as it focuses on the Textured Chic Memories & More cards. I used these card packages quite frequently to make traditional scrapbook pages and I hope this sparks a creative idea in yourself!

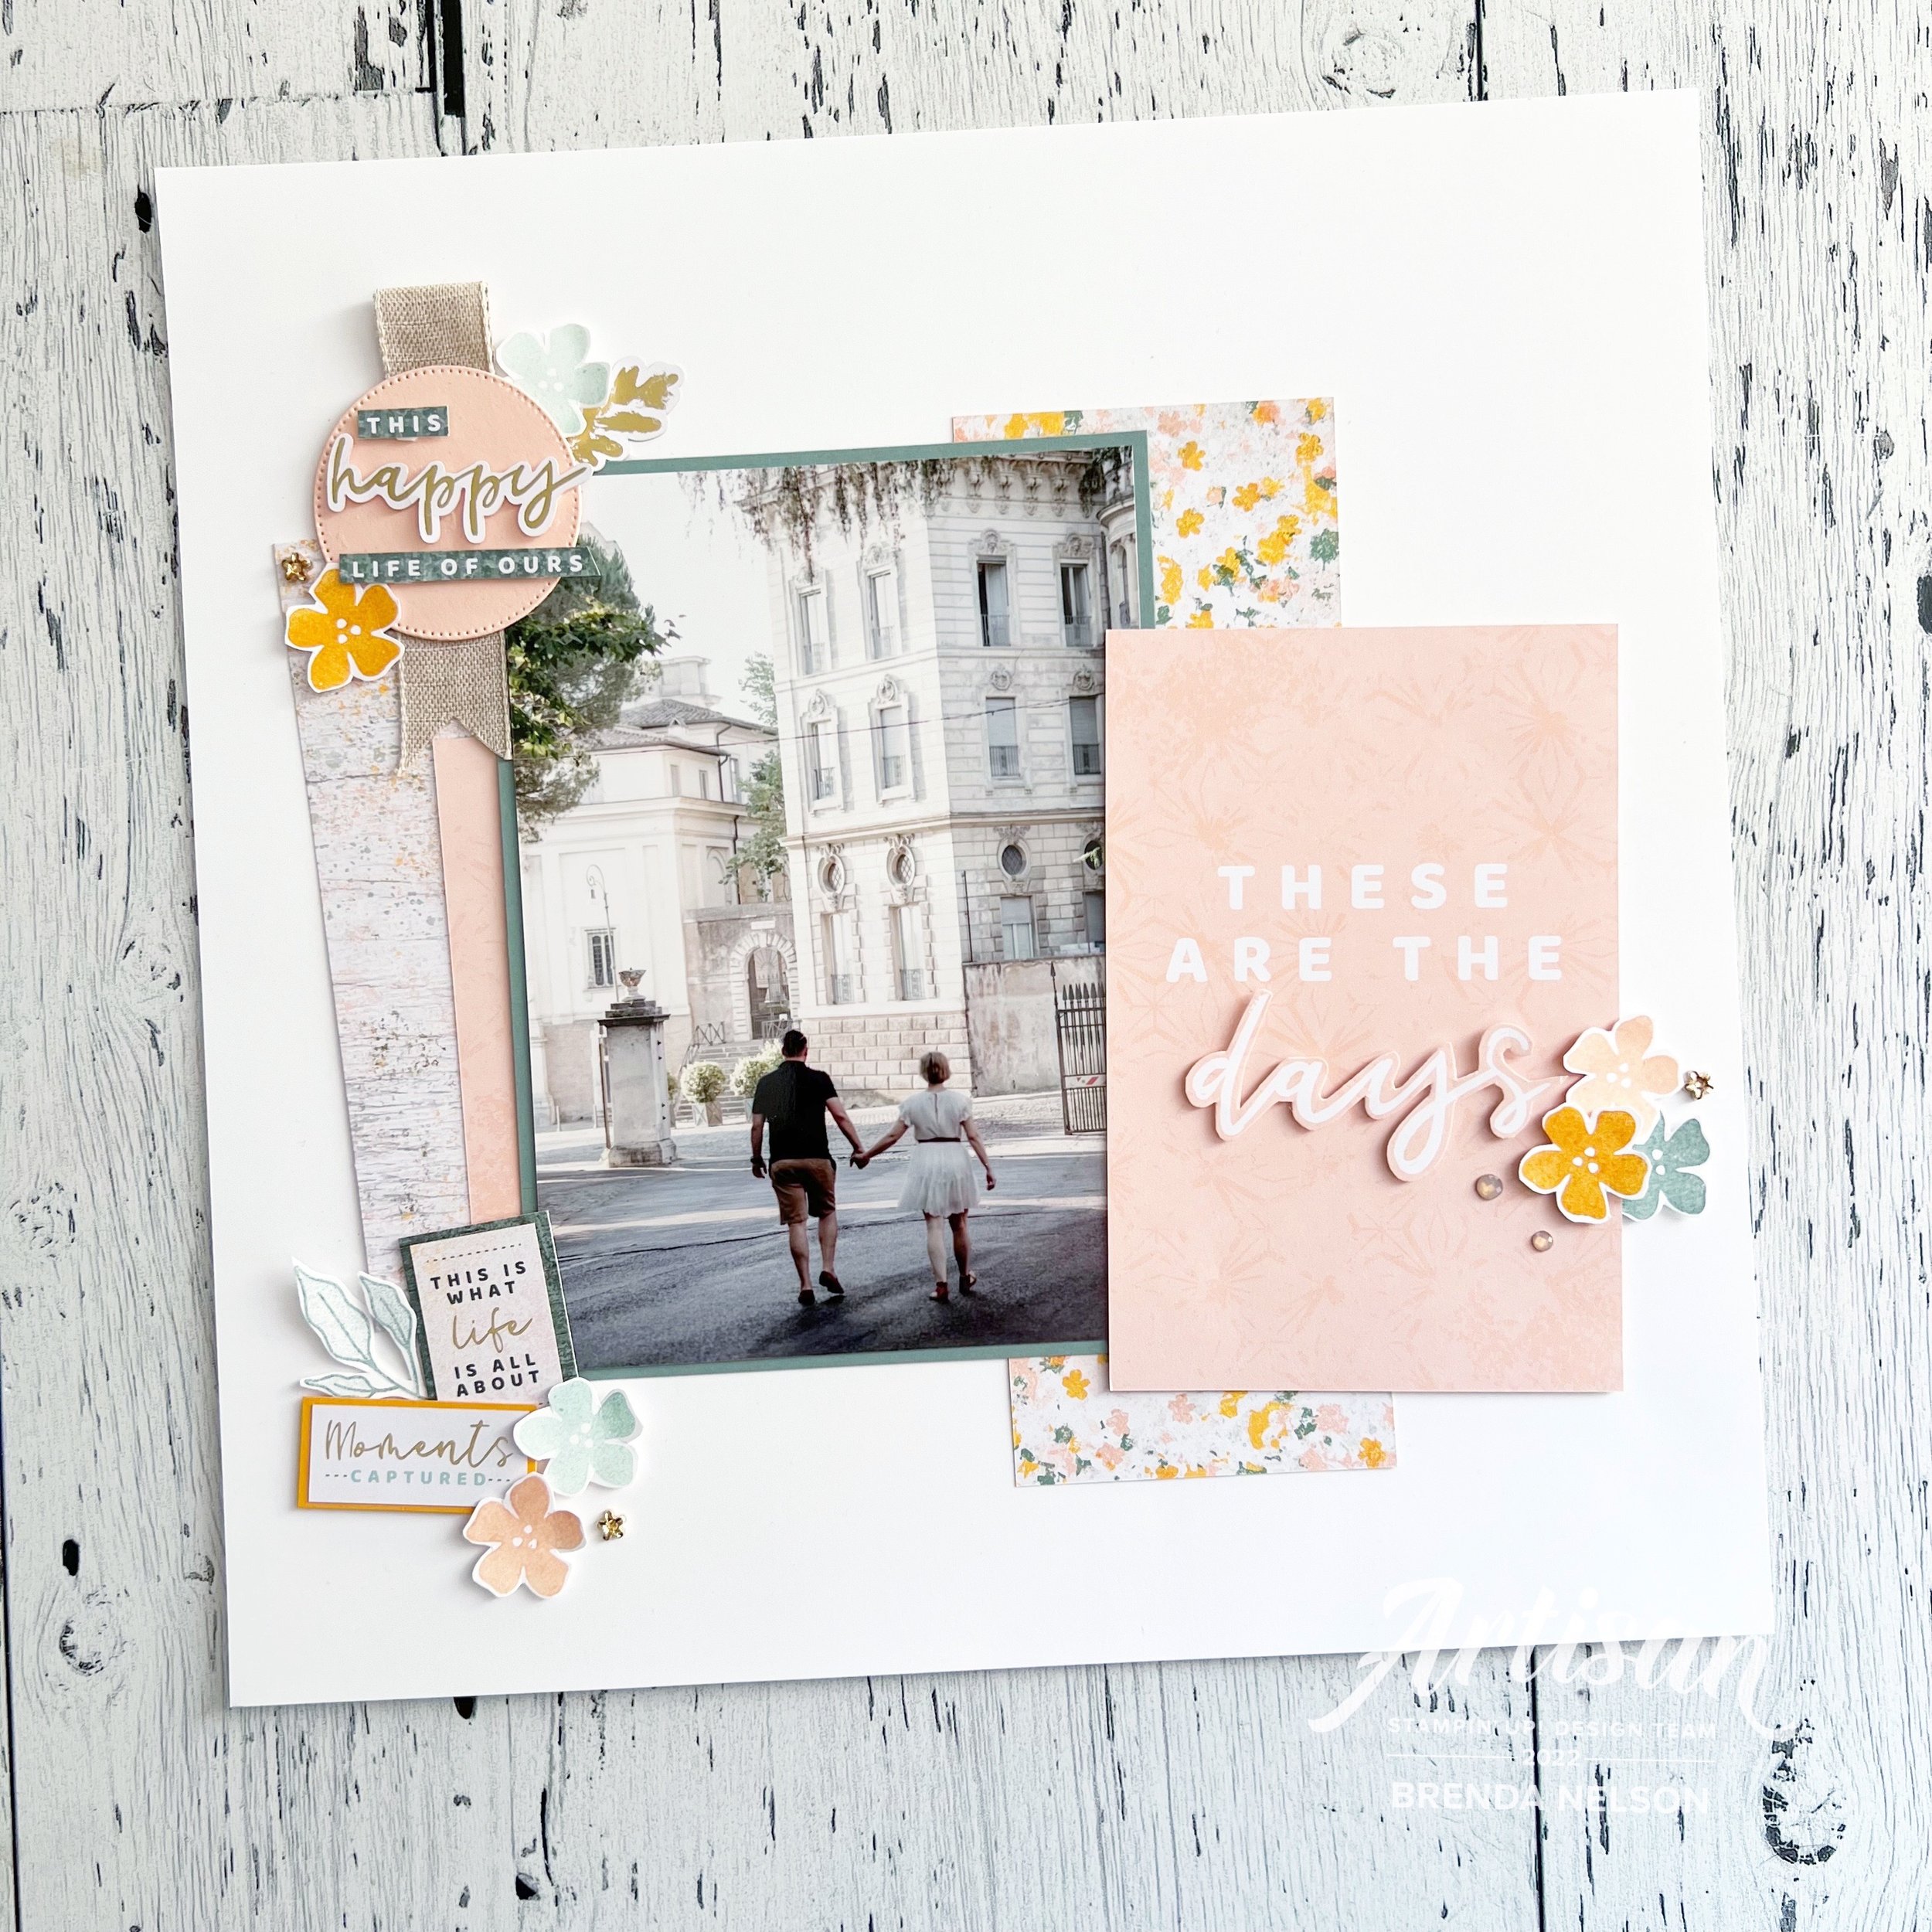
With a few additional supplies I was easily able to make this amazing page to capture this moment in Rome with my husband. This picture was taken on the Greece Incentive trip using a photographer we booked through Flytographer and was one of the best experiences we have ever had on a holiday!

Fun Fact: We were at our photography location at 6 am to take these pictures! It was worth the early hour to not have a soul around in our pictures!

Let me start by saying what I LOVE about our Memories & More cards—the thickness and style of the cards, a little stiffer than our regular card stock and DSP so they immediately add texture. The VALUE of the cards is amazing! You get double of everything which allows you the freedom to cut up a card and layer it if you need to (on the word ‘days’ for example), and finally the variety of phrases and sentiments in the collection of cards. I find there are some really unique sentiments not found in our stamp sets. And the concept designers have been knocking the collections out of the park over the past few catalogues!

And if there are coordinating Cards & Envelopes, make sure to get those too! I often use them as layering pieces—the envelopes are decorative so cut them apart for layering!

For this page I actually did add in a few stamped florals and greenery from the Framed Occasions stamp set so this is actually a hybrid project of sorts. The top left corner of this page truly represents all that I love about M&M cards. For example, I have die cut a circle using Petal Pink card stock and the Stylish Shapes dies and on top have added a sticker (yes! the cards come with stickers too which is brilliant) and then CUT APART one of the 3x4 cards to make a whole new sentiment. I layered some of the new Natural Finish ribbon behind along with some stamped flowers, another sticker and the cute little Flower Trinkets!

On the bottom left of the page I used 2 more stickers (like seriously, how perfect are they?) that I mounted on a piece of Mango Melody card stock and part of the M&M card that was left over after I snipped out those words. Don’t let anything go to waste! A couple more flowers and some greenery tied this area together with the first one—this is a design key. You always want to have repeating elements on your scrapbook page (in my opinion or style of memory keeping at least). :)


My favorite thing to do with this style of memory keeping is to cut one of the duplicate cards apart to layer on top of the original. By adding ‘days’ that is hand cut and popped up with a Dimensional we have truly brought this one dimensional card to life. And don’t get rid of the extra left over, if you look along the left side of the photo mat I have tucked it there to bring this color across the page! Its a pro tip for sure!

I also added a few of the Elegant Faceted Gems to this section with more stamped flowers and a Flower Trinket. Its the best way to add this color trio over to this side of the page.

If you haven’t tried Memories & More cards yet on a traditional scrapbook page I really encourage you to give it a try! The investment isn’t steep and its fun to play around with the many card options in your design!

Make sure to check out my stories so you can see what everyone else is creating and sharing! If you are in Canada and would like to order anything, please visit my store with sincere thanks in advance and send me a message if you are interested in joining in any of my classes!

#sevendaysofscrapbooking

A Card a Day in May--Day 15!!

Well it is typically around this time when I ask myself WHY I thought this challenge was a good idea, hahaha! Seriously though, it coincides with my goal to SEND a card a day so I might as well make one too right?

I am currently making ALL THE THINGS with the Simply Fabulous stamp set as I am featuring it all my In Color Retreat at the end of the month.

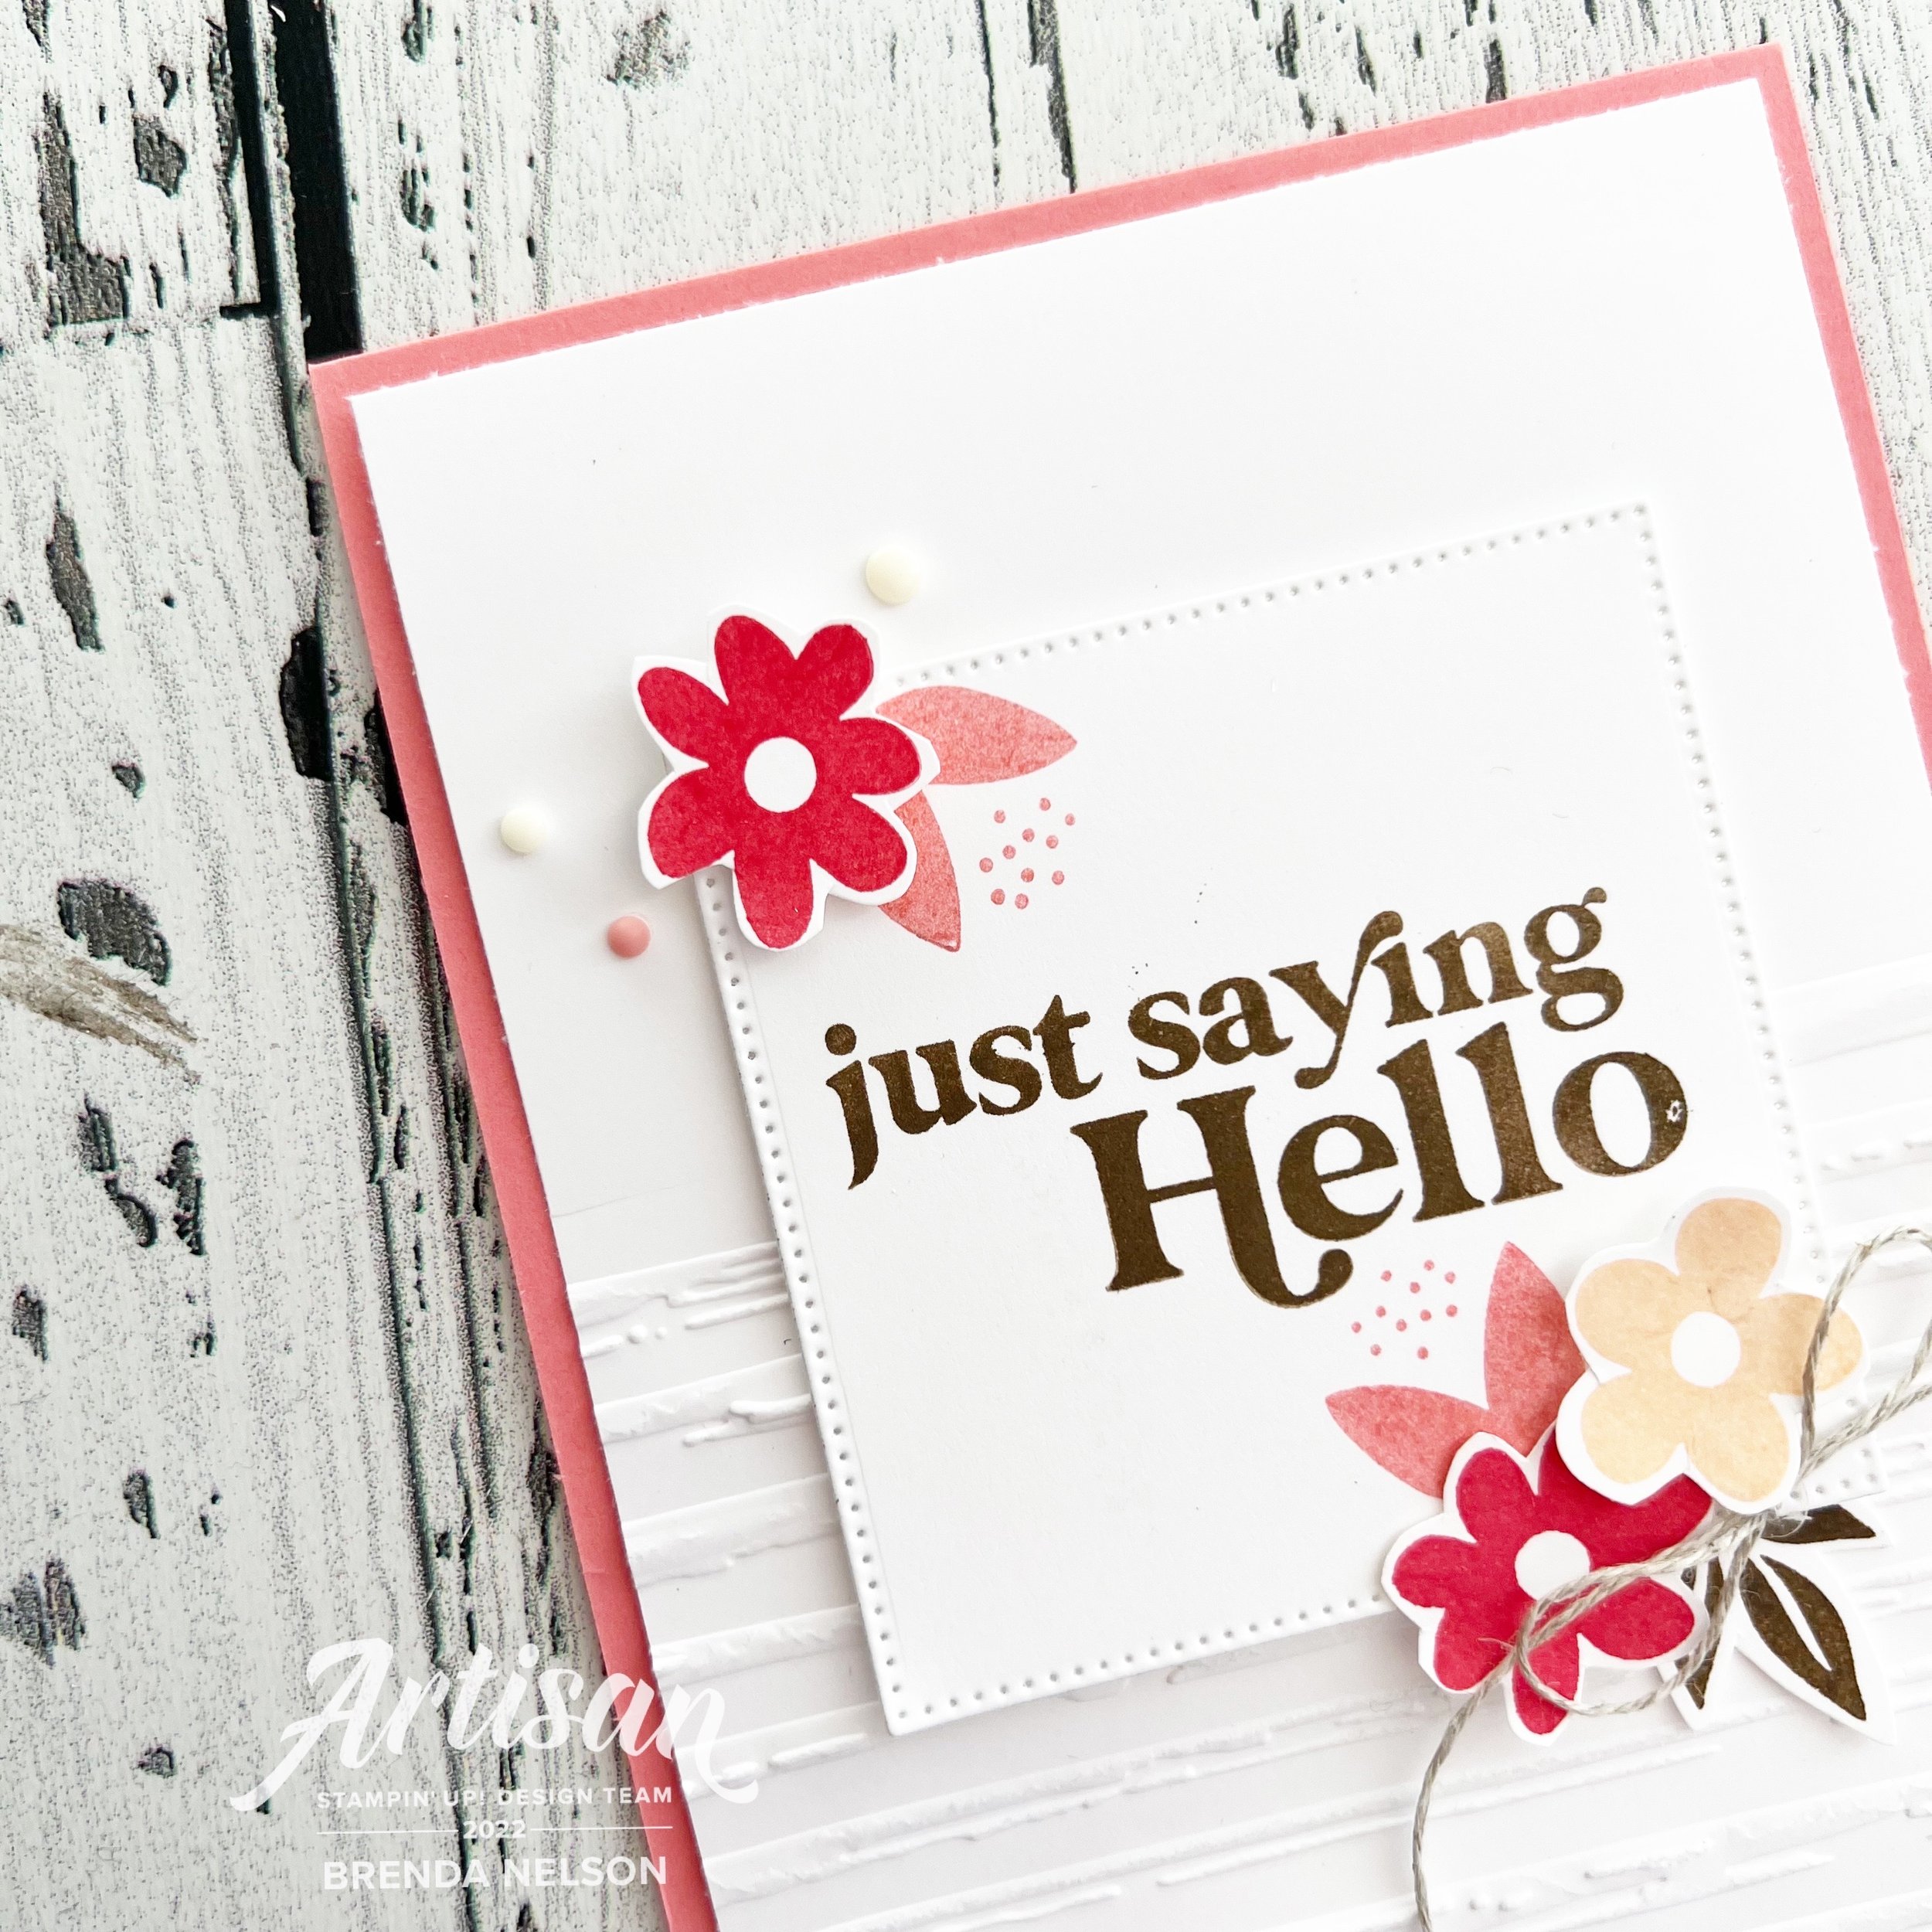
My 15th card share for this month features the awesome stamp set Simply Fabulous and the color palette came from the pile of stuff on my desk. I have a bunch of things in the works and these ink pads were handy!

The sentiment is stamped in Soft Suede and it looks SO GOOD with some Pale Papaya, Flirty Flamingo and Sweet Sorbet accent flowers! Sweet Sorbet and Flirty Flamingo are definitely “color buddies” as I discovered making this card! I cut the sentiment using the Stylish Shapes Die!

The base of this card is Flirty Flamingo and I ran the Basic White layer through the Stripes embossing folder. But only half way through—I love it! The sentiment panel is added over top with Dimensionals and then I hand trimmed the little flowers and leaves to add as accents.

A little bow out of Linen Thread and some Matte Decorative Dots along with Classic Matte Dots added the perfect embellishment touches. I is literally impossible to make a card without embellishemnts!

I would love to open up my mailbox and find this card inside! Wouldn’t you?


I also decided to stamp the inside of this card as I think it adds an adorable touch to the project! And if the goal is to use ALL THE STAMPS then I am inching closer by adding “You Are Simply Fabulous” to the inside!

I hope this project inspires you to stamp something today and if you need any of these supplies and live in Canada, please consider shopping with me! I would love your support so I can keep loving what I do! Make sure to go follow me on Instagram @stampwithbrenda too!

I hope this project inspires you to stamp something today and if you need any of these supplies and live in Canada, please consider shopping with me! I would love your support so I can keep loving what I do! Make sure to go follow me on Instagram @stampwithbrenda too!